DeMag
thingiverse
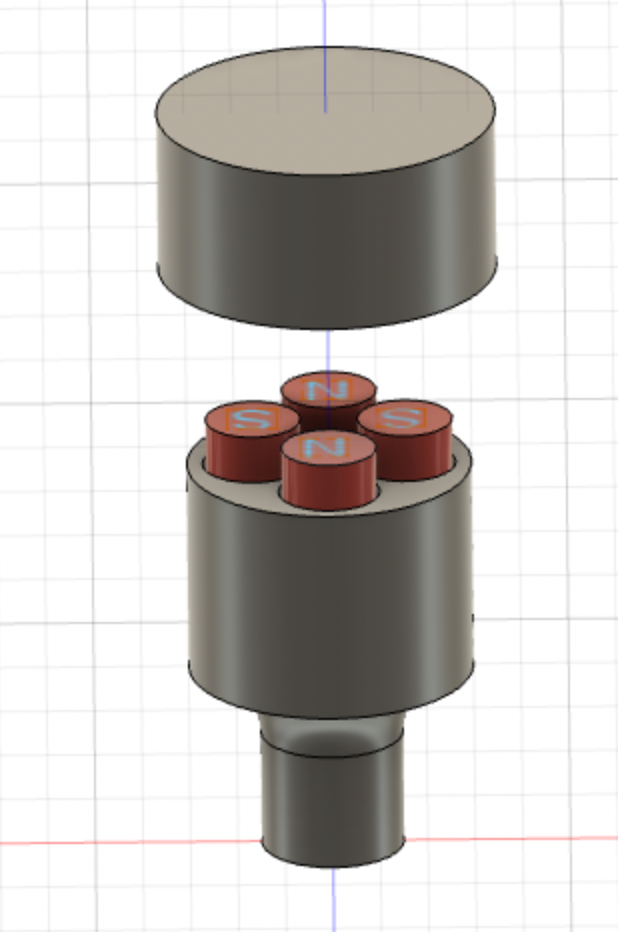
This is a demagnetiser for small parts. My idea isn't new. A very good description of a similar demagnetiser has for example been given by Mark Presling (https://www.homemadetools.net/forum/diy-demagnetising-tool-works-72881). What is new is that I have 3-D printed the holder for the magnets. It has a 12mm shaft that can be inserted into a eg drill press. It works like a charm. My design was done in a parameterised model using Fusion 360. This was exported as an .stl file before being imported into Cura and 3D printed. I recently needed to use an end-mill to machine a fly-cutter using mild steel. However, it was soon clear that the chips were not being thrown off but were clinging to the end-mill - producing a very worrying grinding sound as the chips which were trapped between the end-mill and the sidewall of the stock were being recut. having previously only machined aluminium, this was not a problem. Clearly, storing my end-mills in a tray with a magnetic base was not a good idea since over time, the end-mill became magnetised! In order to demagnetise the end-mill it is necessary to subject it to a periodically reversing B-H loop that slowly decreased in magnitude. A common way to do this is to drive an alternating current through a coil and slowly move the object through the center of the coil where the magnetic field is strongest - and then through the other side where the magnetic field decreases in strength. But a simpler configuration uses a number (typically 4x) of strong (neodymium) permanent magnets that are oriented so that adjacent magnets have opposite north and south poles. The shaft of the demagnetised has a diameter of 12 mm so that it can be inserted into eg a drill press and rotated at ~400RPM. As you bring the object close to the top of the cap, you will feel it being attracted to the center with a pulsing force. Keep on pushing the object past the region of strong field and then out the other side until you can not feel the magnetic force anymore. The object will be now demagnetised. I have not found it necessary to repeat this process, although doing so will not cause any harm. just one word of warning: If the object to be demagnetised has sharp edges such as an end-mill, then it is probably wise to wrap it in eg masking tape, since the otherwise sharp edged would tend to cut into the rotating cap. The Fusion 360 model is fully parameterised, so that all the dimensions can be changed if necessary. I found that the base can be 3D printed with the small diameter sitting on the print bed. No support is necessary since there is a fillet to span the transition from the smaller diameter to the larger diameter. The cap itself is a fairly snug fit over the top of the magnet holder. I kept it in place with a blob of Prestick. For no good reason, the magnets project about 8mm above the top of the base. You could also choose to mage the magnets flush if you choose. The magnets themselves has a diameter of 10mm and a length of 25mm. To allow for clearance, I made the holes with a diameter of 10.7mm.
With this file you will be able to print DeMag with your 3D printer. Click on the button and save the file on your computer to work, edit or customize your design. You can also find more 3D designs for printers on DeMag.