Demoness
thingiverse
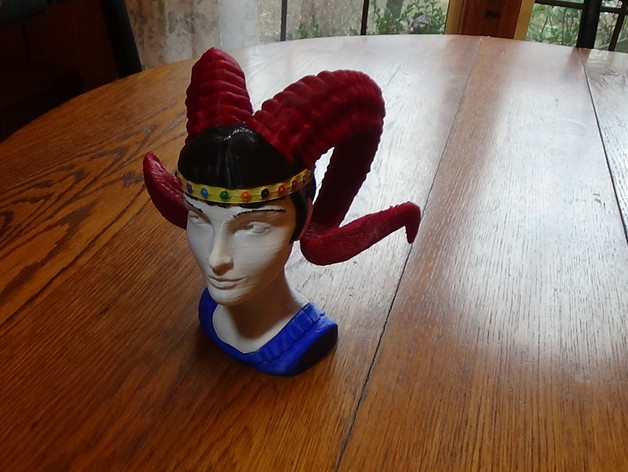
In a world where the demon ladies hide their horns, one group of demoness chooses to flaunt their horns and allow them to grow to their full potential. This is my take on The Flapper and my entry into the #RemixChallenge :) Loubie, you were worried about sameness… I hope this alleviates your concerns! heh. The Demoness was printed in PLA plastic using parts from The Flapper by Loubie, The horns from Ram Skull by makerbot and hardware from Nut Job by mike_mattala. All fine models now combined into this beautiful creature. Be sure to check out the video for printing tips and assembly instructions.https://youtu.be/hC9qcqZIu24 I have also remixed the poem Loubie included with The Flapper…. They can sing of the girls who never let them show, Who are afraid to let those curled horns grow! But I'll chant of the maidens whose horns grow free, Never sawn, Never pruned, Never cut like a tree. Woe to those who seek them without, Let them know how you feel with a shout! For nothing compares to the fine lady with horns She'll eye them all with properly aimed scorn. For she is a free spirit who knows from where she came, The stock of beasts and demons untamed. -- Remixed from Unknown Print Settings Printer Brand: RepRap Printer: Sunhokey Prusa I3 Rafts: No Supports: Yes Resolution: 0.3 Infill: 20% Notes: Detailed assembly and these print instructions are in the video. Be sure to check that out :)https://youtu.be/hC9qcqZIu24 Don’t be intimidated by the number of parts, or the print time. You can totally do this! If your printer gets wonkey along the way, you’ll know when to make adjustments if you print the bolts as instructed and test fit on each part along the way. I printed mine on a Chinese PRUSA i3 using slic3r with all parts at 20% infill. Adjust as per your preferences. I printed all parts one at a time. Step 1: Get your printer adjusted properly. Print out one bolt and one Test_Nut. Let them fully cool then make sure they fit together well. If the fit is very loose, adjust your filament feed rate higher. On my printer this is the e-steps setting. If the fit is tight, reduce your feed rate. You’ve just completed the hardest part! Now the rest is easy :) Step 2: Start at the top! Print the horn bases, Horn_L_1 and Horn_R_1. Note, R is her right, not yours. Print another bolt and 2 rods. Let the bolt and rods fully cool and make sure they fit well into the horns. Print the horn ends Horn_L_2 and Horn_R_2. These parts will require supports. Don’t be afraid of supports :) I used the default auto generate supports in slic3r with only two changes, I set pattern spacing to 3mm and interface pattern spacing to 3mm also. Print the hair. This part also requires supports. Same settings as above. Print the headband. Nothing special here. Print another bolt! let it and the headband cool and make sure the bolt fits well into the headband. Step 3: Lets face it! You’re doing great! Print the the head. No supports required. This is the longest print so while the head is printing you can go ahead and fit the rest of the parts into the hair and headband and bolt them all in place. Have a look at the video for proper fit and tips here. If you’re struggling on assembly, check for any globs of plastic which might need to be trimmed. Print two more bolts! - Let them and the head fully cool and be sure the bolts fit well into the shoulders. If you don’t have a socket wrench which fits into the head cavity. I’ve provided a printable one for you. Go ahead and print that now. While it’s printing, you can paint the head and headband parts :) The printable wrench has tabs to hold the bolt. Slice those tabs with a razor blade. This wrench is probably a one time use thing, save it for the bolt which holds the head to the headband/hair/horns assembly ;) Print the outfit. You’re almost done! No supports required on the outfit. Complete the assembly by bolting the head to the hair/horn/headband assembly (see video) and the outfit to the assembled head. You did it! And she looks awesome! You rock! Post your photos now :) How I Designed This The horns were tough! I tried several programs before I was able to find one that could work with the horns. I was able to split the bases out with MeshLab and then get them into tinkercad. I did most of the work in tinkercad. I used netfabb online service to clean up any problems with the edited models and slic3r to generate gcode for the printer.
With this file you will be able to print Demoness with your 3D printer. Click on the button and save the file on your computer to work, edit or customize your design. You can also find more 3D designs for printers on Demoness.