Depth Gauge for the GTS10XC Table Saw
prusaprinters
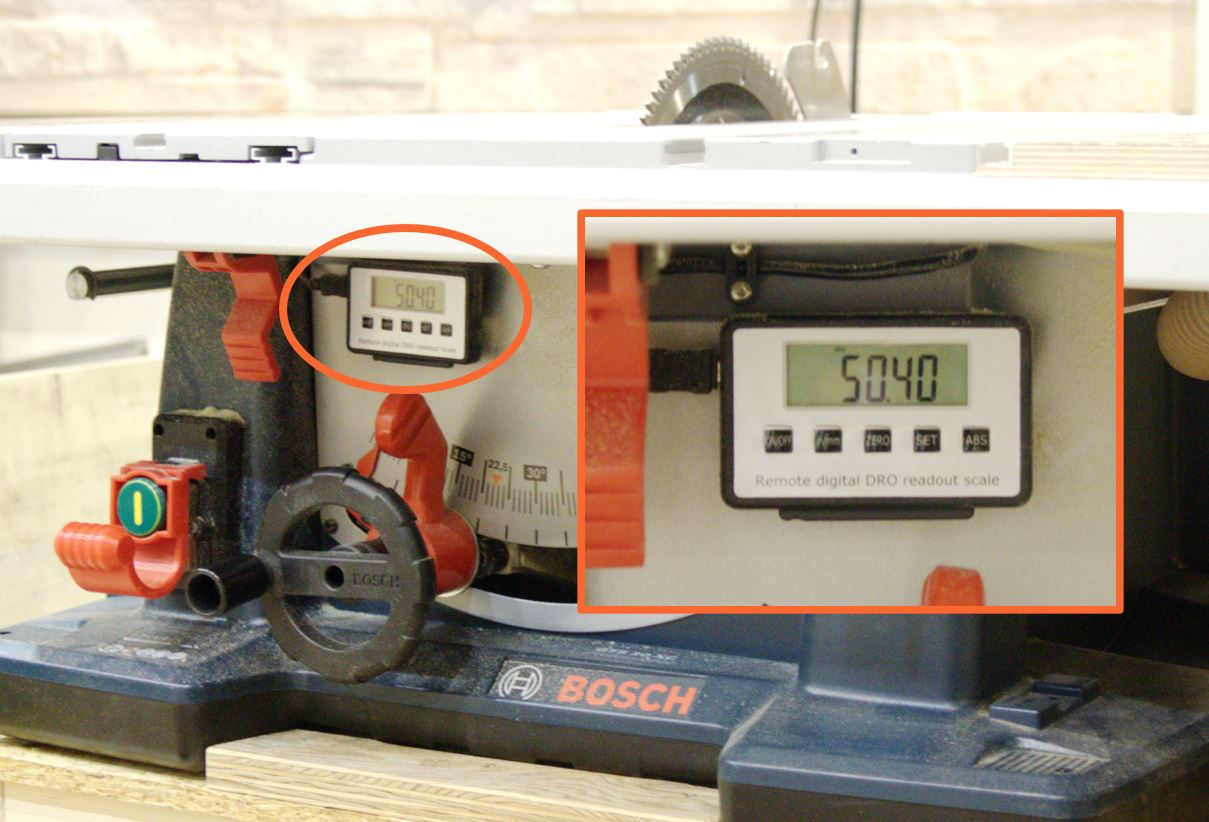
<h3>Disclaimer</h3><p><strong>Modifying a tool like a table saw might be dangerous! So if you want to apply this modification then you do it at your own risk!</strong></p><h3>Description</h3><p>Accurately adjust the depth of your blade on the Bosch GTS10XC. Based on an idea by a youtube video from Nachdenksport.</p><p>The print parts are mounts for a digital linear scale 0-150 mm. You only need to print 3 parts for mounting the scale. Optional: If you do not want to rely on the magnets to mount the display, you can also print a display mount.</p><h3>Printing</h3><p>All parts are printed in PETG. I opted for 0.3mm layer height for all parts, only the displaymount part (optional) has been printed in variable layer height.</p><h3>For the scale mount:</h3><p>Print one of spacer1, spacer2 and slidermount. The scale has to be mounted upside down - so turn the mount brackets by 180 degress. Also you must shorten the bar to 192..212mm.<br>For mounting the scale bar you need to drill and thread two M5 holes:</p><figure class="image image_resized" style="width:75%;"><img src="https://media.prusaprinters.org/media/prints/60394/rich_content/e3d76fcf-3c6e-411c-bb54-ebec5f1d4465/depth_gauge3.jpg#%7B%22uuid%22%3A%22b2caec3e-ffa1-4da7-9e15-7eb3075b9d14%22%2C%22w%22%3A855%2C%22h%22%3A1283%7D"></figure><p>Use slider2 with its prolonged side to accurately space the hole not to near to the table - otherwise the saw can not fully tilt back to 90 degrees.</p><p>Use 2pcs M5x8mm screws to mount the scale the the machine. Use 4pcs M3x6mm screws to mount the slidermount part to the slider of the scale.</p><figure class="image image_resized" style="width:50%;"><img src="https://media.prusaprinters.org/media/prints/60394/rich_content/7753eac6-658e-4a4f-ab7a-e0a07bbebe6e/depth_gauge2.jpg#%7B%22uuid%22%3A%22a28d9e24-1452-414c-b744-0f00b1c1ecdf%22%2C%22w%22%3A803%2C%22h%22%3A1045%7D"></figure><p> </p><figure class="image image_resized" style="width:75%;"><img src="https://media.prusaprinters.org/media/prints/60394/rich_content/c0687741-79ac-4cbc-a7d2-6ab0056cde64/depth_gauge4.jpg#%7B%22uuid%22%3A%22f3a3b554-dfd0-48cf-8282-f3c3a20aa319%22%2C%22w%22%3A932%2C%22h%22%3A786%7D"></figure><h3>For the display mount (optional)</h3><p>Print one of displaymount and strainrelief (from <a href="https://www.prusaprinters.org/prints/68192-universal-strain-relief-clip-m3-12mm">this project</a>). Use 2pcs M6x12 screws with washer to mount the displaymount to the saw. Use 2pcs M3x6mm screws to mount the original display mount part from the scale to the 3d printed part. Use 2pcs M3x10 screws to mount the strain relief:</p><figure class="image image_resized" style="width:75%;"><img src="https://media.prusaprinters.org/media/prints/60394/rich_content/f6d13cb7-1cdd-41bc-84a0-5507479dd204/depth_gauge7.jpg#%7B%22uuid%22%3A%228f035e53-35e2-4735-8721-4e121128ba6a%22%2C%22w%22%3A932%2C%22h%22%3A786%7D"></figure><p>Now attach the display:</p><figure class="image image_resized" style="width:75%;"><img src="https://media.prusaprinters.org/media/prints/60394/rich_content/5589bc2d-acb3-43bb-aa3a-be598dda7c8b/depth_gauge6.jpg#%7B%22uuid%22%3A%22028aaf7a-c190-46e6-be43-8416f5ac7818%22%2C%22w%22%3A986%2C%22h%22%3A786%7D"></figure><h3>Cable managemenet</h3><p>The cable can be zip-tied to the motor cable. The remaining cable can then be-zip tied to a nice hole in the plastic inside the machine:</p><figure class="image image_resized" style="width:75%;"><img src="https://media.prusaprinters.org/media/prints/60394/rich_content/18ba05d8-a0a8-410e-8bc7-56f067038b5e/depth_gauge5.jpg#%7B%22uuid%22%3A%222eb4f2b3-37e0-4144-8ed4-252b88c3f8db%22%2C%22w%22%3A718%2C%22h%22%3A1009%7D"></figure><p>Here you are. Now can accurately adjust the height of your blade:</p><figure class="image"><img src="https://media.prusaprinters.org/media/prints/60394/rich_content/b7ca3036-5476-48a5-a533-b4c3e96a87da/overview.jpg#%7B%22uuid%22%3A%22613cf672-2511-4c93-851c-ba3a16b0e037%22%2C%22w%22%3A2525%2C%22h%22%3A1717%7D"></figure><h3><strong>Source Code</strong></h3><p>The design has been implemented in OpenSCAD:</p><figure class="image image_resized" style="width:50%;"><img src="https://media.prusaprinters.org/media/prints/60394/rich_content/4aadd17f-1cf3-4cbc-8d94-e8a9ffbb7349/gts10_depth_gauge_openscad.png#%7B%22uuid%22%3A%22caabdc2f-800c-4e03-bdad-cb8bfe1c6b2c%22%2C%22w%22%3A866%2C%22h%22%3A787%7D"></figure><p>The source code is available for download, so feel free to adjust it to your needs!</p><h3><strong>Happy printing!</strong></h3><p>If you like this design, then <strong>please leave a like</strong> and also <strong>post a photo as a make in the comments</strong>. Also check out my <a href="https://www.prusaprinters.org/social/52356-mageb/prints"><strong>other designs</strong></a>.</p>
With this file you will be able to print Depth Gauge for the GTS10XC Table Saw with your 3D printer. Click on the button and save the file on your computer to work, edit or customize your design. You can also find more 3D designs for printers on Depth Gauge for the GTS10XC Table Saw.