Desktop Cyclone Dust Collector
prusaprinters
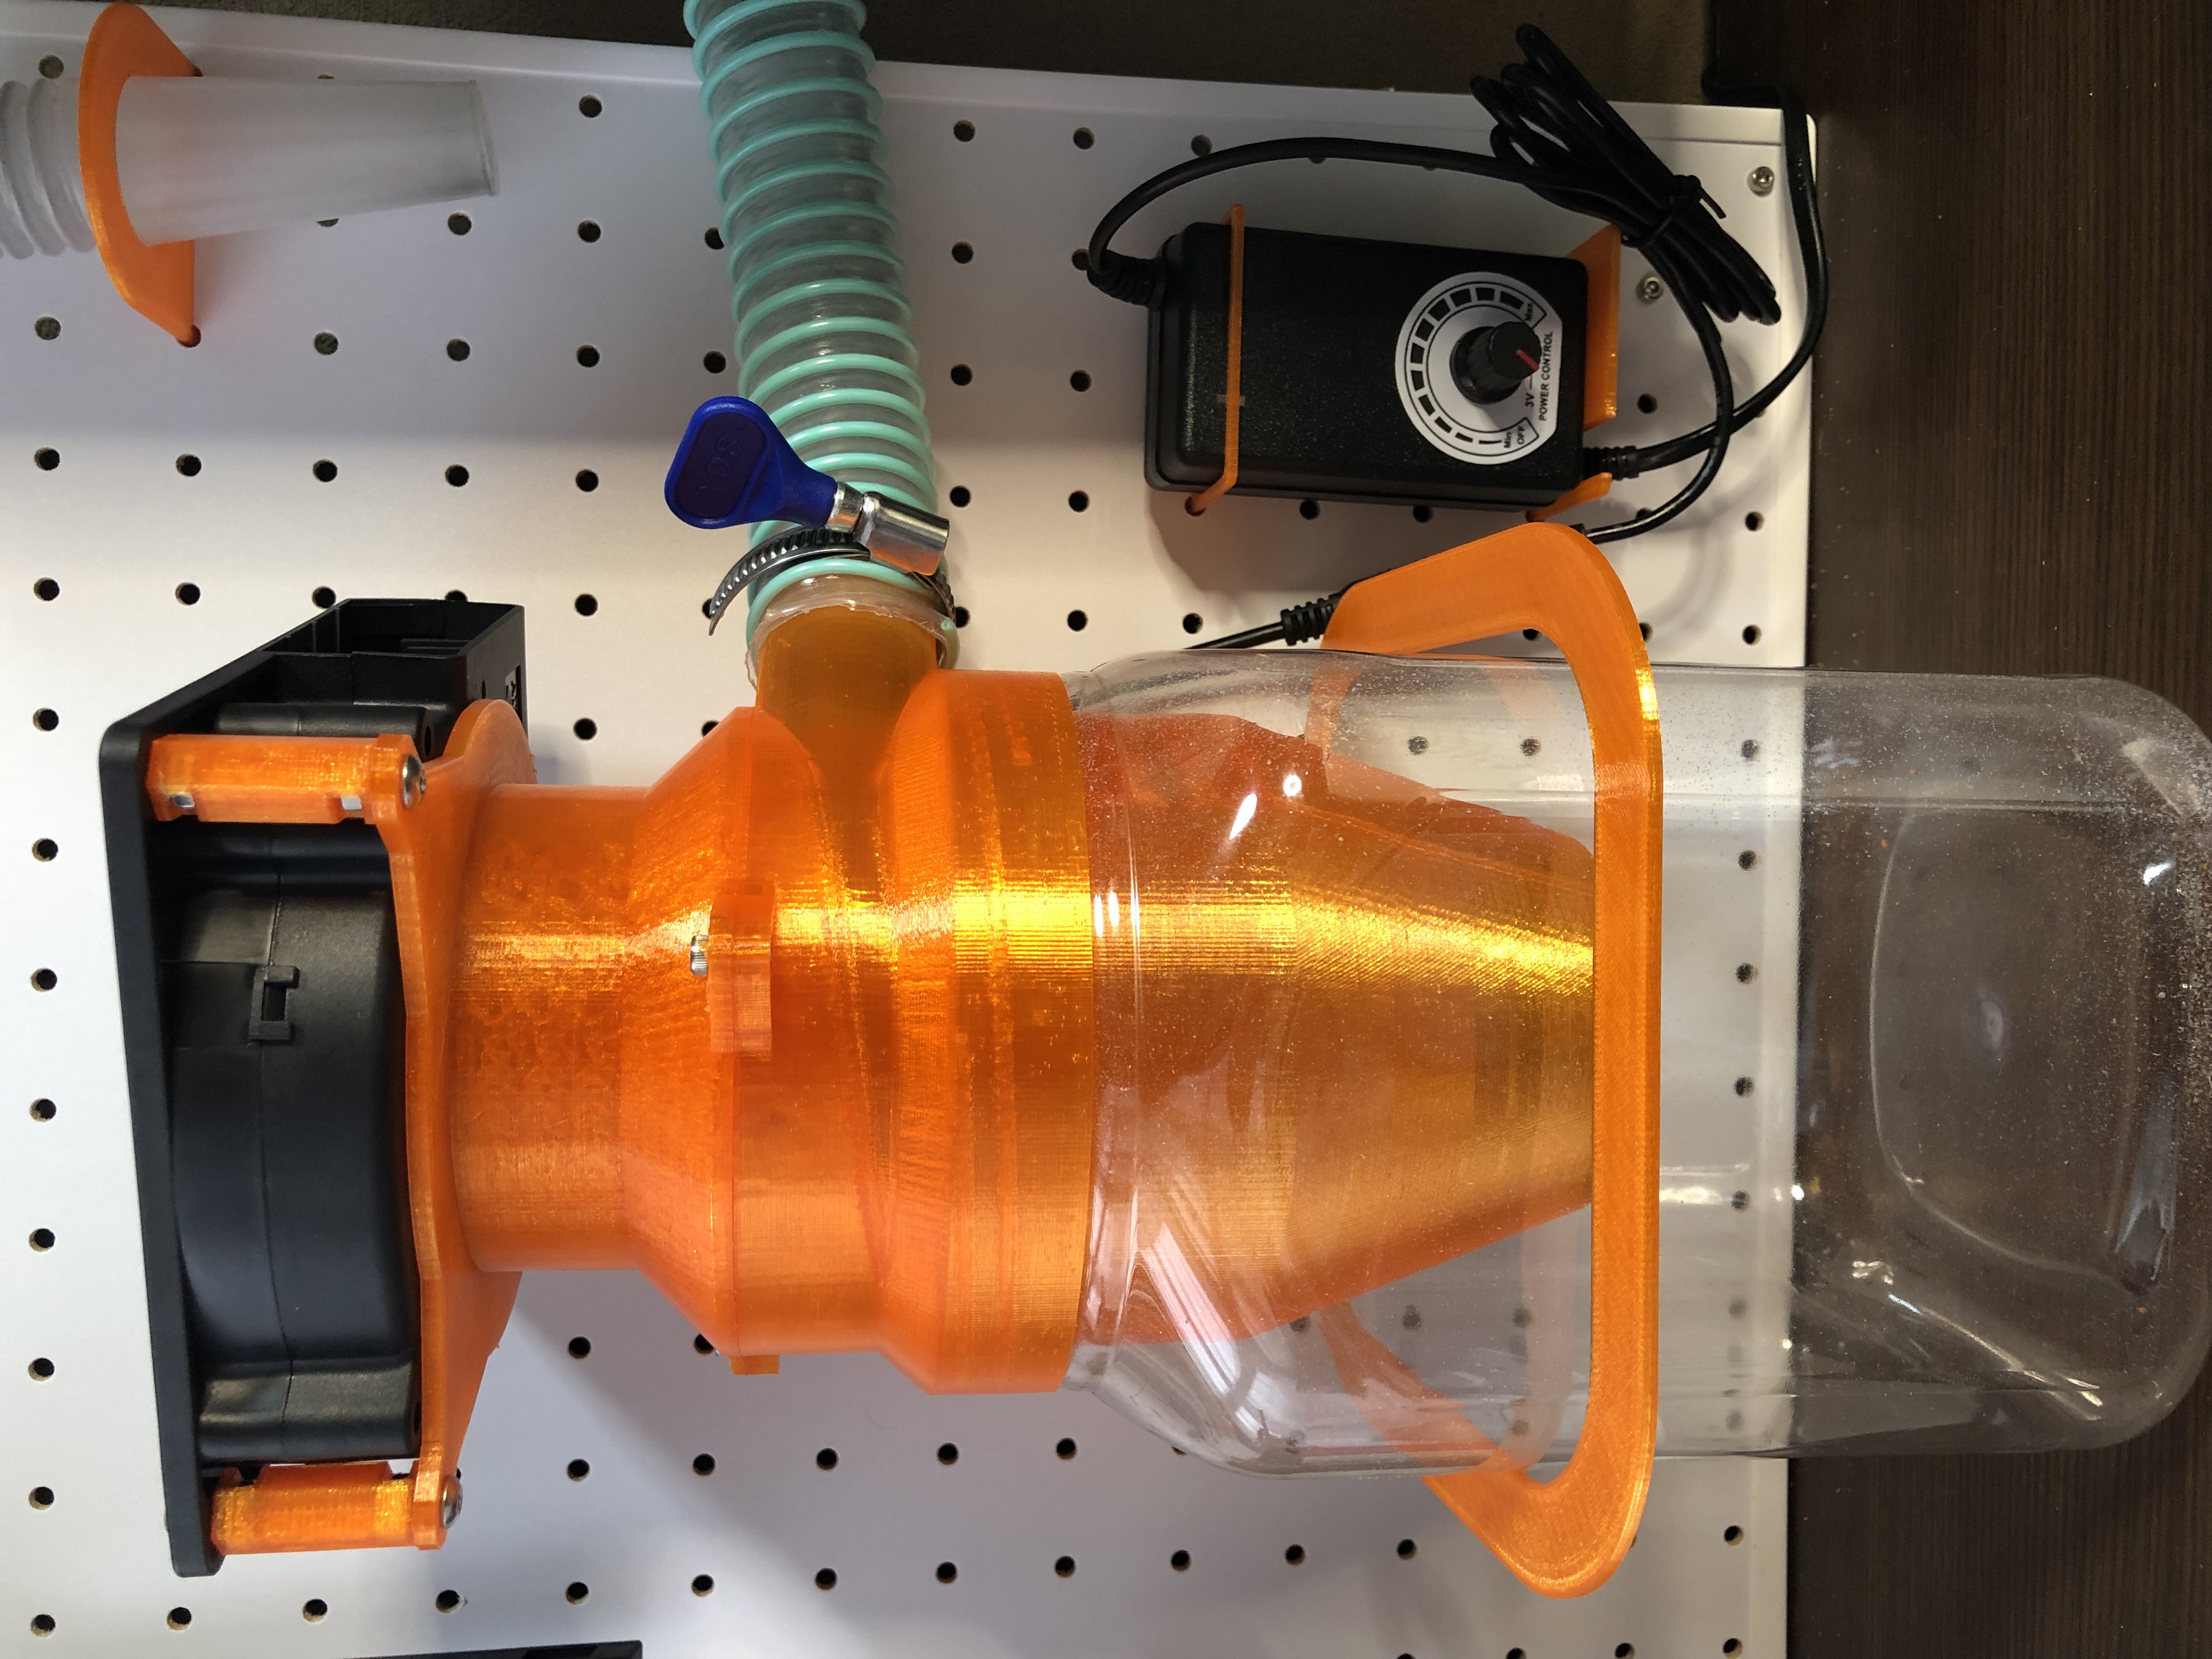
<h3>Update 2<br>アップデート2</h3><p>There was a gap between the sirocco fan and the "fan adapter". One of the four corners of the sirocco fan does not have a hole for fixing, resulting in a three-point fixing. This makes it difficult to apply force evenly. An O-ring was added as a countermeasure.<br>シロッコファンと「fan adapter」の間に隙間が空いていました。シロッコファンの四隅のうち一つには固定用の穴が空いていないため、三点固定になってしまいます。このため均等に力を加えるのが難しくなっています。対策としてOリングを追加しました。</p><p>The updated models are "fan adapter" and "fan connecter".<br>アップデートしたモデルは「fan adapter」と「fan connecter」です。</p><p>I used the following O-ring.<br>Oリングは以下のものを使いました。<br><a href="https://www.amazon.co.jp/dp/B002P97RCS">https://www.amazon.co.jp/dp/B002P97RCS</a></p><h3>Update<br>アップデート</h3><p>Added "cleaner adapter". It is used to attach a handheld cleaner. It is noisy, but has more suction power.<br>「cleaner adapter」を追加しました。ハンディクリーナーを取り付けるのに使います。音はうるさいですが、こちらの方が吸引力が高いです。</p><figure class="image image_resized" style="width:50%;"><img src="https://media.printables.com/media/prints/279627/rich_content/af600781-e478-41cb-a6a7-5844d2db875a/img_0642.jpeg#%7B%22uuid%22%3A%224098b8cc-c957-40b7-be24-94465920e9ce%22%2C%22w%22%3A3024%2C%22h%22%3A4032%7D"></figure><p>Handy cleaner: <a href="https://www.amazon.co.jp/dp/B096LYFYZB">https://www.amazon.co.jp/dp/B096LYFYZB</a></p><h3>Motive for creation<br>作成の動機</h3><p>I had previously made a cyclone dust collector that collected dust in a PET bottle, but the narrow mouth of the PET bottle prevented long, thin pieces of dust from falling out.<br>Therefore, I created a dust collector that uses a wide-mouth container.<br>以前ペットボトルにゴミを溜めるタイプのサイクロン集塵機を作ったのですが、ペットボトルの口が狭いために細長いゴミが落ちていかない問題がありました。<br>そこで口の広い容器を使う集塵機を作りました。</p><h3>Key component<br>鍵となる部品</h3><p>As a container, I searched for a clear, inexpensive, wide-mouth container and found the following one.<br>容器として、透明かつ安価で口の広いものを探して以下のものを見つけました。</p><figure class="image image-style-align-center image_resized" style="width:50%;"><img src="https://media.printables.com/media/prints/279627/rich_content/fedc2ab9-b7fc-4055-9860-6525d8240777/img_0488.jpeg#%7B%22uuid%22%3A%22ca963922-6367-4948-a496-599565353f73%22%2C%22w%22%3A4032%2C%22h%22%3A3024%7D"></figure><p>A polyethylene canister.<br>I made a model to fit the threads of this one, so if you wanted to use a different container, you would need to change it.<br>I will upload the Fusion360 archive file for this purpose.<br>ポリエチレン製のキャニスターです。<br>これのネジ山に合うようにモデルを作ったので、違う容器を使う場合は変更が必要です。<br>そのためにFusion360のアーカイブファイルをアップロードしておきます。</p><h3>Parts needed<br>必要な部品</h3><h4>Parts to print<br>印刷する部品</h4><ul><li>cyclone separator: 1</li><li>fan adapter: 1</li><li>fan connecter: 3</li><li>polyethylene tank cap adapter: 1</li><li>canister holder: 1</li><li>upper controller holder: 1</li><li>lower controller holder: 1</li><li>upper nozzle holder: 1</li><li>lower nozzle holder: 1</li></ul><h4>Parts to purchase<br>購入する部品</h4><ul><li>Sirocco fan: <a href="https://www.amazon.co.jp/dp/B09G5WFHJY">https://www.amazon.co.jp/dp/B09G5WFHJY</a></li><li>Canister: <a href="https://www.amazon.co.jp/dp/B001UJJDG2">https://www.amazon.co.jp/dp/B001UJJDG2</a></li><li>Nozzles for polyethylene tanks: <a href="https://www.amazon.co.jp/dp/B0046W8G5O">https://www.amazon.co.jp/dp/B0046W8G5O</a></li><li>Drain hose for washing machine: <a href="https://www.amazon.co.jp/dp/B003PHKWJE">https://www.amazon.co.jp/dp/B003PHKWJE</a></li><li>Hose band: <a href="https://www.amazon.co.jp/dp/B00TQKYLPK">https://www.amazon.co.jp/dp/B00TQKYLPK</a></li></ul><p>I purchased the sirocco fan as a set with the controller, but for some reason it is not available now. The URL above is for the fan alone. If you want to use a different fan, please modify "fan adapter" and "fan connecter".<br>私はコントローラーとセットのシロッコファンを購入したのですが、なぜか今は購入できません。上記URLはファン単体のものです。違うファンを使う場合は「fan adapter」と「fan connecter」を修正して下さい。</p><h3>About printing<br>印刷について</h3><p>The "cyclone separator" can be printed without any support, but the intake is a little distorted and the material hangs down a little at the bridge.<br>It might have been better to use PrusaSlicer's paint-on support feature and add support at least where it can be easily removed. I used Lightning Infill to save material, but the collision detection kicked in during printing. It is safer to use gyroid for infill. That is why I did not attach the gcode for "cyclone separator".<br>The "fan adapter" needs support. Other than that, you can print without support.<br>「cyclone separator」はサポートなしで印刷できますが、吸気口が少し歪みブリッジの部分で材料が少し垂れ下がってしまいました。<br>PrusaSlicerのペイントオンサポート機能を使って、容易に外せる場所だけでもサポートをつけた方が良かったかもしれません。材料を節約するためにライトニングインフィルを使ったのですが、印刷中に衝突検知が働いてしまいました。インフィルにはジャイロイドを使う方が無難です。そんなわけでgcodeは添付しませんでした。<br>「fan adapter」はサポートが必要です。それ以外はサポートなしで印刷できます。</p><figure class="image image_resized" style="width:50%;"><img src="https://media.printables.com/media/prints/279627/rich_content/09339c30-531a-4379-9b89-b3fb8c032822/img_0627.jpeg#%7B%22uuid%22%3A%22a55cc2c6-8151-44fe-9afc-84d29397f1a2%22%2C%22w%22%3A3024%2C%22h%22%3A4032%7D"></figure><h3>Fixing the dust collector<br>集塵機の固定</h3><p>If the dust collector is not fixed, it will fall down when the hose is moved. I used a "canister holder" to fix it to the pegboard. In addition, I also attached the controller to the pegboard.<br>集塵機を固定しないと、ホースを動かした時に倒れてしまいます。私は「canister holder」を使ってペグボードに固定しました。ついでにコントローラーもペグボードに取り付けています。</p><figure class="image image_resized" style="width:50%;"><img src="https://media.printables.com/media/prints/279627/rich_content/6c014624-9437-40ab-b922-7343d22948b6/img_0638.jpeg#%7B%22uuid%22%3A%22883504ec-6b78-4f4c-a804-27a5d20a9de1%22%2C%22w%22%3A4032%2C%22h%22%3A3024%7D"></figure><figure class="image image_resized" style="width:50%;"><img src="https://media.printables.com/media/prints/279627/rich_content/4bba7a51-fb5e-47a3-8c80-4a806ac4feee/img_0636.jpeg#%7B%22uuid%22%3A%223b742995-e111-40ce-b46e-fe4eaf85e833%22%2C%22w%22%3A3024%2C%22h%22%3A4032%7D"></figure><h3>How to assemble<br>組み立て方</h3><ul><li>Attach the sirocco fan to the "fan adapter" using the "fan connecter". Insert an M4 nut into the "fan connecter". Connect the "fan connecter" and the "fan adapter" using M4x8mm screws. Use the screws supplied with the fan to secure the sirocco fan.<br>「fan connecter」を使ってシロッコファンを「fan adapter」に取り付けます。「fan connecter」にはM4ナットを挿入して下さい。M4x8mmのネジを使って「fan connecter」と「fan adapter」を接続します。シロッコファンの固定にはファンに付属しているネジを使います。</li></ul><figure class="image image_resized" style="width:50%;"><img src="https://media.printables.com/media/prints/279627/rich_content/81b18eea-b83b-43ac-a89e-71a2788a806c/img_0633.jpeg#%7B%22uuid%22%3A%225ad77d2d-a955-4b17-a314-2f19c1ee4735%22%2C%22w%22%3A4032%2C%22h%22%3A3024%7D"></figure><ul><li>Connect the "cyclone separator" and "fan adapter" using three M3x8mm screws and M3 nuts respectively.<br>M3x8mmのネジとM3ナットをそれぞれ三つ使って「cyclone separator」と「fan adapter」を接続します。</li></ul><figure class="image image_resized" style="width:50%;"><img src="https://media.printables.com/media/prints/279627/rich_content/90efbefb-25dd-4088-a36e-77e917cbafac/img_0634.jpeg#%7B%22uuid%22%3A%227ba06a33-b4ea-4d72-8369-6e94f7cb9ea7%22%2C%22w%22%3A3024%2C%22h%22%3A4032%7D"></figure><ul><li>Remove the canister lid and install the "cyclone separator" instead.<br>キャニスターの蓋を外して、代わりに「cyclone separator」を取り付けます。</li></ul><figure class="image image_resized" style="width:50%;"><img src="https://media.printables.com/media/prints/279627/rich_content/8bebc977-55c6-447d-8c0d-6edfa7cb702e/img_0635.jpeg#%7B%22uuid%22%3A%22e2aa69bc-e17f-4905-b07e-091e05ce14e9%22%2C%22w%22%3A3024%2C%22h%22%3A4032%7D"></figure><ul><li>Cut off one end of the drain hose (see the picture).<br> 排水ホースの片側(写真で示す方)を切断します。</li></ul><figure class="image image-style-align-center image_resized" style="width:50%;"><img src="https://media.printables.com/media/prints/279627/rich_content/be2ebe9e-7181-44ac-928a-f64075e04bf6/img_0489.jpeg#%7B%22uuid%22%3A%2273c75d76-bd94-46b8-9f8a-b5d8b18a1eda%22%2C%22w%22%3A3024%2C%22h%22%3A4032%7D"></figure><figure class="image image_resized" style="width:50%;"><img src="https://media.printables.com/media/prints/279627/rich_content/a4bb2db8-820a-4e16-861c-85ed4b2c59e8/img_0491.jpeg#%7B%22uuid%22%3A%22c9e3fcb5-8e62-407c-b93b-618c4114d694%22%2C%22w%22%3A3024%2C%22h%22%3A4032%7D"></figure><ul><li>Secure the cut side of the hose to the intake of the "cyclone separator" using a hose band, being careful not to overtighten.<br>締め過ぎに注意しながら、「cyclone separator」の吸気口にホースの切断面をホースバンドを使って固定します。</li></ul><figure class="image image-style-align-center image_resized" style="width:50%;"><img src="https://media.printables.com/media/prints/279627/rich_content/2899fda5-56e2-48dc-bc5f-1bf0d1f0c26e/img_0490.jpeg#%7B%22uuid%22%3A%22a3a3366a-8bef-4ab2-8e51-3af4659ca377%22%2C%22w%22%3A3024%2C%22h%22%3A4032%7D"></figure><figure class="image image_resized" style="width:50%;"><img src="https://media.printables.com/media/prints/279627/rich_content/a5065a15-692c-408b-a20a-3c7808214101/img_0639.jpeg#%7B%22uuid%22%3A%229a0a0bf3-414b-4490-9dbd-8067c58c5d17%22%2C%22w%22%3A4032%2C%22h%22%3A3024%7D"></figure><ul><li>Attach the “polyethylene tank cap adapter” to the other end of the drain hose.<br>排水ホースの反対側に「polyethylene tank cap adapter」を取り付けます。</li></ul><figure class="image image-style-align-center image_resized" style="width:50%;"><img src="https://media.printables.com/media/prints/279627/rich_content/bcd48634-56ab-4a74-86f0-fe3ecbd500e5/img_0509.jpeg#%7B%22uuid%22%3A%22c7eaa58c-7710-4ac2-bc3e-1122a5adf7f9%22%2C%22w%22%3A4032%2C%22h%22%3A3024%7D"></figure><figure class="image image-style-align-center image_resized" style="width:50%;"><img src="https://media.printables.com/media/prints/279627/rich_content/e93be3f0-c63c-4575-b844-faaabb821f24/img_0510.jpeg#%7B%22uuid%22%3A%2234a1db39-6d2d-46f4-8e7f-97e91c141d76%22%2C%22w%22%3A4032%2C%22h%22%3A3024%7D"></figure><ul><li>Attach the nozzle using the cap.<br>キャップを使ってノズルを取り付けます。</li></ul><figure class="image image-style-align-center image_resized" style="width:50%;"><img src="https://media.printables.com/media/prints/279627/rich_content/6f623f69-783d-4a2b-8e7c-4dfc3dd975bb/img_0511.jpeg#%7B%22uuid%22%3A%22e3b5f34e-e541-4f43-92a9-b2b7a45e2bf2%22%2C%22w%22%3A3024%2C%22h%22%3A4032%7D"></figure><ul><li>Attach the "upper controller holder" and "lower controller holder" to the pegboard and secure the controller.<br>「upper controller holder」と「lower controller holder」をペグボードに取り付け、コントローラを固定します。</li></ul><figure class="image image_resized" style="width:50%;"><img src="https://media.printables.com/media/prints/279627/rich_content/e5075b39-3432-4a31-b404-bbddbaa9ae77/img_0636.jpeg#%7B%22uuid%22%3A%2294ba3fb5-328c-4739-b77d-e0d4db0e5f2a%22%2C%22w%22%3A3024%2C%22h%22%3A4032%7D"></figure><ul><li>Attach the "canister holder" to the pegboard and place the canister inside.<br>「canister holder」をペグボードに取り付け、キャニスターを中に入れます。</li></ul><figure class="image image_resized" style="width:50%;"><img src="https://media.printables.com/media/prints/279627/rich_content/a0f35ccc-ef88-4b6d-855a-29b6eeff3fa9/img_0638.jpeg#%7B%22uuid%22%3A%22bd524289-c0b3-4371-9360-a6d9854f1c1f%22%2C%22w%22%3A4032%2C%22h%22%3A3024%7D"></figure><ul><li>Attach the "upper nozzle holder" and "lower nozzle holder" to the pegboard and store them as shown in the picture when not in use.<br>「upper nozzle holder」と「lower nozzle holder」をペグボードに取り付け、使わない時は写真のように収納します。</li></ul><figure class="image image_resized" style="width:50%;"><img src="https://media.printables.com/media/prints/279627/rich_content/998cd362-4096-4805-9354-b43833be23ae/img_0640.jpeg#%7B%22uuid%22%3A%220d349653-830b-4bd1-95d5-b67208099653%22%2C%22w%22%3A3024%2C%22h%22%3A4032%7D"></figure><ul><li>Connect one end of the controller to the fan and the other end to the outlet.<br>コントローラの一端をファンに、他端をコンセントに接続します。</li></ul><p>This completes the assembly.<br>これで組み立ては終わりです。</p>
With this file you will be able to print Desktop Cyclone Dust Collector with your 3D printer. Click on the button and save the file on your computer to work, edit or customize your design. You can also find more 3D designs for printers on Desktop Cyclone Dust Collector.