Desktop Equatorial Sundial
prusaprinters
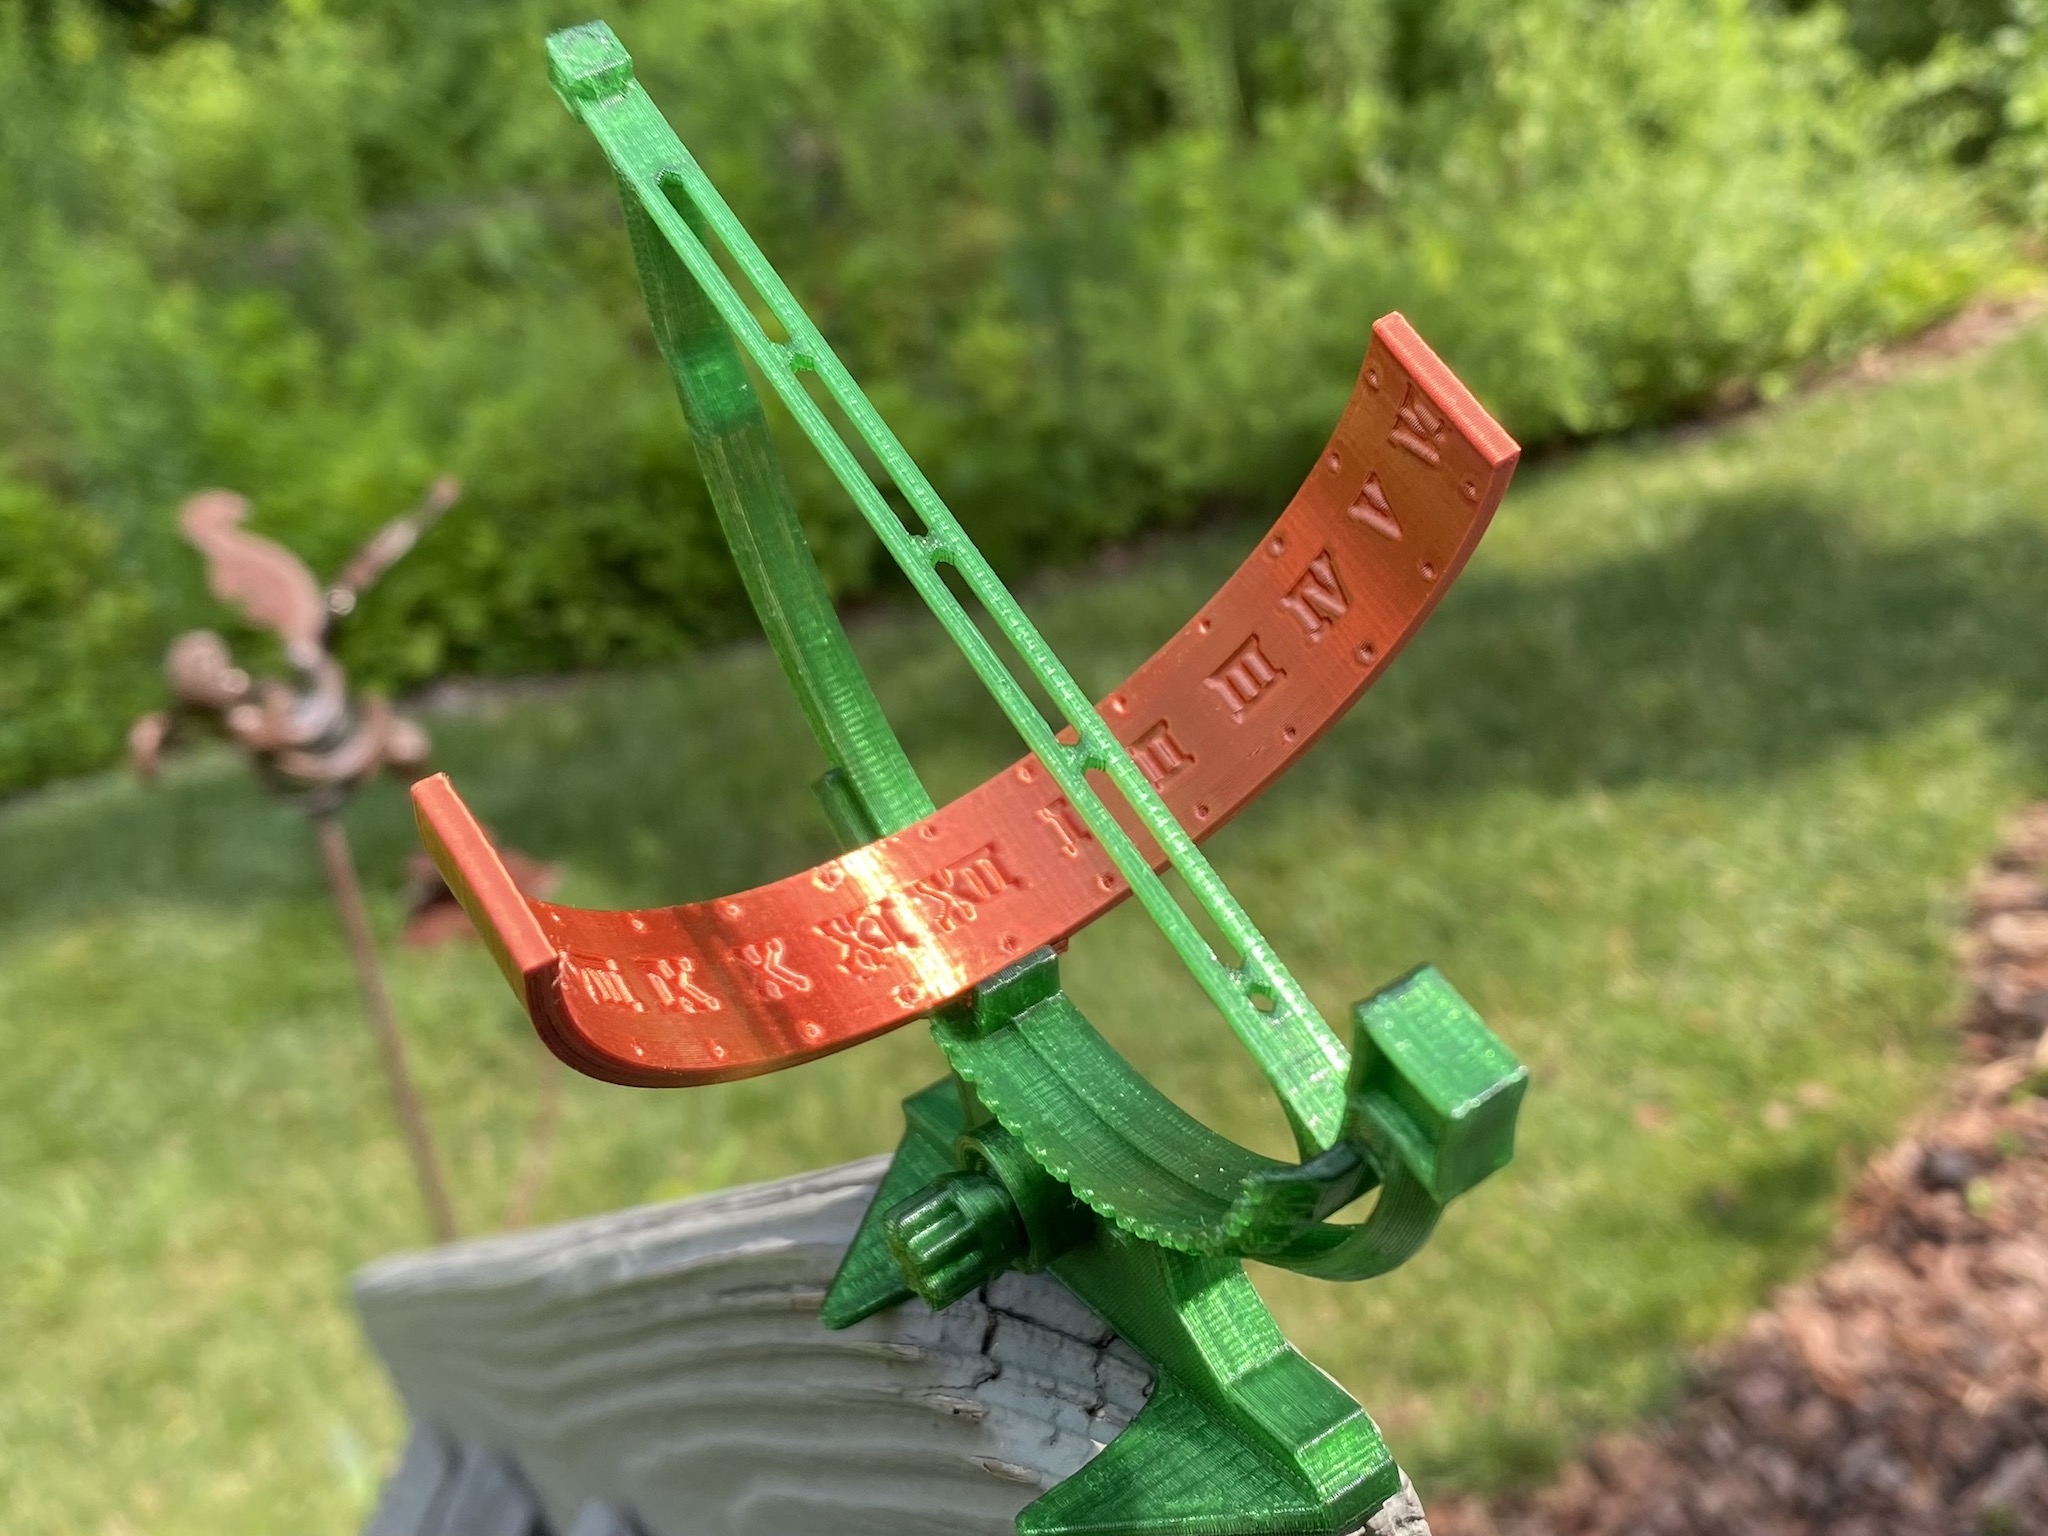
<p>The great thing about an equatorial sundial is that it is spaced evenly no matter where you are on the globe, and you only need to adjust the angle at which it sits relative to your latitude, so that the gnomon is parallel to the Earth's rotational axis. I designed this sundial with an adjustable angle and a swappable hours arc, which means it should work almost anywhere.</p><p>The main body of the sundial prints in place. The arc with the hours on it prints separately, and attaches to the main body. A different hours arc is needed for the Northern Hemisphere vs. the Southern Hemisphere—the numbers read in the opposite direction, clockwise in the Northern Hemisphere vs counterclockwise in the Southern Hemisphere—so in the rare but possible case of this sundial being used in both hemispheres, you would want to print both versions of the hour arc, and not attach them permanently.</p><p>There is a single point of assembly—the hours arc attaching to the main body—and then you want to adjust the rotation of the main body to match your latitude.</p><p>For me, using my Ender 3, the times for these prints came out at around 2 hours and 20 minutes for the main body, and 1-1.5 hours for the hours arc. </p><p>One thing to be aware of is that this sundial measures local solar time, rather than our standardized time. It won't match up exactly with UTC/GMC time, and has no offset for daylight savings, etc.</p><h3>Print Instructions:</h3><h4>For both parts:</h4><ul><li>PLA</li><li><strong>NO supports</strong></li><li><strong>NO rafts</strong>; if you *absolutely* need to, you might use a brim</li><li><strong>0.2mm layer height</strong>, although finer should work if you’d like</li><li><strong>0.4mm line/nozzle width</strong>; if your settings are set to anything else, please at least take a careful look at how everything slices before printing, as some details may disappear.</li><li>A freshly releveled bed with solid <strong>bed adhesion </strong>(Once I neglected to relevel the bed for a test print after build plate removal and just babystepped Z instead. This was a mistake. Please learn from my hubris.)</li><li><strong>3 perimeters</strong></li><li>‘Ensure vertical shell thickness’ turned on (Prusa slicer)</li><li>Bridge settings enabled</li><li>Everything should load in the orientation it’s meant to be printed in</li><li>You're probably going to want to use Prusa slicer for this one</li></ul><h4>For the main body of the sundial:</h4><ul><li>This involves three interconnected parts including a screw, and a lot of 45º overhangs and bridges, so after the first few layers, you will want your parts cooling fan on or close to 100%.</li><li><strong>Infill at 80%+ for the screw</strong>; I recommend cubic; the rest can be around 20%.</li><li>To set these different infill amounts: using Prusa slicer, load <i>sundial_mainbody_final.stl</i>, then load <i>screw_modifier_sundial.stl</i> as a modifier to set its infill separately at 80%+. (Right click and select “add modifier > load…”; then right click that modifier and select “infill".)</li><li>Recommended: 30-35% infill/perimeter overlap</li></ul><h4>For the hours arc:</h4><ul><li>There are two files for this, and you want the one that matches your hemisphere:<ul><li><i><strong>sundial_hoursNORTH.stl</strong></i><strong> if you live in the Northern Hemisphere</strong></li><li><i><strong>sundial_hoursSOUTH.stl</strong></i><strong> if you live in the Southern Hemisphere</strong></li></ul></li><li>You’re going to want a medium to lighter color for this so that you can better see the shadow of the gnomon cast onto it.</li><li>I’d recommend making sure the seams don’t fall on the inside face of the arc, especially on the numbers. (The connection area of the arc and the numbers area are two different shells and thus iffy about painting seams where they overlap, just as a heads up.)</li><li>The hours arc is a bit more forgiving vertical-angle-wise than the main body; I wanted to be able to print it with my Polyalchemy Elixir, which isn’t quite as obliging with overhangs as standard PLA.</li><li>I’d also recommend using the ‘avoid crossing perimeters’ setting in Prusa slicer.</li><li><strong>Infill: </strong>There’s not much room for infill when you print this with 3 perimeters; you can either do 20%+ ish cubic or grid, or just fill that area in solid.</li><li>The hours arc loads upside down; that is the way you want to print it.</li></ul><h4>Post-printing instructions:</h4><ul><li><strong>Take care when removing the main body of the sundial from the bed; it consists of three parts</strong> that don’t actually touch in print orientation (as shown in renders in pictures above), and it’s best to try to gently get them free individually. (You can make sure the screw separates from the bed first by getting it free with gentle pressure and then turning a bit to the left/counterclockwise, so that it unscrews slightly and moves up from the bed.)</li><li><strong>Make sure the three pieces of the main body can move independently. </strong></li><li><strong>The hours arc should slide onto the area that sticks out in the middle of the main arc</strong> (as shown in pictures above), and will stay put and stable if the fit is good. If the fit is too loose/if it wobbles, you can either permanently adhere it, or use something like a bit of tape: When printed with regular PLA and similar settings to the main body, I found the hours arc to fit onto the main body decently, sliding into place and staying stable. When I printed it with Polyalchemy Elixir Copper, there was some amount of shrinkage, giving a fit that was too loose. IMO the easy way to fix a loose fit like this, without something permanent like glue, is to use a small sliver of tape—not for adhesion, but to make up the small gap—placed along one of the inner areas so that it doesn’t show once the parts are connected.</li><li><strong>Find your latitude.</strong> You can do this with Maps/GPS software or an internet search. I’d recommend rounding it up to the nearest whole number, since this sundial is probably too small for decimal accuracy to matter.</li><li>The screw should already be at a position where the arc of the main body can rotate without trouble, but if you’ve fiddled with it or are readjusting, turn left/counterclockwise to loosen a bit.</li><li>As shown in one of the pictures above:<strong> rotate the arc of the main body so that the arrow on the base aligns with your desired latitude. Then turn the screw right/clockwise to tighten that in place</strong>; you want a bit of resistance, the point where the screw puts some pressure on the rotating arc. This should keep your chosen angle/latitude in place.</li><li>The gnomon—the straight, thin part in the center that casts the shadow—has a pointy bit at the top. (The base is also pointy on that side, if you need help to remember, which I sometimes do.) The direction that side points should face North in the Northern Hemisphere, and South in the Southern Hemisphere. <strong>So find north or south, </strong>as matches your hemisphere and nearest pole,<strong> and set the sundial on a flat surface, in the sun, with the pointy side pointed south in the Southern Hemisphere</strong>,<strong> </strong>or <strong>north in the Northern Hemisphere. </strong></li><li><strong>Do not </strong><i><strong>leave</strong></i><strong> this sundial in the sun</strong>, particularly in warm months, assuming you print in PLA. This is a desktop sundial, and as such would prefer to live on a desk or table, indoors. Use your own judgment when leaving PLA prints in a sunny spot, even inside. I haven’t tested it myself, but I hear you can definitely melt PLA if you leave it in direct sun or too warm a place otherwise. (Hot cars seem to be a common culprit.)</li></ul><h3>Etc.</h3><h4>Extra file stuff:</h4><ul><li>I’m going to include versions of the hour arcs written in arabic numerals rather than roman numerals, just in case anyone would prefer that for reasons of legibility, education, inscrutable preference, or otherwise.</li><li>If you want to modify all three parts of the main body in Prusa slicer, you can get the three parts separate to use as modifiers: <i>sundial_justbodyarc_printrotation.stl, sundial_justthebase.stl, sundial_justthescrew.stl</i></li><li>You can also use those parts to modify the design, or—I believe?—to print the pieces (base, main body arc, and screw) in different colors if you have multiple extruders.</li><li>I’m also including a blank version of the hours arc in case you want to modify that: <i>sundial_arcconnector_incontextfor90.stl </i>and <i>sundial_blankarc_incontextfor90.stl</i>. These shells are separate so you can modify the mesh of the hours arc without risk of altering the connector piece. These are in design rather than print orientation, and will load in context with the sundial set to its 90º rotation (<i>sundial_mainbody_90.stl</i>).</li></ul><h4>Other details</h4><ul><li>Filaments shown in photos: Polyalchemy Elixir Copper, Jessie Green Ice from Printed Solid, Creality white</li><li>Programs used for design: OnShape, Inkscape, Blender</li><li>Sources:<ul><li>With thanks to this<a href="https://www.instructables.com/The-Equatorial-Sundial/"> CNC/woodworking instructable</a> for the very helpful explanations on how equatorial sundials work: https://www.instructables.com/The-Equatorial-Sundial/</li><li>Notable design inspiration:<ul><li>https://commons.wikimedia.org/wiki/File:Zw_stelling.jpg (gnomon - since the gnomon needs to be a certain height from the build plate in order to remain centered, having this open line in the center to let light through helps with narrower accuracy where the shadow falls thickest.)</li><li>https://commons.wikimedia.org/wiki/File:Equatorial_sundial_by_József_Mérő,_Érd.jpg (rotational setup)</li></ul></li></ul></li></ul>
With this file you will be able to print Desktop Equatorial Sundial with your 3D printer. Click on the button and save the file on your computer to work, edit or customize your design. You can also find more 3D designs for printers on Desktop Equatorial Sundial.