Desktop Vacuum Former
thingiverse
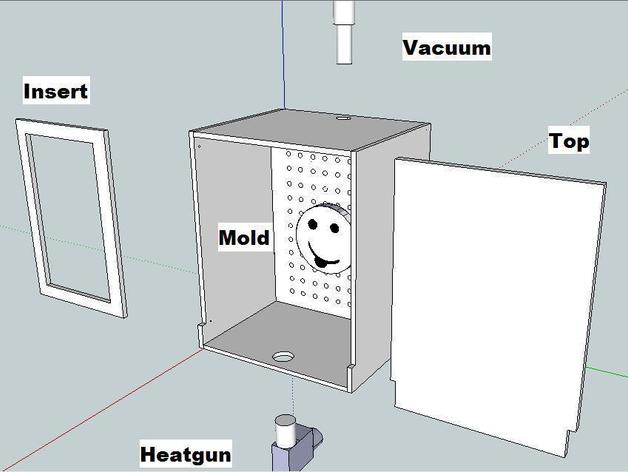
Yet another desktop vacuum former. This one operates with a heatgun and vacuum (of course). Designed to be printable at Ponoko and released for FREE. http://www.ponoko.com/design-your-own/products/desktop-vacuum-former-with-3-files-6514 Requires: Heatgun, vacuum, machine screws, glue, aluminum foil Designed for laser cut in MDF or wood .25 inches thick Same dimensions as makerbot except on its side. Instructions Assembly instructions here: http://support.ponoko.com/entries/20509538-desktop-vacuum-former Assembly instructions: Insert the perforated middle board and the bottom board into one of the end pieces. See pic 1.http://support.ponoko.com/attachments/token/vymlueqea2w5nzz/?name=Assemble_Vac_Former_-1.jpg Attach the other end piece onto the other side forming a modified 'H'. See pic 2.http://support.ponoko.com/attachments/token/0e9v8ythj44eubn/?name=Assemble_Vac_Former_-2.jpg Place the boards onto the right side board. Use the machine screw joints to secure in place. Glue together. Ensure that there are no air leaks along the seams especially at the bottom board and the perforated middle board. See pic 3.http://support.ponoko.com/attachments/token/les09twbxhu8ix2/?name=Assemble_Vac_Former_-3.jpg Place the left side board onto the other side. Secure in place with machine screws. Glue together. Again ensure that there are no air leaks at the seams. Line inside and top with aluminum foil. Place mold form onto perforated middle board. Cover any excess holes with duct tape. Place plastic onto insert frame and use machine screws to lock onto insert frame. Option 1: Use string to create handles on either side to hang plastic down over mold. String is laced underneath insert through each side to form 2 loops to support the insert by hand (pic needed) Option 2: use long machine screws to create "table" with insert. 4 Long machine screws are used with 2 additional nuts per screw. Nuts secure plastic while screws serve as legs that lift insert with plastic over the mold form (pic needed) Place vacuum nozzle into bottom hole and heat gun into top hole. Place lid on. Turn on heat gun. when ready turn on vacuum. Plastic will form to mold. remove plastic and trim.
With this file you will be able to print Desktop Vacuum Former with your 3D printer. Click on the button and save the file on your computer to work, edit or customize your design. You can also find more 3D designs for printers on Desktop Vacuum Former.