Destiny 2 Seventh Seraph Officer Hand Cannon - Movable
thingiverse
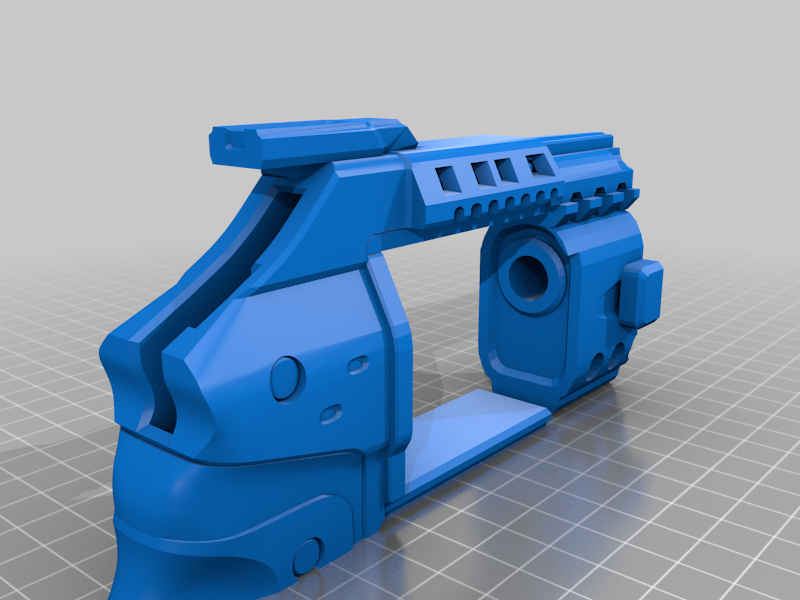
Destiny 2 Seventh Seraph Officer hand cannon with movable hammer, trigger, and magazine/magazine insert. Hammer and triggers can be setup with rubber bands or a springs (0.4x5x25mm). If using springs, 7SHC_TRGGR_INSRT is not needed. top and bottom halves have smaller sliced files for smaller print volumes some pieces (insert pieces and keys) might need sanding down would highly recommend dry fitting everything before and after painting and before gluing together to make sure movable parts can move freely Text Assembly instructions: I highly recommend doing these steps without glue first to make sure you don't need to sand anything down a little bit before gluing it all together ------IF PRINTING THE TOP IN SLICED PIECES------- 1. (if printing the barrel in sliced pieces) Use the Keys to help align and glue together the Barrel pieces (7SHC_TOP_BCK, 7SHC_TOP_MID, 7SHC_TOP_FRNT) -----IF PRINTING THE BOTTOM IN SLICED PIECES---------- 1. glue 7SHC_MAG_INSRT into the box shaped hole at the edge of 7SHC_BTTM_FRNT with the post of 7SHC_MAG_INSRT facing outward from the piece 2. place 7SHC_MAG onto the post of 7SHC_MAG_INSRT so that it can pivot around 3. Use Keys and the bottom of 7SHC_MAG_INSRT to align and glue together the bottom pieces (7SHC_BTTM_FRNT , 7SHC_BTTM_MID, 7SHC_BTTM_BCK) -------IF PRINTING THE BOTTOM IN ONE PIECE----------- 1. Insert the post of 7SHC_MAG_INSRT into the pivot hole of 7SHC_MAG 2. Apply glue to the large flat face of 7SHC_MAG_INSRT and insert it into the forward box shaped hole in 7SHC_BTTM so that the magazine can pivot around freely -------COMMON TO ALL SLICED VERSIONS INSTRUCTIONS---------- 1. Insert the large post of 7SHC_HMMR_INSRT into the pivot hole for 7SHC_HMMR 2. Either use a short rubber band from the forward peg on 7SHC_HMMR to the small peg on 7SHC_HMMR_INSRT, or a spring from the small peg on 7SHC_HMMR_INSRT to the rear peg on 7SHC_HMMR so that the hammer can return when pulled back and released 3. Add glue to the large flat face of 7SHC_HMMR_INSRT and then insert the HMMR Combo into the box shaped hole in the top-back of 7SHC_TOP_BCK -------RUBBER BAND TRIGGER OPTION-------- 1. hook rubber band on post of 7SHC_TRGGR_INSRT and glue 7SHC_TRGGR_INSRT into the rear rectangular hole of 7SHC_BTTM (or 7SHC_BTTM_MID if sliced bottom) so that the post of the insert is pointing towards the back of the gun. 2. insert 7SHC_TRGGR_PIN through the hole of 7SHC_TRGGR and carefully glue just the PIN into the semi circular groove of the bottom half of the gun (7SHC_BTTM or 7SHC_BTTM_MID), and loop the rubber band around the back post of the trigger ------SPRING TRIGGER OPTION---------- 1. insert 7SHC_TRGGR_PIN through the hole of 7SHC_TRGGR and carefully glue just the PIN into the semi circular groove of the top half of the gun (7SHC_TOP_BCK) 2. take a spring and put one end on the post on the post that is inside the space the trigger goes into when pulled in 7SHC_TOP_BCK 3. take the other end of the spring and put it on the post on the top back of 7SHC_TRGGR -------COMMON TO ALL SLICED VERSIONS INSTRUCTIONS---------- 7. MAKE SURE THE MAGAZINE IS ROTATED ALL THE WAY TO THE LEFT SIDE OF THE GUN WHEN DOING THIS. use keys to help align and glue together the top and bottom halves of the gun 8. 7SHC_MAG_CRTDG kind of just exists and doesn't need glue so you can "unload" and "reload" it
With this file you will be able to print Destiny 2 Seventh Seraph Officer Hand Cannon - Movable with your 3D printer. Click on the button and save the file on your computer to work, edit or customize your design. You can also find more 3D designs for printers on Destiny 2 Seventh Seraph Officer Hand Cannon - Movable.