Detail paint brush set storage case box for golden maple brushes
thingiverse
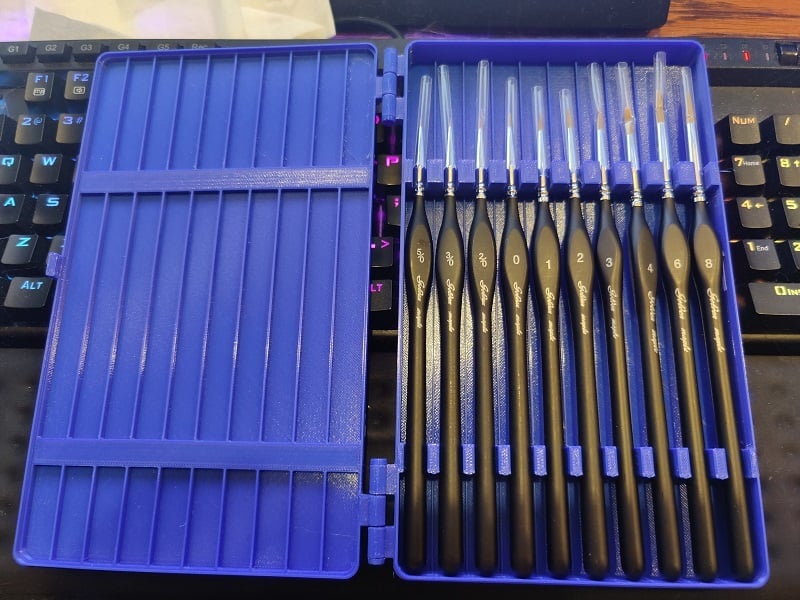
I know not a lot of people like to 'store' their brushes away, but this was a necessary evil for me as i do not have a house with a 'room' dedicated for painting, and I need to get my paint stuff 'out' every time i want to paint, and my brushes were just rolling around in my paint box. Also I have a cat who LOVES To eat bristles on anything, So I have no choice! This is a remix of another design, but I fixed a few little issues I had with the original design (no fault of anyone, I'm just particular). These fit the fat grip brushes from amazon listed here: https://www.amazon.com/Detail-Brushes-Miniature-Detailing-Painting/dp/B075L8LCTG/ref=sr_1_16?dchild=1&keywords=golden+maple+brush&qid=1620270294&sr=8-16 They seem to be a 'golden maple' brand. I used the 20mm deep one as these brushes are kind of bulky in the center. This case is a bit 'flexible' if you push in the center of the lid, it flex, so do not expect a super solid box, but it does the job just fine. In re-designing this i had a few goals in mind. 1. I did not want the brushes to be able to 'slide' forward and splay the brushes by hitting the edge wall, so i added slotted holders that just fit this particular brush set. I made the front slots about 5.7mm wide and I believe the rear ones are 8mm (dont quote me on that though!) 2. I shrank the original box to save space and material, it is now about 210mm long instead of the original 230mm I believe (i could be wrong on the original size). I also had to widen the box on the two outside holders as they were like 1.2mm thinner then the rest of the holders and the two outside brushes didnt quite fit with their size's facing up ward. 3. I also didnt want the brushes to flop around too much so i put the strips in the lid to cover the 'slots' when closed so the brushes shouldn't move too much. You can also storage the brushes with their plastic covers on the bristles if thats your thing (I haven't used these brushes yet so I never bothered to take them off). But either way the brushes SHOULD NOT slide into the end of the box splaying the bristles or anything like that (i have tested it and it works great). 4. I removed the divider walls from bottom half of the box as this new design didnt need them, but you'll see I put them back in with a height of about 2-3mm as this seemed to help re-enforce the rigidity of the box, but I feel this still saved materials from not having to print them at their original full height (which was unnecessary with their new slotted holders) 5. I also removed the 'brushes' text from the top, as I just didnt want that there. #Now a few caveats. 1 I'm not a modeler so it took me hours just to do these changes. IF i was better at this, i probably would have changed the '1 latch' to '2 latches' near the corners rather than the center. I find that with this design when its latched closed my top corner kind of pulls upward as i think there was slight warping when printing (my printer just has this problem). The box stays closed just fine, it just doesnt look the same all around as one corner slightly pulls up. (functionality is fine though). Also the latch doesnt really 'CLICK' very tight, its a loose fit and while it will keep our brushes safe if you treat it nicely, if you take it and flip it up side down and shake it WILL open and your brushes will come falling out. So dont do that :) 2 I tried to model some hinge pins so you dont have to buy anything, but they came out a bit too thick and I had to sand them a ton to get them to fit, This should be easy enough for anyone to do though, sorry! I suck at modeling! So I did not bother including them, they are super flimsy anyways. Sorry!! (yes my picture has mine installed and glued into place, but i'm too ashamed to include them lol.) 3 this one is kind of important. These brushes ALL have slightly different sizes near the back end of the brush. Originally I had all the slots different sizes to fit the brushes exactly, but then i found out there is inconsistencies in how the brushes are made and so I had to make a one size fits all for this particular brand of brush. Some were slightly fatter than others. 4 lastly, the brushes are very close together so without needle nose fingers you wouldn't be able to grab and pull out, but the easy way to solve this, is simply push down on the back of the brush, this will cause the front of the brush to pop up out of its holder, then just grab and pull upward (dont pull at an angle or some of the 'fatter' brushes ends may not slide out quick and easy due to their inconsistent production). I can do this with one hand even if needed. If someone would love to remix this and fix the latch and make hinge pins, that would be great, as i think its a solid design now, and there's LITERALLY 0 paint brush holders on here besides the one i remixed this from. I printed this in PETG just cuz thats what I'm using for now. YES i used supports from the plate only to help the hinges form as my PETG overhang prints fail on my printer sometime. Also i used a brim of about 4-5mm cuz i get warping on larger objects. but if you print these two pieces on their back (I may not have oriented them that way sorry if not!) you wont use much in the way of supports. Please comment if you print it or show it! i'm new to all this so even just 'thanks' helps!! I wish was a better modeler, but tinkercad would not load the original model correctly for me so i had to use mattercontrol and holy smokes that thing is bad.. bad bad bad.. why does the camera barrel roll.. yick!!!
With this file you will be able to print Detail paint brush set storage case box for golden maple brushes with your 3D printer. Click on the button and save the file on your computer to work, edit or customize your design. You can also find more 3D designs for printers on Detail paint brush set storage case box for golden maple brushes.