Dial Gauge Holder
thingiverse
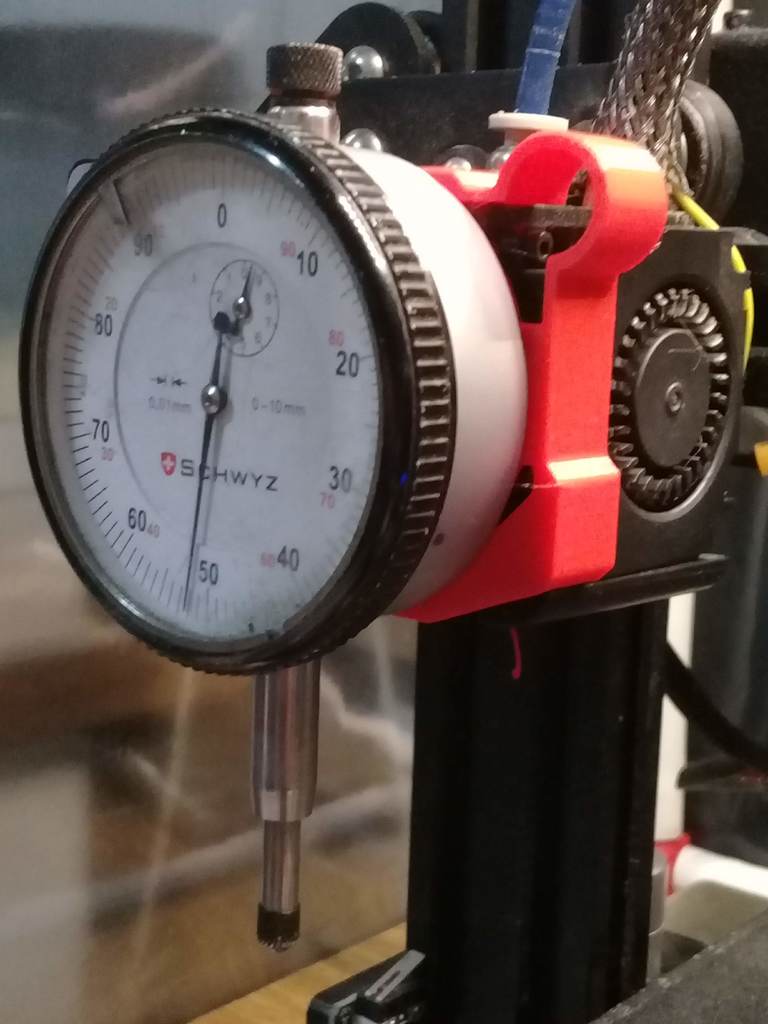
Yay! This is my very first contribution to Thingiverse! A friend of mine asked me to look for a dial gauge holder but didn´t find anything suitable for his own so decided to modify some of the ones I found useful. I liked the way https://www.thingiverse.com/thing:3461192 from [leitefrog](https://www.thingiverse.com/leitefrog) attachs to the Ender 3 stock fan (it fits perfect!!) but needed to use the stock screws of my friend´s gauge in order to attach the holder, https://www.thingiverse.com/thing:3041642 from [Reese9885](https://www.thingiverse.com/Reese9885fits) did the trick so I mashed them together using Tinkercad. Thanks to both of them for their designs! I added some vent holes to the circle so a hot bed-levelling can be performed, the rectangle is at the same height as the the circle the indicator sits on it so no supports needed. Added 2mm high to the rectangle for a better grip to the fan, just in case. It is a very simple print indeed, 1 hour and a half with 0.4 nozzle, 0.2mm layer high and 50% infill. It could be used a higher layer like 0.24 or even 0,28 in order to lower printing time as the holder doesn´t need a detailed surface to work. The same with the infill. I hope you like it and find it useful. Comments, advices and constructive criticism are more than welcome :D Dial gauge is Schwyz brand, it looks pretty old. Vamos! Este es mi primer aporte a Thingiverse! Un amigo me pidió que le buscara un soporte para su reloj comparador pero no encontré ninguno adecuado para el suyo así que decidí modificar algunos de los que me parecieron útiles. Me gustó el de [leitefrog](https://www.thingiverse.com/leitefrog) https://www.thingiverse.com/thing:3461192 ya que se agarra perfectamente al cooler de la Ender 3 pero necesitaba usar los tornillos de la parte trasera del reloj para sostener el soporte, https://www.thingiverse.com/thing:3259876 de [Reese9885](https://www.thingiverse.com/Reese9885fits) anduvo perfecto pero tiene ciertos detalles que no me convencían así que uní los dos usando Tinkercad y este es el resultado. Muchas gracias a ambos por sus diseños! Le agregué al círculo algunos agujeros de ventilación asi que sería posible realizar un nivelado de cama en caliente, el marco tiene la misma altura que el círculo que soporta al comparador así que no son necesarios soportes. También le agregué 2mm de altura al marco para un mejor agarre, por las dudas. Es una impresión muy sencilla, demora 1 hora y media con una boquilla de 0,4, capa de 0,2mm de altura y relleno del 50%. Se podría utilizar una altura de capa mayor, 0,24 o 0,28 ya que la pieza no requiere de mucho detalle, lo cual restaría tiempo de impresión. Lo mismo con el relleno. Espero que les guste y les sea útil. Los comentarios, consejos y críticas constructivas son más que bienvenidos :D El comparador es marca Schwyz, se ve bastante viejo. https://youtu.be/ihwqW2mEG3I https://youtu.be/W3pS4l-gjDo
With this file you will be able to print Dial Gauge Holder with your 3D printer. Click on the button and save the file on your computer to work, edit or customize your design. You can also find more 3D designs for printers on Dial Gauge Holder.