Dial Gauge Mounts for 3 Axis Calibration (X, Y, and Z)
prusaprinters
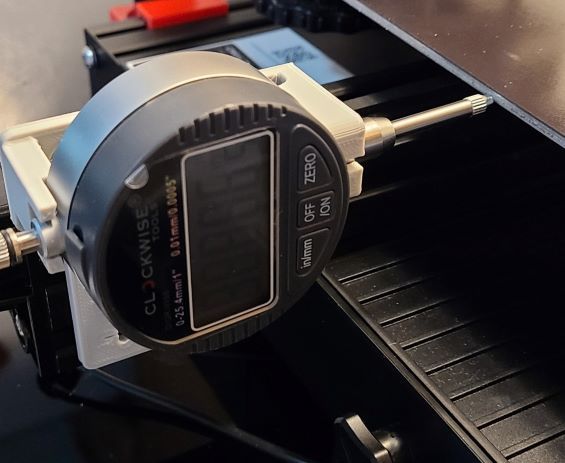
<p>These mounts allow step calibration for all 3 axes of your printer, providing a firm and secure mount for a dial gauge. These should work with any printer that uses 20mm V-slot or T-slot rail for the XZ axis mount, and any V-slot or T-slot rail for the Y axis mount.</p> <p>It is designed for a gauge with an approximate 57.7mm diameter body and 9.6mm diameter shaft sleeve, but it should work for slightly smaller gauge bodies. The top-end clip provides secure support for the gauge, but does not require an exact fit. I am using the Clockwise Tools DIGR-0105 gauge, as shown in the pictures.</p> <p>The mounting holes are designed for M3x10 or M3x8 screws and T-nuts to hold the mounts securely in place. I used one of the printable M3 T-nut designs available on the site.</p> <p>The XZ mount should simply clip to the crossbar with no screws, but holes are provided if necessary. The Y mount will require screws and T-nuts.</p> <h3>Print Settings</h3> <p><strong>Printer Brand:</strong></p> <p>Creality</p> <p class="detail-setting printer"><strong>Printer: </strong> <div><p>Ender 3</p></div> <p><strong>Rafts:</strong></p> <p>No</p> <p class="detail-setting supports"><strong>Supports: </strong> <div><p>Yes</p></div> <p><strong>Resolution:</strong></p> <p>.2</p> <p class="detail-setting infill"><strong>Infill: </strong> <div><p>20</p></div> <p><strong>Filament:</strong> IIIDMax PLA+ Space Gray</p> <p><br/> <p class="detail-setting notes"><strong>Notes: </strong></p> </p><div><p>I printed with 3 walls, no special settings otherwise.</p></div> Post-Printing ============= <p>The bottom supports for the XZ mount may leave the surface and rail clip edges a bit rough, but cleanup should be quick and simple with cutters and possibly some light filing.</p> <p>The XZ mount should clip securely to the X axis rail in both orientations, but if it doesn't then use screws and T-nuts to secure it.</p> <p>In an ideal world, your printer would be fully calibrated for a perfect fit, but then you wouldn't need these mounts. If the XZ axis clips are in the way, simply cut them off and use screws and T-nuts.</p> <h3>How I Designed This</h3> <p>While I liked the gauge end support from the original design, I was unable to find a good all-axis solution. Also, I felt that the X and Z axis could easily be handled by a single part, without resorting to using a gauge block.</p> <p>After a few test prints, I decided that the top of the gauge needed more support than the original design provided. I replaced the simple support with a more robust solution, so the gauge clips firmly into place and is held securely in any orientation.</p> <p>I originally wanted the Y axis to either clip on, or have a supporting ledge resting on the top of the bed rail. However this proved to be unreasonable when I took into account the narrow bed profile and the fact that leveling the bed may raise or lower it to a position the gauge couldn't measure. In the end, I decided that simple cutouts for the screws would be the best, most flexible solution.</p> </p></p></p> Category: 3D Printer Accessories
With this file you will be able to print Dial Gauge Mounts for 3 Axis Calibration (X, Y, and Z) with your 3D printer. Click on the button and save the file on your computer to work, edit or customize your design. You can also find more 3D designs for printers on Dial Gauge Mounts for 3 Axis Calibration (X, Y, and Z).