Dial Indicator Gauge Holder Sidemount for X axis bar carriage for Ender 3 (CC-BY)
thingiverse
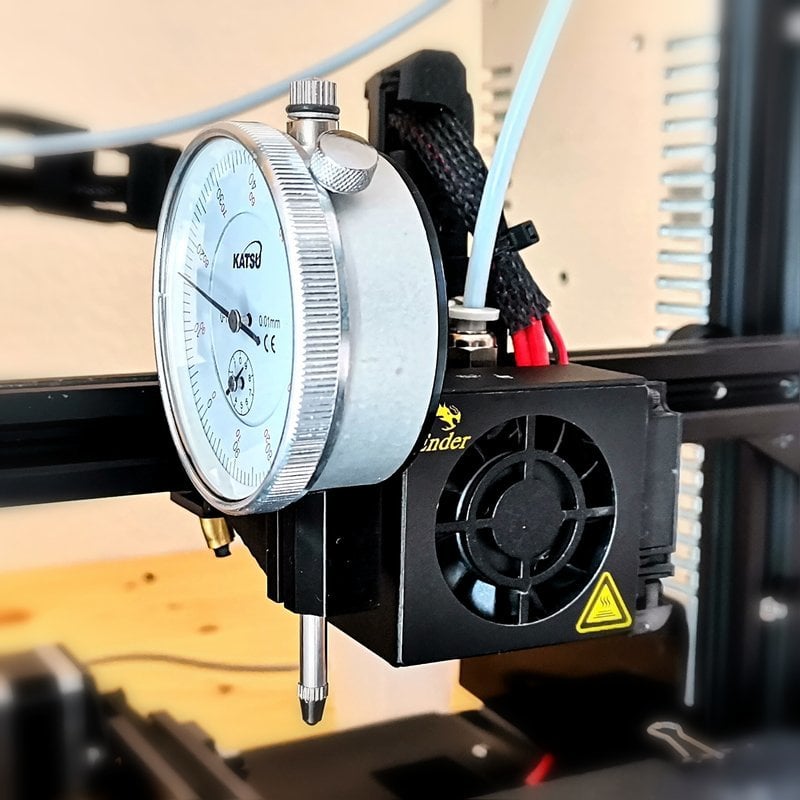
Holds the dial gauge (dial indicator) directly on the x axis carriage instead of over the wobbly fan housing. Less of a remix, more of an inspiration. Compatible with http://www.thingiverse.com/thing:3417079. Other probably too. ## Why The over-the-hotend-fan holder is quite wobbly and can be pushed down easily. That changes the value on the dial gauge. To give it better stiffness, I made a side mount directly on the X carriage. Based on the mounting bracket of the <i>BL Touch</i>. Designed for Ender '3. Might also fit Ender' 3Pro, Ender 3S, Ender '5, Ender '5 Pro, Ender 5S, CR-10. (all links are MakerBot Affiliate Links, not mine) ## Design Details Keeps the hot end fan outlet free to ensure air flow during printing. Homing possible with bracket mounted. Homing possible with dial gauge in place. After installation, the tip of the dial gauge is offset relative to the nozzle tip to the left (X-) and to the front (Y-). Can be used efficiently in combination with OctoPrint and the plugin <i>[Terminal Commands](https://plugins.octoprint.org/plugins/TerminalCommands/)</i> to move directly over bed screws on button push. I recommend <b>Mk4</b> xor <b>Mk5</b>. Mk4 is a little bit closer to the X motor cover as you can by the pictures. For Mk4 holder I used Z=1mm for measuring the bed height. The Mk5 reaches 3mm lower and also further to the front, meaning the nozzle doesn't have to be that close to the bed. Mk2 and Mk3 are included for special cases where these might fit as well or a shorter version is needed. <b>Collision with Mk2 and Mk3 is likely!</b> <b>Make sure no it does not collide with parts mounted to the X axis motor cover</b> (e.g. Pi Camera mount). ## Print Instructions Layer Height: 0.2mm Infill: 20% <i>(maybe less possible)</i> Speed: 50mm/s <i>(adjust according to your experience)</i> Print in assembly position. This makes removing the supports easier without risking to break parts. ## Assembly Instructions 0. Test fit with dial gauge. If too tight use drill bit to widen the mounting hole 1. Remove screws holding the Hot End fan housing on the X carriage. 2. Mount <i>Thingy</i> directly over the half circles of the hot end fan holder. There should be enough space on the backside. 3. <b>Keep</b> the wheel screw where it is. The hole in the <i>Thing</i> fits the screw head. The stock screws should be long enough to hold both the fan housing and the dial gauge holder. <b>REMOVE DIAL GAUGE BEFORE PRINTING</b> ...to avoid damage to printer and dial gauge ### Materials Needed - Dial Gauge - 2mm Allen key (supplied with machine) - 8mm drill bit if fit too tight.
With this file you will be able to print Dial Indicator Gauge Holder Sidemount for X axis bar carriage for Ender 3 (CC-BY) with your 3D printer. Click on the button and save the file on your computer to work, edit or customize your design. You can also find more 3D designs for printers on Dial Indicator Gauge Holder Sidemount for X axis bar carriage for Ender 3 (CC-BY).