Diamond Hotend Conversion, Anycubic Linear Plus Kossel Printer

Diamond Hotend Conversion, Anycubic Linear Plus Kossel Printer

thingiverse

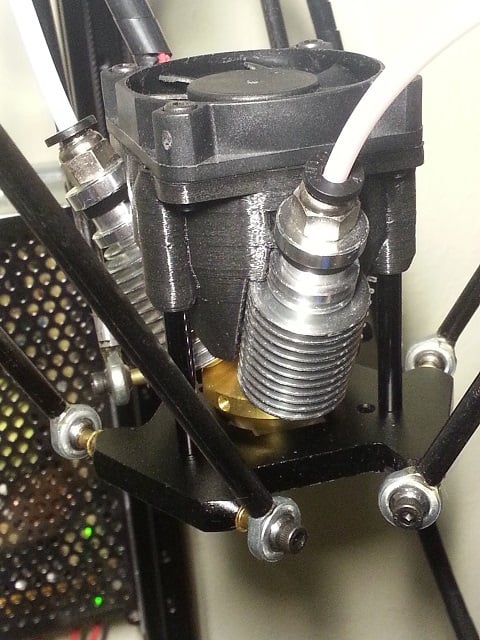
Parts for installing a 3-filament diamond hotend on a Anycubic Linear Plus Kossel 3D printer. Retains the original aluminum effector plate and arm geometry. Increased print height capability of about 315-318mm. The shroud is a remix of kharar's shroud modified for ease of routing wires and accessing the heating element and thermal probe. The shroud is elevated with aluminum standoffs for rigidity and heat tolerance. All printed components shown in the photos was produced with this converted printer. Requires three 35mmL x 5mmOD, M3-threaded aluminum standoffs. Note the orientation and clearance between the hotend and effector plate and drill the three holes in the effector plate to mount the standoffs. You will need six M3x15 socket head screws for mounting the standoffs to the shroud and effector plate, and four for the 40mm/50mm fan to the shroud. NOTE: The blower mount and ducted shroud have been redesigned for a lower profile. The arms may still strike the blower and duct when the print head is in certain positions, especially on the newer models that have the enlarged rod ends. Check the full range of print head travel before use. The ducted shroud and nozzle should be printed with heat-tolerant material and a hotend insulator should be used. You can reuse the eight M2 screws to mount the nozzle and 40mm blower. If you use the clip-on nozzle, screws are optional. Snap the blower mount onto the ducted shroud and use glue, if needed. The rear standoff may be very difficult to install and remove because it is enclosed within the duct. Chase the holes, check the fit in the shroud before final installation, and do not overtighten the screws. Color-mixing does not work well using the diamond hotend as without mechanical agitation, colors tend to emerge from the nozzle closest to the side where the filament enters the nozzle. However, some interesting fade effects can be printed. Also shown in the photo of the samples, the flow needs to be adjusted to get proper extrusion. The unused stepper driver and servo connector on the Anycubic control board can be used to drive a servo-actuated Bowden dual extruder in conjunction with the original single extruder. There is a slight delay as the servo actuates to change color. Printable servo-actuated Bowden dual extruders: https://www.thingiverse.com/thing:1888865 https://www.thingiverse.com/thing:3006321 Alternatively, pins from the IC and AUX headers can be used to drive a stepper driver extension board for a total of three extruder steppers. The IC header has a 5V, 12V, and 2 GND pins for the power cable to the extension. The D42 and D43 pins from AUX and the SCL and SDA pins from IC can be used for the STEP, DIR, and ENABLE cable to the extension. Having three steppers makes it easier to prime the nozzle with all three filaments simultaneously and color changes happen quicker than with the servo setup described above. Required reading: Adding extruder drivers: https://reprap.org/wiki/Adding_more_extruders Trigorilla port mapping: https://www.thingiverse.com/thing:2485534 Information on diamond hotends: https://reprap.org/wiki/Diamond_Hotend A couple of papers on mixing extruders: https://www.reprap.org/wiki/Mixer_extruder Color mixing with Repetier Host: https://reprap.org/wiki/Repetier_Color_Mixing The final model is an untested remix of dintid's shroud for the 5-filament diamond fullcolor hotend. I have not determined the correct length of standoffs needed. It is likely that the Bowden tubes and tube fittings will interfere with the arms. The front two holes are drilled in a different location on the effector plate which will be near the front rectangular cutout. Alternatively, you could try to suspend the entire assembly below the effector plate using the fan mounting holes. The blower, duct, and nozzle will not work with this shroud, and you'll need a way to feed all five filaments to the hotend. UPDATE 03/24/2019: Be sure to disable ENDSTOPS_ALWAYS_ON_DEFAULT. It seems to be causing the Z-hop crashes and layer shifts. This was happening on all of my printers with Marlin 1.1.9. The telltale sign was a random message in mid-print saying that the X or Y endstop had tripped, and if you repeat the print it happens unpredictably at different points, or sometimes not at all. I can now use Z-hop and with the right amount of retraction and no combing on skin layers, results in much crisper prints. I also switched from TMC2130 drivers to Makerbase MKS SERVO42 closed-loop steppers. It was really quiet with the TM2130s, but I had to run at slower speeds and lower acceleration all of the time. Here is a protective cage that I designed for the motor: https://www.thingiverse.com/thing:3497048 I also added three 750mmL 15x15 diagonal struts to brace the frame. These are limiting the print diameter to about 200mm until I design a way to move them further out without twisting the top and bottom triangles. UPDATE 02/25/2019: Here is a small two- and three-color model that you can use to test your conversion: https://www.thingiverse.com/thing:3290186 The two-color panda model can be printed using Cura 15.04 using the Wipe & Prime Tower feature. Cura 15.04 lets you merge the three models, but attempts to prime multiple colors for each layer on the same tower causing the nozzle to hit the tower. Also, set Z hop to 0. Marlin 1.1.9 seems to lose track of the Z axis position if you use Z hop, causing the nozzle to hit the tower and model. UPDATED 01/21/2019: Added a photo of sample prints and revised description to better describe mixing and expected results. Added two shroud versions with a flange that accomodates a 40mm fan. UPDATED 12/28/2018: Added a clip-on nozzle model. Easy tool-less removal for cleaning the nozzle and hotend tip. Added clip-on, bed leveling sensor plate mounts for the bolt-on nozzle and clip-on nozzle. Use the model with the short center cylinder if the bolt-on nozzle is installed. The model with the tall center cylinder is used interchangeably with the clip-on nozzle. Apply a pressure-sensing pad switch to the bottom center of the plate and secure the pigtail with a plastic tie. Apply a cork pad to the pad switch to aid actuation. Connect switch leads to the Z-min pin header on the Trigorilla board. After bed has been leveled, remove leveling plate and sensor assembly before printing. UPDATED 12/20/2018: The v1.02 shroud for the 3-filament hotend corrects the asymmetry and a glitch that was carried over from the prototype into the original model. Improved cable routing. New ducted shroud and v2 blower mount. The original models are still included but should not be used due to interference with the arms.

Download Model from thingiverse

With this file you will be able to print Diamond Hotend Conversion, Anycubic Linear Plus Kossel Printer with your 3D printer. Click on the button and save the file on your computer to work, edit or customize your design. You can also find more 3D designs for printers on Diamond Hotend Conversion, Anycubic Linear Plus Kossel Printer.