DimSim R1 Button plate
thingiverse
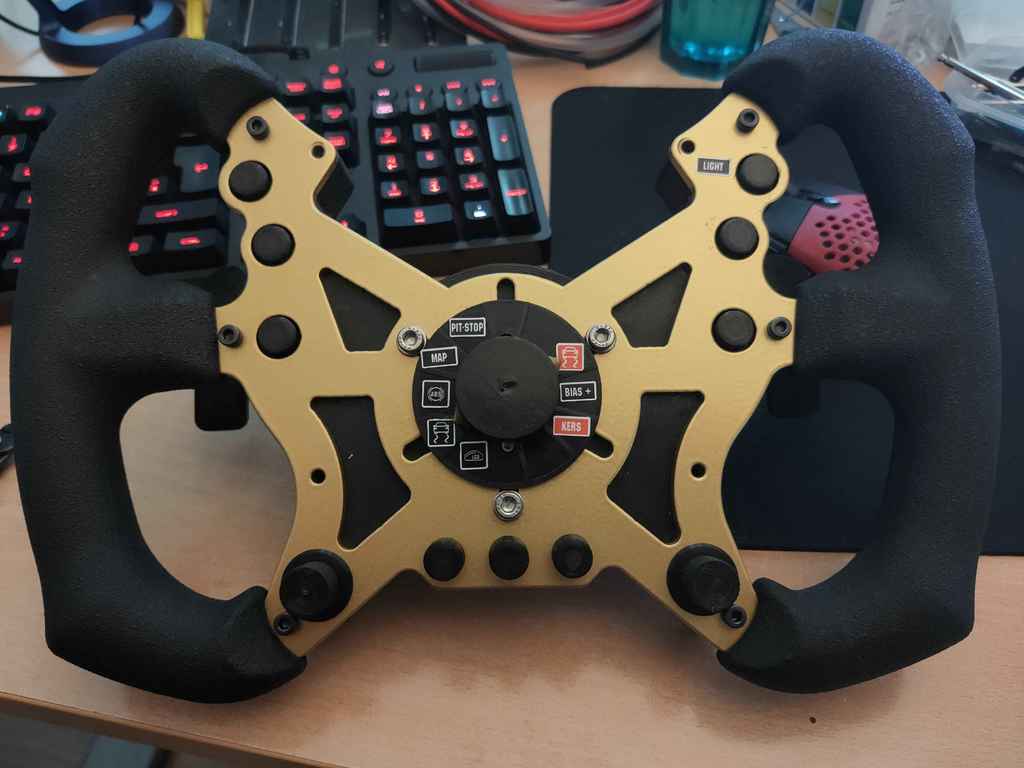
FYI I'm working on a new design with an integrated vocore screen, more 12-way switches, a more "ergonomic" rear and integrated shifters. It'll probably be 2 months before I finish it as I'm now building a Voron V0.1 which is my focus for the time being. ------------- Updates: ButtonCapV2-Aux.stl This cap works for the bottom 3 buttons ButtonCapV2.stl This cap works for the top 6 buttons MutiPosCapV2.stl & MultiPosSwitchV2.stl Redesigned multi-position switch R1_wheel v57.step I've now included the Step file so you can import & adjust. I removed the DimSim supplied DXF from the design as it's not mine to distribute - if you require this I'd suggest contacting DimSim (they were very keen to help when I reached out). Original Posting: Designed for use with SimuCube SQR but likely compatible with other 70mm mounts. I've seen a couple of button plates for the DimSim R1 (https://www.ebay.co.uk/itm/DimSim-Steering-Wheel-R1-SIMRACING-/183784911114) but fancied doing my own. The main difference here is the multi-position switch in the centre which I use to control the functionality of the bottom 2 encoders - this is possible thanks to FreeJoy (https://github.com/FreeJoy-Team/FreeJoy) I also didn't want a wheel that was too busy - I mainly play Assetto Corsa Competizone, so don't need too many buttons - particularly with the multi-function switch functionality. Shifters: I've modified these ones https://www.thingiverse.com/thing:3468245 to provide a physical endstop, utilise 10x10mm magnets & provide a different shift paddle - https://www.thingiverse.com/thing:4590694 BOM: 2x 2.5mmx12mm (for multi-switch assembly) 6x m4 10-15mm (dimsim r1 to backplate) 8x m4 6-12mm for rear-plate 1x gx16 connector (4-pin) 2x leobodnar cts 288 short shaft http://www.leobodnar.com/shop/index.php?main_page=product_info&cPath=98_75&products_id=243 (optionally cts 288v short shaft if you want additional push button) 9x push button https://www.aliexpress.com/item/32958866526.html?spm=a2g0s.9042311.0.0.515a4c4dNCFhEO 2x microswitch for shifters https://www.aliexpress.com/item/32850956248.html?spm=a2g0s.9042311.0.0.27424c4d6E0p39 3x m5 30mm-40mm (to mount SimuCube 2 QR) 3x m5 nylock nut 6x m5 washers 3x m5 x 10mm Alu washer https://www.aliexpress.com/item/33052017430.html?spm=a2g0s.9042311.0.0.27424c4duaeOPx 1x STM32F103C8T6 "bluepill" - (make sure to buy STLink v2 mini as well for programming with FreeJoy - I tried to do it with an arduino but had no luck) https://github.com/FreeJoy-Team/FreeJoy 30awg wire has been sufficient for this project, however I did use awg 28 for the USB -> GX16 pin. Note that USB can be taken from A11 and A12 from the bluepill board (see the FreeJoy configurator for layout). The top 6 push buttons mount to the button plate, The lower 3 mount directly to the DimSim R1 The 2x encoders mount directly to the DimSim R1 using the "Encoder-mount" - you may need to use locktight or superglue to secure these (so far mine have been fine on friction)
With this file you will be able to print DimSim R1 Button plate with your 3D printer. Click on the button and save the file on your computer to work, edit or customize your design. You can also find more 3D designs for printers on DimSim R1 Button plate.