Disco Ball powered by Drone Battery and Raspberry Pi
thingiverse
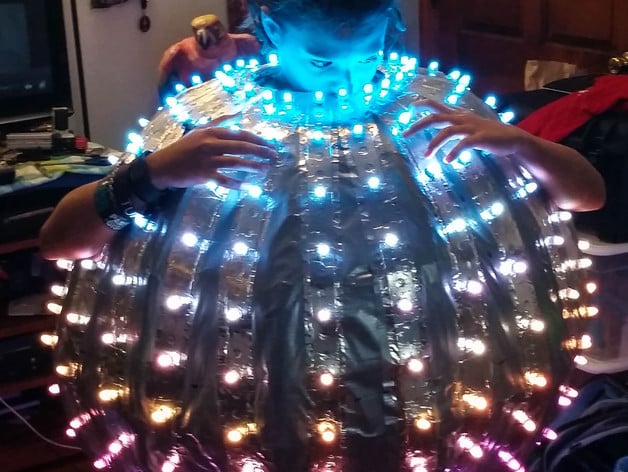
I built this Disco ball for my 12-year-old granddaughter specifically for Halloween (2016). It's fully autonomous, meaning it can run by itself. I also designed it to connect to my WiFi network when she's near the house and pick up signals from my light show here. The battery boxes on either side are made to fit DJI Phantom 3 LIPo Batteries, which will power the Disco ball continuously for up to 4 hours. The pi Plate can hold a Raspberry Pi 2 or 3, as well as a piece of perf board from Radio Shack, which is used to hold a 74AHCT125 chip from Adafruit. This chip acts as a level shifter, converting 3v to 5v for the GPIO pins on the Raspberry Pi. The USB battery box mesh holds a USB battery pack that powers the Rasperry PI. I used suspended ceiling hangar wire from Home Depot to weld the frame together. The Disco ball is covered in chicken wire and wrapped with ducttape, topped off with aluminum duct tape for a reflective surface. Inside, there are 288 5v WS2811 pixels lighting up the show. The Raspberry Pi runs FPP (Falcon Player) software, which displays the sequence created in xLights and uploaded to the Pi. Power for the LEDs comes from two 12/24v to 5v buck converters available on eBay. To see a walkthrough of the internal wiring, check out this YouTube video: https://www.youtube.com/watch?v=W7BY_xqK81E Here's a nighttime test with my 12 and 10-year-old granddaughters wearing it: https://www.youtube.com/watch?v=79Jr6ZnZTSo If you're interested in building your own Disco ball, here are the parts you'll need: * Drop Ceiling Hangar Wire: http://www.homedepot.com/p/DONN-Brand-12-Gauge-6-ft-Hanger-Wires-50-Pack-207535/100346201 * Raspberry Pi 2 or 3: http://www.mcmelectronics.com/content/en-US/raspberry-pi * 2x Drone Batteries: http://store.dji.com/product/phantom-3-intelligent-flight-battery * 74AHCT125 chip: https://www.adafruit.com/product/1787 * 12/24v to 5v Buck converter: http://www.ebay.com/itm/182036212948 * 6x 50 node WS2811 Pixels: http://www.diyledexpress.com/index.php?main_page=product_info&cPath=42_44&products_id=179 * 2x Foil Tape Rolls: http://www.homedepot.com/p/Nashua-Tape-1-89-in-x-50-yd-322-Multi-Purpose-HVAC-Foil-Tape-1207792/100030120 * Perf Board: https://www.radioshack.com/collections/maker-parts-kits/products/general-purpose-ic-pc-board?variant=20332061061 * USB Battery Pack - You can use a different one, as this is currently discontinued. * Additional supplies: + WiFi Adaptor (for model 2) + uSD card + usb thumb drive for the Pi + 14ga wire + Wire ties + Heat shrink tubing to cover connections + Chicken wire (you'll need some of this, as well as a couple rolls of duct tape) You'll also need welding and soldering skills to complete the project. The software you'll need is FPP - http://falconchristmas.com/forum/index.php?board=8.0 and xLights - http://xlights.org/ The total cost of the costume is around $500, depending on what you have access to and what you must buy. After printing the battery box, you'll need two male F connectors (quick disconnects, flat). Insert wire through the holes in the bottom of the printed box. Crimp and solder the wires to the lugs. Apply a dab of hot glue to the base of the connector and pull the wire back through, pulling the connector into the hole. Twist to align with the blade openings in the battery. This video should help you visualize the battery box: https://www.youtube.com/watch?v=OYVdm-FmvfU Fabricate a small fuse holder using two female F connectors and an ATX 7.5a fuse.
With this file you will be able to print Disco Ball powered by Drone Battery and Raspberry Pi with your 3D printer. Click on the button and save the file on your computer to work, edit or customize your design. You can also find more 3D designs for printers on Disco Ball powered by Drone Battery and Raspberry Pi.