DIY 24VDC laptop power supply
thingiverse
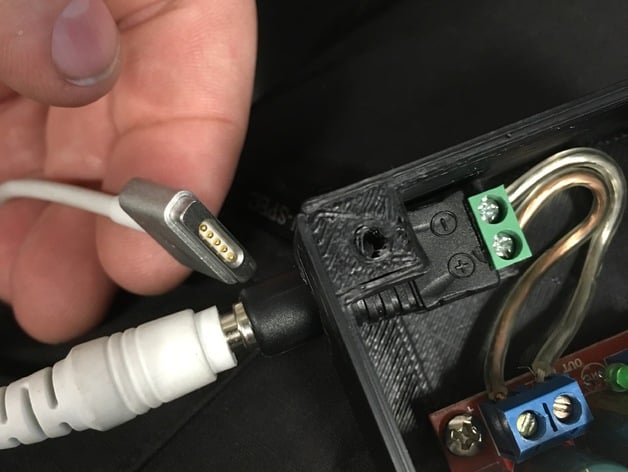
I run the solar power system in my trailer on 24VDC; while I have a converter to let me use 12VDC stuff in it, it's nice to be able to run things off of the 24VDC without using the converter. This is an enclosure that you can use with a few things off of Amazon to make a laptop power supply that works off of 24V. You could probably swap around components and tweak the design to make one that would work off of 12VDC as well -- you'd just need a boost circuit instead of a buck circuit. Anyway, get one of these: http://smile.amazon.com/DROK-Converter-Transformer-Synchronous-Adjustable/dp/B00C9UUFHC or http://smile.amazon.com/dp/B00C4QVTNU Then get a plug for it: http://smile.amazon.com/Ksmile%C2%AE-Female-2-1x5-5mm-Adapter-Connector/dp/B015OCV5XO Connect the power on the "in" and use a voltmeter to measure the voltage on the "out" -- use a screwdriver to adjust the blue potentiometer (next to the "out") until the voltage is where you want it. 19V is probably safe for about anything; if you want, though, look at your laptop power supply and see what the output voltage of that is and adjust it to that voltage. My macbook pro magsafe 2 power supply says 20V on it, so I set it to that. YMMV and use at your own risk =] You'll need one pair of wires for input power -- 24VDC. Run it in through the hole on one end of the box and then connect it to the "in" terminals on the stepdown converter. Tie a knot in the wire close enough to the regulator board that it will fit in the case, but far enough to provide stress relief (the knot won't go through the hole). Take one of the plug / receiver parts from the second link above and connect ~4 inch long wires from + to + and - to -. Make sure you don't cross them! That would be bad. You may have to use a razor knife to open up the hole on the side a bit, but at this point stick the narrowest part of the plug out through the hole and push all the way through until you can push it down so it is held by the small protrusion from the bottom of the case. It should be directly below the green plugs and will hold it in place (see the pictures). Screw down the board using standard computer hard drive screws or similar (those just happen to fit -- adjust the size in the openscad file if you need to) so it doesn't go anywhere. Test everything before you install the lid; I used #6-19 1/2" long screws (http://smile.amazon.com/Thread-Rolling-Plastic-Finish-Phillips/dp/B00GDXT716) to attach the lid. There are a few ways to get the adapters from this box to your laptop. If you need a magsafe 2 plug, get one of these: http://smile.amazon.com/Connector-DC-MagSafe-Cable-5-5x2-5mm/dp/B00JQ4I4D6 If you have a jump start battery, such as http://smile.amazon.com/Emergency-Road-Battery-Starter-Charger/dp/B016KVONGY, the laptop power adapters from those will work. You can probably find them singly somewhere as well; I haven't needed to look, 'cause I have 4 of those type of batteries and each came with adapters =] Good luck! Print Settings Printer Brand: LulzBot Printer: TAZ 5 Rafts: No Supports: No Resolution: 0.25 layer height Infill: 20% Notes: I'd make your shell thickness a little thicker than normal -- at least 1.5mm. That's just for strength; this prints pretty cleanly, though, and it's very strong. There are a lot of improvements that could be made to the model; you could reduce the amount of wasted space inside with just a little bit of work. I just got what I needed and decided to be done for now =] Maybe on a future remix (like if I ever do the 13.8v adapter) I'll do it.
With this file you will be able to print DIY 24VDC laptop power supply with your 3D printer. Click on the button and save the file on your computer to work, edit or customize your design. You can also find more 3D designs for printers on DIY 24VDC laptop power supply.