DIY $42 FPV Goggles for RC Quadcopters or Planes
thingiverse
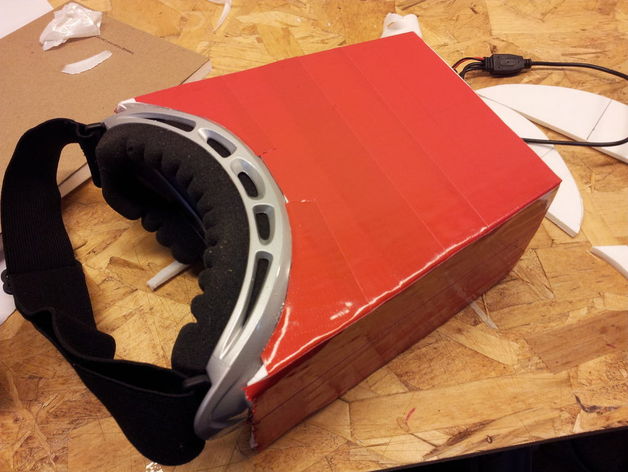
In my opinion the best way to enjoy FPV is with video goggles. Sadly the cheapest FPV goggles out there is around $150. $150 I don't have. So i came up with a solution! A DIY pair you can make for $42! Sure the experience isn't as great as what you would get from a Fatshark or other high end FPV goggles, but its definitely worth the 42 bucks! The goggles consist of a 4.3 inch LCD screen, Foam board, Ski Goggles, and Duct tape (color) LCD: http://www.banggood.com/Wholesale-4_3-Inch-LCD-Car-Rearview-Monitor-with-LED-Blacklight-for-Camera-DVD-p-63953.html?p=KX28152008068201507H 15.99 SKI GOGGLES: http://www.banggood.com/WOLFBIKE-Riding-Glasses-Ski-Goggles-Motorcycle-Windproof-Glasses-p-1018141.html?p=KX28152008068201507H ($5.94) RECEIVER: http://www.banggood.com/Eachine-FPV-5_8G-32CH-Wireless-AV-Receiver-RC832-p-975426.html?p=KX28152008068201507H ($19.99) Step 1: Parts / Materials Parts: 4.3 Inch LCD screen - $15.99 (I got mine here)http://www.banggood.com/Wholesale-4_3-Inch-LCD-Car-Rearview-Monitor-with-LED-Blacklight-for-Camera-DVD-p-63953.html?p=KX28152008068201507H Ski Goggles or 3D glasses - i got mine from Wm- around $15 Bucks but you can pick this, which is better (save money and material) 1st option http://www.banggood.com/WOLFBIKE-Riding-Glasses-Ski-Goggles-Motorcycle-Windproof-Glasses-p-1018141.html?p=KX28152008068201507H ($5.94) 2nd option (can skip some steps if you buy these) http://www.banggood.com/ColorCross-Virtual-Reality-3D-Video-Glasses-For-46-inch-Smartphones-p-958588.html?p=KX28152008068201507H ($13.99) 3rd option (can skip some steps if you buy these) http://www.banggood.com/Xiaozhai-Z3-BOBOVR-VR-Box-3D-Google-Glasses-Virtual-Reality-Movie-Video-Game-for-46-Inch-Smartphone-p-1020539.html?p=KX28152008068201507H ($14.99) Materials: Dollar tree foam board Hot Glue and glue gun Duct tape (any color you want) Tools: Hobby Knife Straight edge Pencil Step 2: Screen Distance Determining the distance the screen is from your face is critical!! For everybody the distance may be different depending on the users eyesight. Place the screen in front of your face and find a distance you like. Then take a ruler and measure how far it is from your nose to the front of the screen. Record the measurement. In my case i liked 3 1/2 in Step 3: Constructing the Screen Housing Start by popping out the lens of the ski goggles. Trace the top part of the goggles onto the foam board, find the middle of the Goggles and draw a straight line out. (Make sure you use a square) From the leading edge of the goggles measure out the distance you want the screen (step 3's measurement) Find the length of the screen and center it on the line(picture 5) Then find the width of the screen and and add that measurement from the line where the screen would sit. Draw another line where the back of the screen would be. (the same length from Picture 5) From the corner of the goggles to the very far line Draw a line with a straight edge.(Picture 8) Do the same on the other side. Make notches on the line that was just drawn. The notches should be 1 cm deep and 1 1/4 inch long, space the two with another inch. Duplicate on the other side and make sure the distance from the corner of the goggles to first notch is the same. (notches may be different depending on the distance you choose the screen to be) Cut the piece out and trace it onto foam board. Cut the piece out. Sides: First find the height of the screen and add 1/8 of an inch. Then find the length of the base board. (the tapered side) Make a square with the two measurements that you just acquired.(Don't cut out yet) Lay the base board next to the side and make marks on where the notches are. The notches on the side board should come out NOT in! Cut it out, trace it, and cut that one out. Step 4: Gluing and Tape Now glue all the piece together to construct the housing. Add strapping tape or packaging tape on the edges. Test fit the screen and if there is a gap cut a piece of foam board out and glue it the housing. Bevel the edges of the housing as in Picture 6 Glue the top of the housing to the goggles. The bottom of the goggles may not fit. I used one of the rounded edges that was cut out previously from the top or bottom base boards. I then removed the paper from the inner side to make it more flexible. Glue it in along with the bottom of the goggles. Make a notch for your nose if needed Step 5: Duct Tape and Mounting the Screen Cover the housing in duct tape for color and to make the inside darker for better Video footage. Stark with the top, then the bottom, and then the sides. Glue the LCD display in with a bead of glue! Give it a test! Step 6: Done! Now enjoy the feeling of flying like never before!! Thanks and enjoy with the cheapest FPV googles! How I Designed This Step 1: Parts / Materials Parts: 4.3 Inch LCD screen - $15.99 (I got mine here)http://www.banggood.com/Wholesale-4_3-Inch-LCD-Car-Rearview-Monitor-with-LED-Blacklight-for-Camera-DVD-p-63953.html?p=KX28152008068201507H Ski Goggles or 3D glasses - i got mine from Wm- around $15 Bucks but you can pick this, which is better (save money and material) 1st option http://www.banggood.com/WOLFBIKE-Riding-Glasses-Ski-Goggles-Motorcycle-Windproof-Glasses-p-1018141.html?p=KX28152008068201507H ($5.94) 2nd option (can skip some steps if you buy these) http://www.banggood.com/ColorCross-Virtual-Reality-3D-Video-Glasses-For-46-inch-Smartphones-p-958588.html?p=KX28152008068201507H ($13.99) 3rd option (can skip some steps if you buy these) http://www.banggood.com/Xiaozhai-Z3-BOBOVR-VR-Box-3D-Google-Glasses-Virtual-Reality-Movie-Video-Game-for-46-Inch-Smartphone-p-1020539.html?p=KX28152008068201507H ($14.99) Materials: Dollar tree foam board Hot Glue and glue gun Duct tape (any color you want) Tools: Hobby Knife Straight edge Pencil Step 2: Screen Distance Determining the distance the screen is from your face is critical!! For everybody the distance may be different depending on the users eyesight. Place the screen in front of your face and find a distance you like. Then take a ruler and measure how far it is from your nose to the front of the screen. Record the measurement. In my case i liked 3 1/2 in Step 3: Constructing the Screen Housing Start by popping out the lens of the ski goggles. Trace the top part of the goggles onto the foam board, find the middle of the Goggles and draw a straight line out. (Make sure you use a square) From the leading edge of the goggles measure out the distance you want the screen (step 3's measurement) Find the length of the screen and center it on the line(picture 5) Then find the width of the screen and and add that measurement from the line where the screen would sit. Draw another line where the back of the screen would be. (the same length from Picture 5) From the corner of the goggles to the very far line Draw a line with a straight edge.(Picture 8) Do the same on the other side. Make notches on the line that was just drawn. The notches should be 1 cm deep and 1 1/4 inch long, space the two with another inch. Duplicate on the other side and make sure the distance from the corner of the goggles to first notch is the same. (notches may be different depending on the distance you choose the screen to be) Cut the piece out and trace it onto foam board. Cut the piece out. Sides: First find the height of the screen and add 1/8 of an inch. Then find the length of the base board. (the tapered side) Make a square with the two measurements that you just acquired.(Don't cut out yet) Lay the base board next to the side and make marks on where the notches are. The notches on the side board should come out NOT in! Cut it out, trace it, and cut that one out. Step 4: Gluing and Tape Now glue all the piece together to construct the housing. Add strapping tape or packaging tape on the edges. Test fit the screen and if there is a gap cut a piece of foam board out and glue it the housing. Bevel the edges of the housing as in Picture 6 Glue the top of the housing to the goggles. The bottom of the goggles may not fit. I used one of the rounded edges that was cut out previously from the top or bottom base boards. I then removed the paper from the inner side to make it more flexible. Glue it in along with the bottom of the goggles. Make a notch for your nose if needed Step 5: Duct Tape and Mounting the Screen Cover the housing in duct tape for color and to make the inside darker for better Video footage. Stark with the top, then the bottom, and then the sides. Glue the LCD display in with a bead of glue! Give it a test! Step 6: Done! This is final product, you can decorate it however you want. Now enjoy the feeling of flying like never before!! Thanks!
With this file you will be able to print DIY $42 FPV Goggles for RC Quadcopters or Planes with your 3D printer. Click on the button and save the file on your computer to work, edit or customize your design. You can also find more 3D designs for printers on DIY $42 FPV Goggles for RC Quadcopters or Planes.