DIY Filament Dehydrator Oven
thingiverse
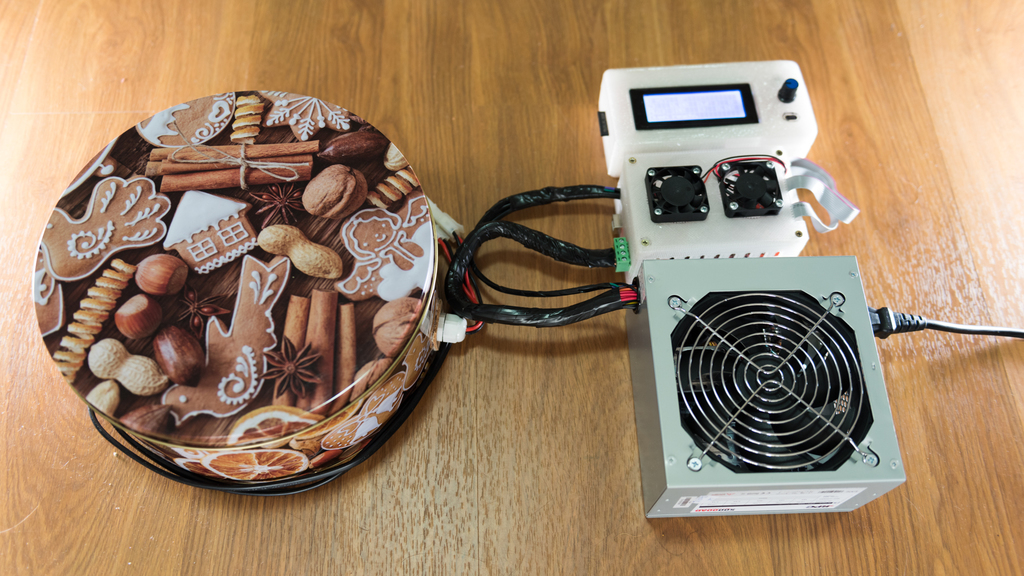
Why buy a dehydrator and spend time modifying it if you already own everything needed to build your own [ fancy / overkill / g-code driven ] filament dehydrator oven ? Needed parts : - 1 x arduino mega 2560 r3 board - 1 x ramps 1.4 board - 1 x 2004 LCD with encoder and SD card slot - 2 x 40 mm 12V fans - 1 x 500W ATX power supply - two pairs of mini tamyia connectors with 10mm silicone wire - two pin dupont connector with 20cm of red/black wire - for powering fans - three pin dupont connector with 20cm of red/back/yellow wire - for controlling the ATX power supply - 1 x 100k NTC thermistor - 1 x MK2Y 220mm round 12V PCB heated bed - 3 x M3x10 bolts - for securing the heatbed - 3 x M3 nuts - for securing the heatbed - 6 x M3 washers - for securing the heatbed - 4 x countersunk wood screws for the ramps case lid - 4 x countersunk wood screws for the lcd case - 1 x FAT32 formatted SD card - for running g-code - 1 x 3D printed case for arduino + ramps - 1 x 3D printed lcd case (https://www.thingiverse.com/thing:35438) - 1 x round cookie box (big enough to fit the 220 mm heatbed and one spool of filament) - 1m of 12 AWG wire - 1 x self tightening electrical connector (heat resistant) Needed tools & materials: - wire strippers - wire insulation - soldering tool - soldering wire - 2 mm thick cork sheet - glue - drilling machine Needed skills: - basic electronics understanding - basic soldering skills - time and patience Programming : - arduino 1.8 (https://www.arduino.cc/en/Main/Software) - the firmware (https://www.thingiverse.com/download:4089572) Assembly : - This is more or less 3D printer hardware and if you ever assembled a kit you know already what needs to be done. - Pay attention to electrical wiring / soldering and also for good performance to insulation of the cookie box. Please do not solder wires that will be tighten down with screws ! Also use the mini tamyia connector pairs inverse one from another so you don't accidentally mismatch the thermistor with the 12V heating power. - The firmware is a little bit modified for aesthetics reasons, but otherwise a standard Repetier v 0.92.9 which i've chosen over Marlin for ease of web configuration. - Don't forget to PID calibrate the heatbed which is done on Repetier firmware with : "M303 P1 S70 R8" for 8 cycles at 70 degrees. - On the file section you will find also a zip file (https://www.thingiverse.com/download:3913246) with a demo 1m g-code sample and also 1h 2h 4h g-code samples to dry your filament at 70 degrees Celsius. Power draw : - min : idle ATX power supply off, fans off : 1.5W - max : heating up at full power : 100W (the first 2-3 minutes) - med : PID controller stabilized heating : ~ 40W (the rest of the process) Results : - initial ambient humidity : 40% - 4h for one spool of ABS : 15% humidity - 8h for one spool of ABS : 10% humidity Humidity was monitored with an arduino connected to 2 x DHT11 + 2 x DHT22 sensors.
With this file you will be able to print DIY Filament Dehydrator Oven with your 3D printer. Click on the button and save the file on your computer to work, edit or customize your design. You can also find more 3D designs for printers on DIY Filament Dehydrator Oven.