DIY Headphone inspired by Aurorus Audio Borealis/Australis
thingiverse
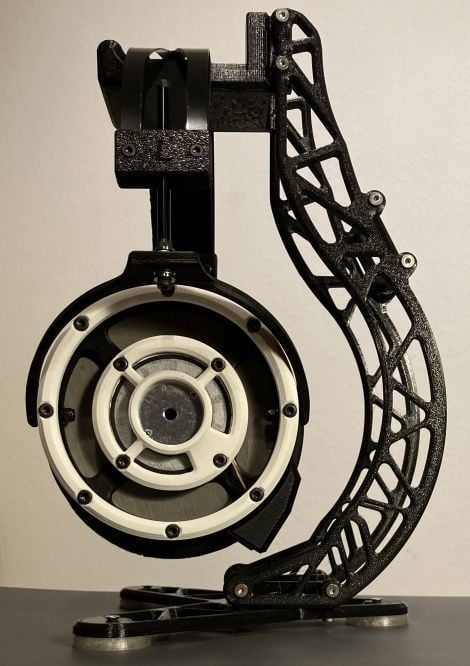
DIY Headphone inspired by Aurorus Audio Borealis/Australis A big thanks goes out to u/mwildebeast for the inspiration u/Meteroson for the idea to use F3-8M thrust-bearings Aurorus Audio and sleepdeprecation from thingiverse for the headband design. I´ve created this one from scratch to fit bigger earpads (pad ring diameter 105 mm - old AKG pads 105 mm; Brainwavz XL pads 110 mm) and to use some smaller screws (M2 + M3). At the moment the Brainwavz XL velour pads are my favourite ones. Flat bass response with mellow highs. Can´t believe how good these 10$ cheap drivers are. The headband design is still a little bit jittery :) Otherwise these cans are very comfortable. Total weight for the open version without cable is only 325 gram with non existing pressure on head and ears. What you need?! In total for both cups: - 8 x M4 Nylon Washers (1 mm thick) - 4 x 11 mm long PTFE tube 3x4 mm diameter for hinge > see picture - 2 x 4 mm long PTFE tube 3x4 mm diameter for hinge > see picture - some mesh as front grill for driver protection - some mesh as damper between the printed parts. I´ve used 400. - 2 x 60 mm standoffs with M3 thread; outer diameter 5 mm. - 220 mm strap as headband (1 - 1,5 mm thick; 32 mm width) - metal head bow from Beyerdynamic (DT770; DT880; DT990) - 2 x F3-8M thrust-bearings and some Loctite - Blu Tack for driver (2 x 1 gr) and front grill (2 x 0.8 gr); each 157 mm long > see picture - 2 x 3.5 mm audio jack (8 mm outer diameter with 6 mm thread/screw > see picture) - 30 cm thin wire - 2 x 50 mm drivers from Peerless or equal - Brainwavz XL pads Screws (in total for both cups) - 4 x 6 mm M3 (audio jack) - 8 x 6 mm M3 (pad ring) - 8 x 6 mm M2 (pad ring) - 8 x 6 mm M3 (driver clamp) - 8 or 16 x 6 mm M3 (outer ring) - 16 x 8 mm when using closed plate - 4 x 10 mm M3 (headband) + 4 M3 nuts - 4 x 16 mm M3 (hinge) - 2 x 22 mm M3 for standoff (20 and 25 mm should also work and depends if you will use a locknut or not - i´ve used one with approx. 3.5 mm thickness and some Loctite) - 6 x M3 locknut Print settings: i´ve printed all parts in 0.2 mm layerhight with 20% infill and support. I hope/think thats all for now. For private use only! Remixes are welcome. If you have some ideas please share them with the community - use the REMIX button. The CAD files were created with Fusion 360. The software is free for private use. If you are not sure how to assemble the phones, check the files in Fusion using the Inspect feature. Have fun! Update 22.11.2021 added Rendered DIY Borealis Exploded for Assembly (thanks to cosworthq / oneshotofmartini for creating these)
With this file you will be able to print DIY Headphone inspired by Aurorus Audio Borealis/Australis with your 3D printer. Click on the button and save the file on your computer to work, edit or customize your design. You can also find more 3D designs for printers on DIY Headphone inspired by Aurorus Audio Borealis/Australis.