DIY high power UV cure box
thingiverse
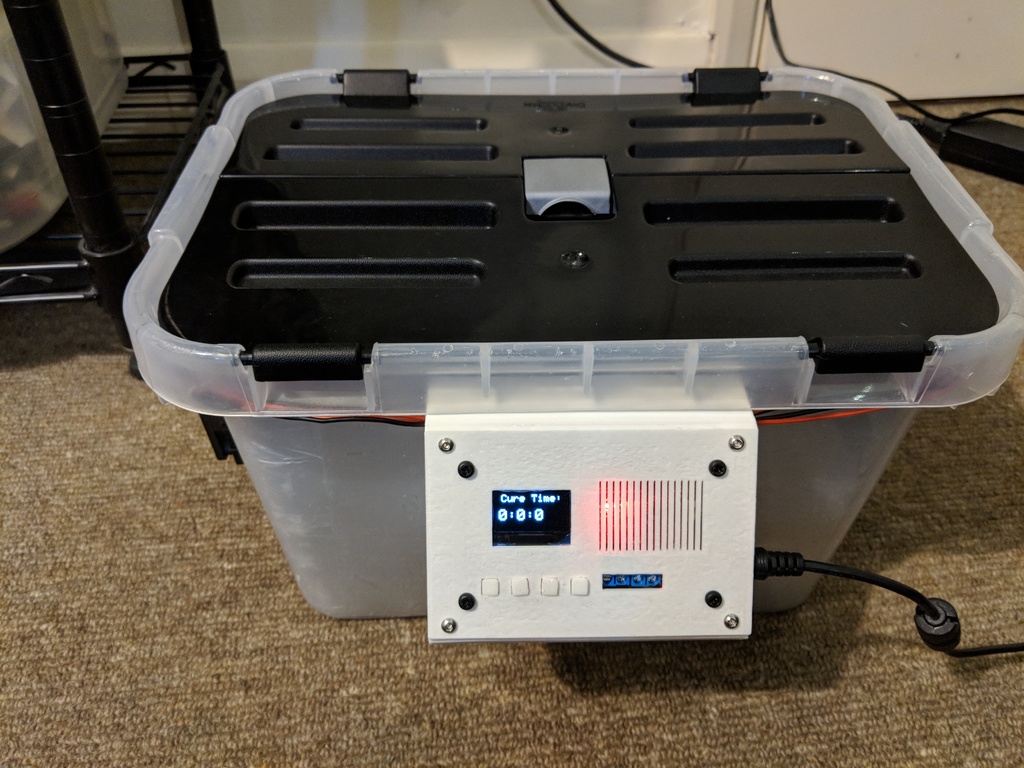
Hi all, I decided to make my own UV cure box for my Wanhao Duplicator 7 printer. It uses two 30W leds to quickly post cure the part from a resin based 3D printer. The cure box uses an Arduino to automate the cure process, so that you can set a time for the cure, and it will automatically shut off the leds when the time runs out. That isnt really necessary though, you could just mount the leds and drivers to the box and turn it off and on manually. I am uploading the files and code I used for this project so people are free to modify it or make one as they please. Also please not that this project and the files are far from perfect, there might be some mistakes, and the tolerances I used might not be right for your printer. There is also a bug in the code I've written which makes the piezo buzzer beep twice if you end a cure early. Not a big deal, but a bit annoying. Parts used: Box: I found this "dragon 10L storage box" at my local shop (Wilko in the UK). It is plenty big to fit lots of parts or another plastic container to put water in, if you like to cure in water. To increase reflection and block the light eascaping fromt he box, I used some reflective tape on the inner walls of the box. https://www.ebay.co.uk/itm/Hydroponics-Mylar-Sheet-Alu-Tape-Reflective-Heat-Proof-Self-Adhesive-Grow-Room-/262180134639?hash=item3d0b275eef http://www.wilko.com/plastic-storage/dragon-storage-box-10-litre/invt/0447636 Hardware: All the mounting is done with m3 sized hex head bolts/screws and m3 nuts. I used a few different lengths to keep things tidy. Leds: I used two high power 30W leds I got from Aliexpress. This is definetly the most expensive part of the project, but it is good to spend a bit on low quality, but decent leds, as some you find on Ebay Or Aliexpress are very bad quality. You also need a constant current driver for the leds. The one linked is plenty powerful for the two leds in Parallel https://www.aliexpress.com/item/UV-Purple-LED-Ultraviolet-Bulbs-Lamp-Chips-365nm-375nm-380nm-385nm-395nm-400nm-405nm-3W-5W/32836018477.html?spm=a2g0s.9042311.0.0.pnRLq7 https://www.ebay.co.uk/itm/DC-Boost-Step-up-Converter-Constant-Current-Power-Supply-LED-Driver-250W-10A/252500569378?epid=867291999&hash=item3aca34ed22:g:Xa0AAOSw2MJZeVZj Cooling: You will need to cool the leds if you want to run them past a few watts, so I used a cheap cpu cooler from Amazon. I also used a spare 70mm fan to cool the electronics, but it might not be neccesary. Heatsink, Amazon search B00006B8CO (model: TX3, style: 7/370) Other Electronics: I used an Arduino nano, 128x64 0.96" i2c OLED, FDD6670A mosfet, and 4 tactile push buttons. You can find these all very easily on Ebay, except for maybe the mosfet. I used the FDD6670A since that is what I had on hand, but you could substitute something different. The circuit I made uses 12v to power the Arduino, which controls the mosfet to switch the 12v to the boost converter and fans. I don't have time to completely explain the circuit so you will need to have some experience with Arduino/electronics.
With this file you will be able to print DIY high power UV cure box with your 3D printer. Click on the button and save the file on your computer to work, edit or customize your design. You can also find more 3D designs for printers on DIY high power UV cure box.