DIY Life-Size Terminator Arm Lamp
prusaprinters
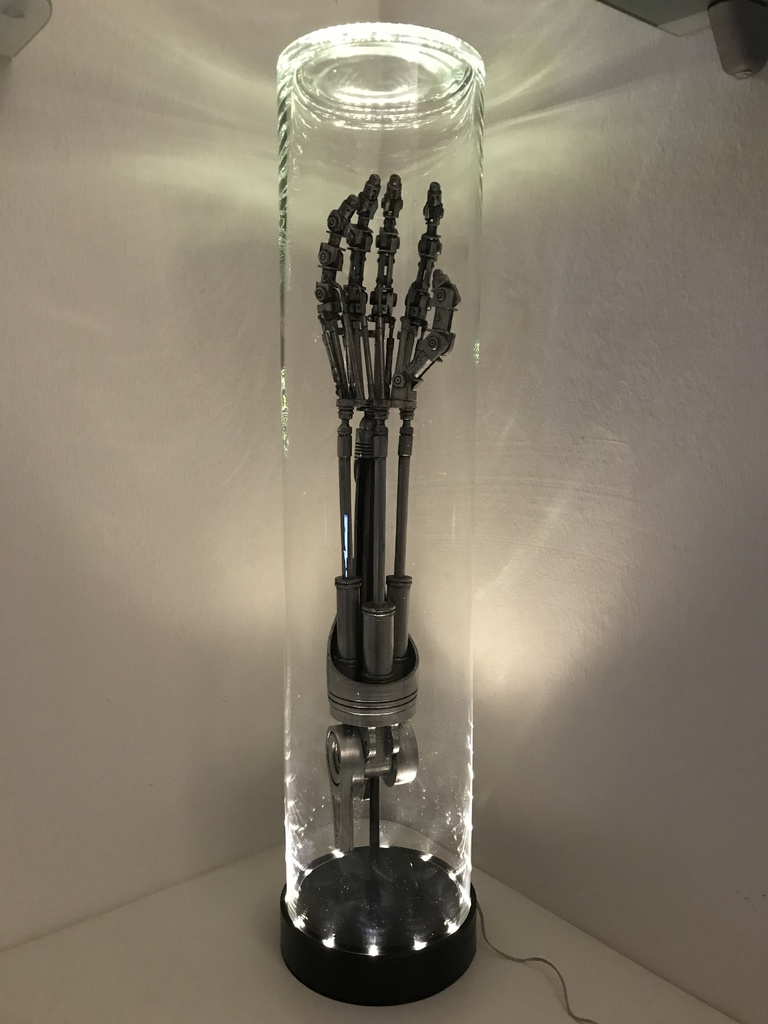
<p>First of all. Thank you nracmo (<a href="/nracmo/about">https://www.thingiverse.com/nracmo/about</a>) for the design! I have cleaned up a couple of parts, redesigned some of them to fit my need and raised the resolution. Further more i have designed a stand for the arm.</p> <p>The arm is based on the second terminator movie.</p> <p>If you like my work feel free to tip a small amout. It would help significant.</p> <p>.......................................................................................................................................</p> <p>Update 10.06.2018</p> <p>Fixed an error in hand.stl which could result in holes on the tip of the piston for the middle finger. (Thanks 3D_ProtoPrinting -> <a href="/3D_ProtoPrinting/about">https://www.thingiverse.com/3D_ProtoPrinting/about</a>)</p> <p>.......................................................................................................................................</p> <p>Update 16.06.2018</p> <p>Due to some difficulties people had with the files hand_tubes.stl and arm_rods.stl. I have added split versions of the two files.</p> <p>If you still have problems with a tube try to lower the speed by 50% to allow the print to cool more and use a raft.</p> <p>(Thanks LordGrantham -> <a href="/LordGrantham/about">https://www.thingiverse.com/LordGrantham/about</a>)</p> <p>.......................................................................................................................................</p> <p>Update 11.07.2018</p> <p>Check out the Tronxy X5SA Review by Nexi-Tech (<a href="/Nexi-Tech/about">https://www.thingiverse.com/Nexi-Tech/about</a>). You can see the lamp in action in his video! ;D <a href="https://www.youtube.com/watch?v=Pq3qjdaRnuY&t=1123s">https://www.youtube.com/watch?v=Pq3qjdaRnuY&t=1123s</a></p> <h3>Print Settings</h3> <p><strong>Printer:</strong></p> <p>anycubic i3 mega</p> <p><strong>Rafts:</strong></p> <p>No</p> <p><strong>Supports:</strong></p> <p>Yes</p> <p><strong>Resolution:</strong></p> <p>0.3mm - 0.1mm</p> <p><strong>Infill:</strong></p> <p>10%</p> <p><strong>Notes:</strong></p> <p>Choose the resolution depending on the parts. I have printed the big parts in a low resolution and the small parts (fingers, hand) in a high resolution to keep the details.</p> <h3>Post-Printing</h3> <p>You need the following to build yourself a terminator arm lamp!</p> <ul> <li>this 3d printed parts</li> <li>ikea CYLINDER vase (height 68cm, diameter 16cm)-> <a href="https://www.ikea.com/de/de/catalog/products/60223328/">https://www.ikea.com/de/de/catalog/products/60223328/</a></li> <li>ikea lighting chain SÄRDAL -> <a href="https://www.ikea.com/de/de/catalog/products/60277514/">https://www.ikea.com/de/de/catalog/products/60277514/</a></li> <li>nails with a round head and 2mm diameter</li> <li>a 160mm long rod with a 8.6mm diameter that is strong enough to hold the hand</li> <li>superglue</li> <li>sanding paper</li> <li>primer</li> <li>chrome spraypaint</li> <li>black spraypaint (for the base)</li> <li>black shoe cream</li> <li>optional: a cable with a interesting structure (i did not use it on my arm)</li> </ul> <p>Nip off the heads from the nails. You need the heads for the fingers.</p> <p>I have glued the parts with hotglue to some cardboard sheets to make the first primer round easier.</p> <p>The process of priming and sanding was as following:</p> <p>2 layers of primer</p> <p>sanding</p> <p>3 layers of primer</p> <p>sanding</p> <p>4 layers of primer</p> <p>final sanding</p> <p>I have tried to name the files acording to their groups.</p> <p>The fingers were fixed with nails to the hand.stl. Nails were also used with the red pistons and the hand. As well as the turquoise colored small rods. The nails were also used to fix the red washers to the fingers and to close the holes.</p> <p>After the parts where glued. The arm was spray painted with 2 layers of chrome spray paint.</p> <p>The LEDs were installed in the base and fixed with some hot glue and zip tie.</p> <p>The stand_*.stl parts where glued together afterwards.</p> <p>Finaly the arm received a washing with black shoe cream.</p> <p>Just mix some black shoe cream with water until it is very liquid. Apply it on the model and wait for a couple of minutes. After that take a tissue and rub the cream from the model. That way the black polish will stay in the cavitys and the arm receives more depth.</p> <p>Just google "prop weathering wash" for tutorials.</p> <p>The hardest part on the whole build is to clean the vase. Damn you fingerprints and smudges!!! :D</p> <p>If you reached this point:</p> <p>Congratulations fine sir or lady. You are a proud owner of a terminator arm lamp! Enjoy!</p> Category: Decor
With this file you will be able to print DIY Life-Size Terminator Arm Lamp with your 3D printer. Click on the button and save the file on your computer to work, edit or customize your design. You can also find more 3D designs for printers on DIY Life-Size Terminator Arm Lamp.