DIY Mini Air Purifier
prusaprinters
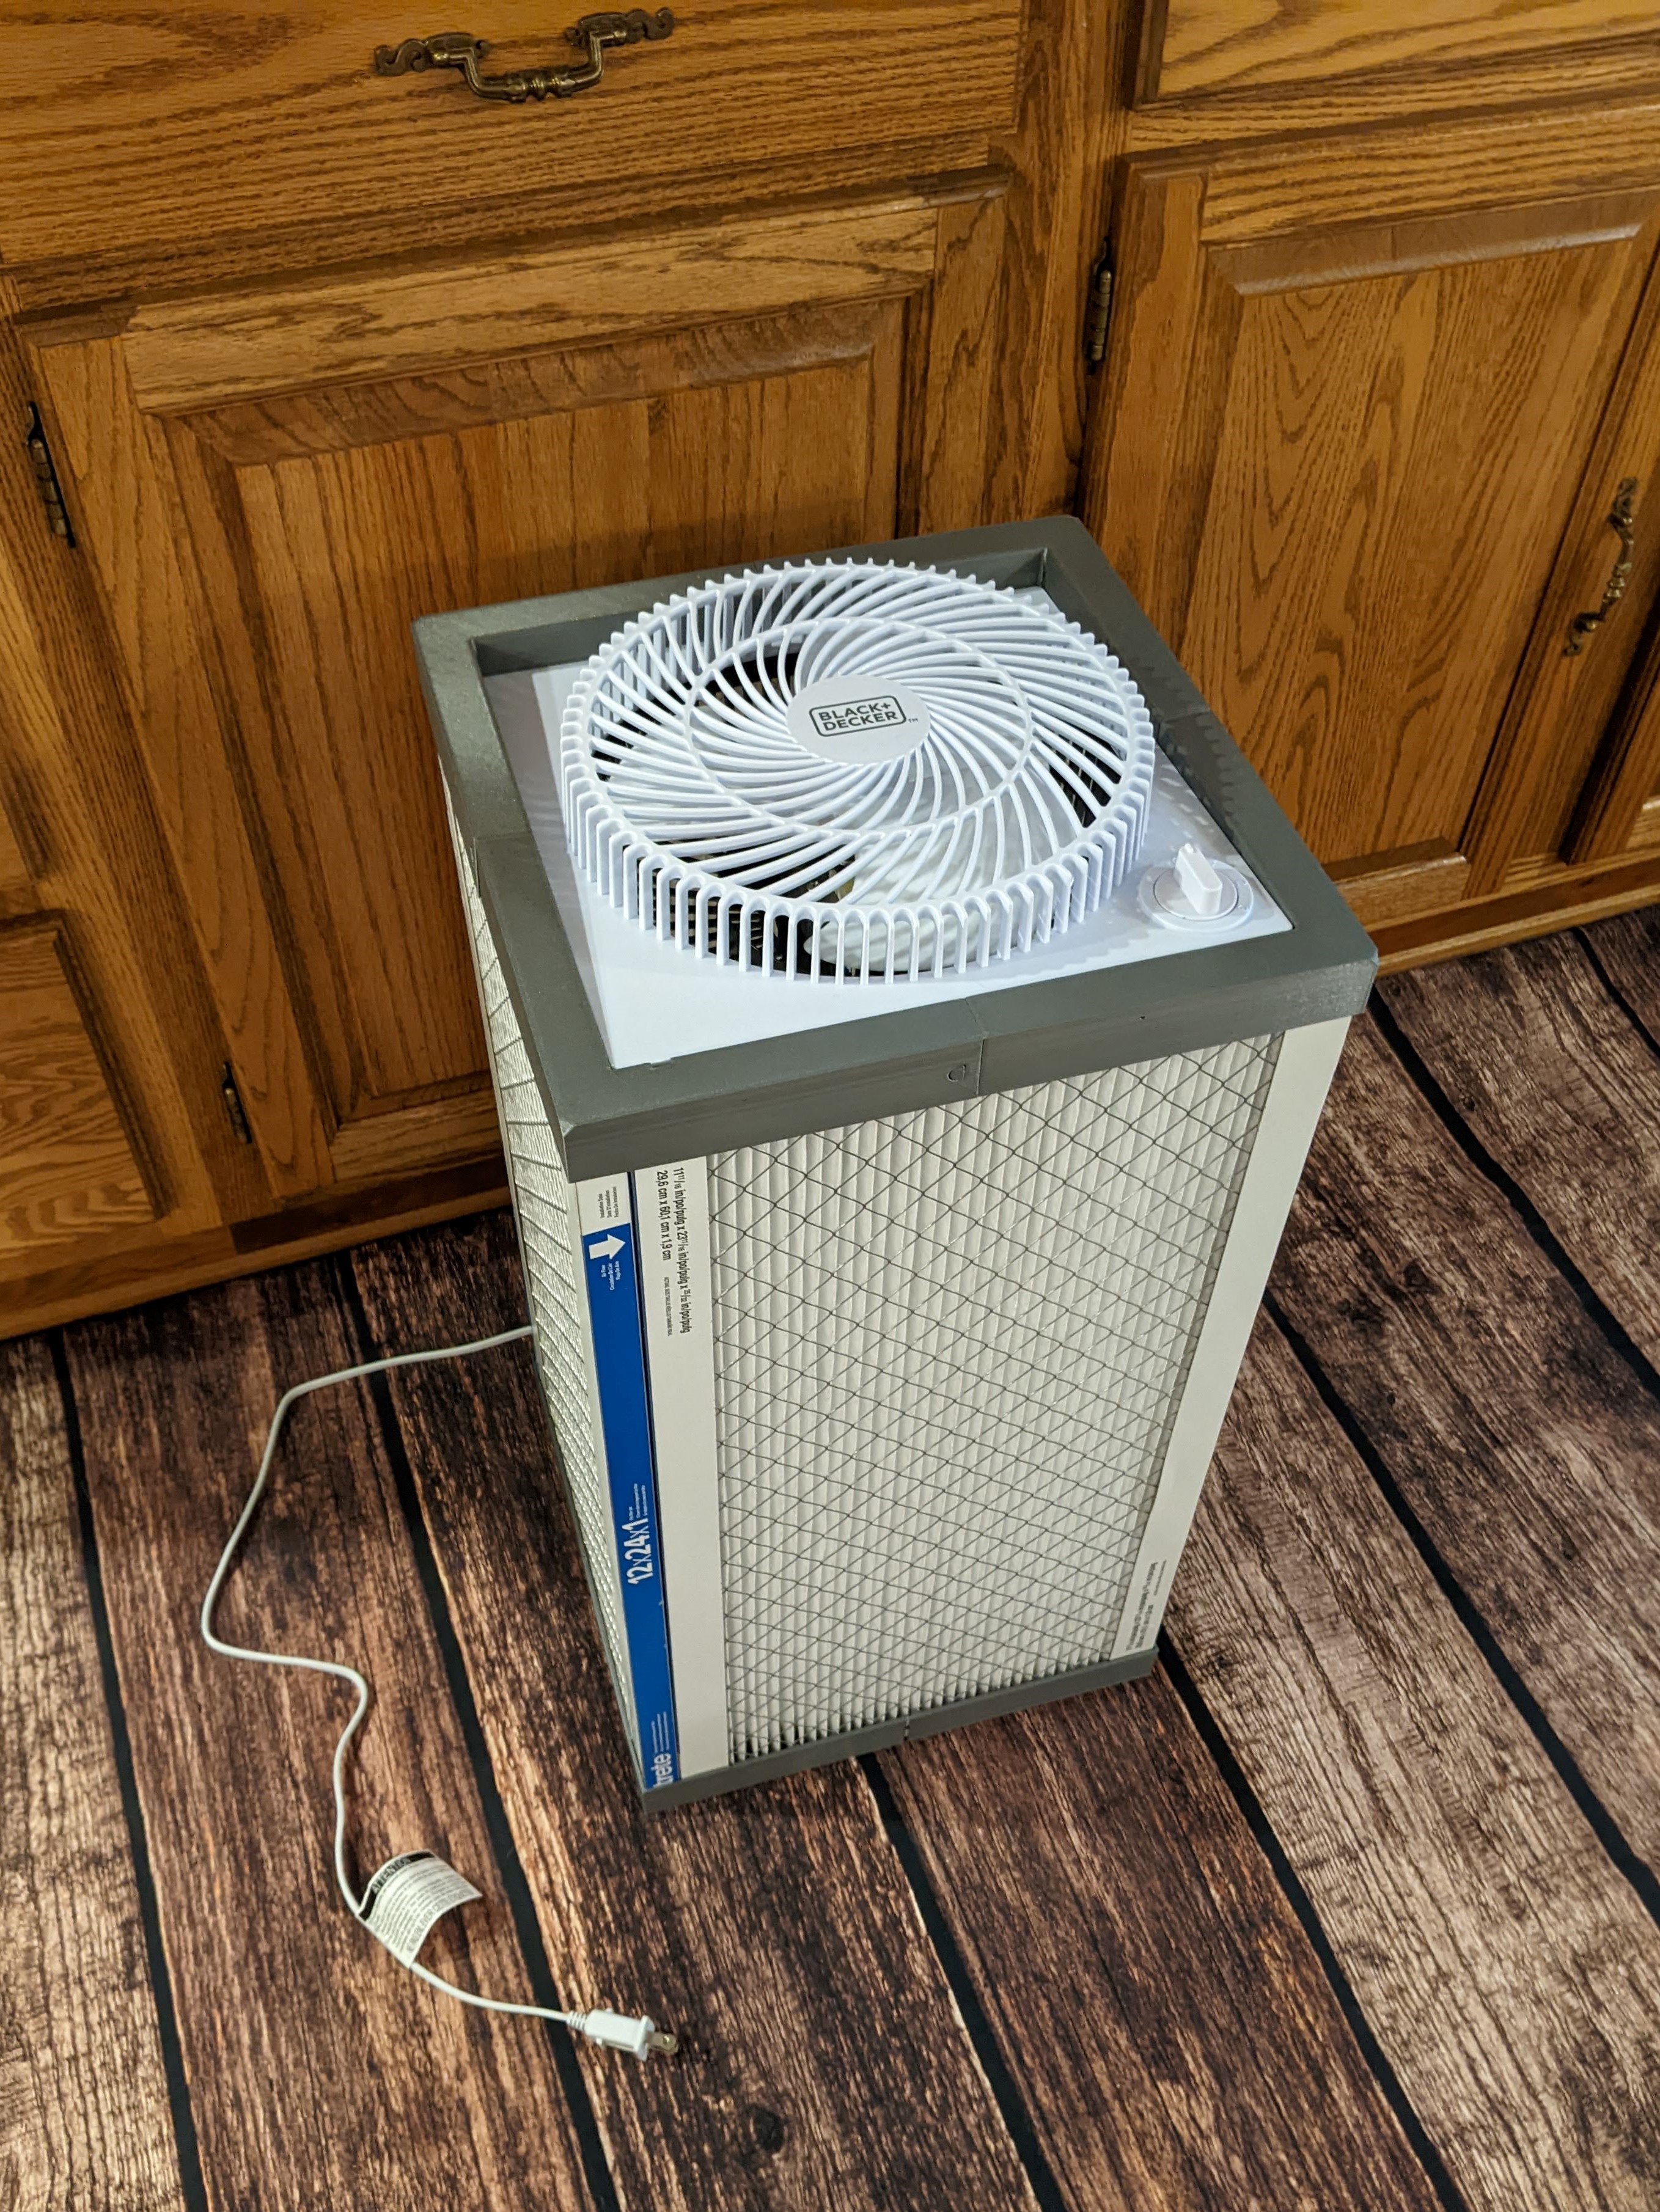
<h4>Background</h4><p>Included are files for 8 bracket pieces that print without supports and connect without fasteners or glue. Along with a fan and 4 furnace filters they can be used to create a mini <a href="https://en.wikipedia.org/wiki/Corsi%E2%80%93Rosenthal_Box">Corsi-Rosenthal Box</a>. (Standard C-R Boxes use a 20 inch box fan and 20 inch filters.) This C-R box can be used to filter the air in a small to medium size room, removing contaminates such as smoke, virus carrying particles, wood dust, etc. depending on the type of filter media used.</p><p>Typically Corsi-Rosenthal boxes are constructed using tape to connect the filters to the fans and base. Inspired by <a href="https://twitter.com/haussamen/status/1488163457933344772?s=20&t=TUB-MSJ4TaSZlcoKAEHjjw">Heath Haussamen's tweet</a>, I thought it would be fun to make some 3D printable brackets to construct a similar mini version. I wanted to make my version easy assemble and disassemble and allow use of the fan by itself when filtering was not needed. It also makes changing filters very straight forward.</p><p>Using four US standard 12x24x1 inch filters you can create a tall version, 12x20x1 for a medium version, and 12x12x1 creates a little cube.</p><h4>Results</h4><p>It turned out better than I expected, and has some nice airflow for its size while being very quite. Also, the fit with the 3M filters is good enough that I'm not sure I even need to tape the sides of the filters together.</p><h4>BOM</h4><p>I used four 12x24x1 inch MERV 13 <a href="https://www.amazon.com/gp/product/B06WP6CY4G/ref=ppx_yo_dt_b_asin_title_o01_s00?ie=UTF8&th=1">3M Filtrete MPR1900 filters</a> for my tall version but this should fit other brands. It is recommended to use MERV13 or higher for virus carrying particles. </p><p>The fan is a <a href="https://www.amazon.com/gp/product/B06WP6CY4G/ref=ppx_yo_dt_b_asin_title_o01_s00?ie=UTF8&th=1">Black & Decker 9in Mini Box Fan, Model BFB09W</a>.</p><h4>Cost</h4><p>At the time of writing this the total cost is the same for each of the 3 versions as the different sized filters are all priced the same. I went with the larger filters as I plan to put this on the floor of our bedroom. I don't think the larger size will filter more air per minute, but the filters should last longer and it should be quitter. The 12x12x1 version is great for portability.</p><ul><li>Fan: $17.50</li><li>3M Filtrete MPR1900 MERV13 Filter 2-Pack: $38, Qty2: $76</li><li>PETG Filament: $12 @ $20/Kg</li><li><strong>TOTAL COST: $105</strong></li></ul><p>Similar sized air purifiers run anywhere from $150 to $300 so this seems like a reasonable DIY project. Also, I'm using higher cost filters. You can buy MERV13 filters for about half the cost if you look around, so closer to $70-$75.</p><h4>References</h4><p>https://www.texairfilters.com/a-mini-corsi-rosenthal-box-air-cleaner/</p><h4>Printing</h4><p>I recommend using PETG or ABS for these brackets as they need to flex. When the fan is inserted it bends the inner walls of the upper brackets to create a good seal and make the dimensions work so the filters create a perfect square.</p><h5>Recommended Printing Parameters</h5><ul><li>Material: PETG</li><li>Nozzle Size: 0.6mm</li><li>Layer Height: 0.3mm</li><li>Supports: None</li></ul><h4>Assembly</h4><h5>Base</h5><p>Slide the two quarters base pieces together guiding the two tabs through the first slots, over the retaining nubs, and under the second slots. Once in place these are a little tricky to remove so take your time and assemble on a flat surface. Make sure the side tab is on the correct side of the mating piece as well. Do this again with the remaining two quarters to create the second half. Slide the two halves together similar to the previous steps to create the base.</p><figure class="image image_resized" style="width:67.18%;"><img src="https://media.prusaprinters.org/media/prints/131142/rich_content/57af4791-dcf9-4a05-a696-57497c65409e/image.png#%7B%22uuid%22%3A%228d56339a-361d-4bdc-8814-188b5e45b981%22%2C%22w%22%3A1319%2C%22h%22%3A658%7D"></figure><figure class="image image_resized" style="width:62.27%;"><img src="https://media.prusaprinters.org/media/prints/131142/rich_content/45f6af80-5d67-4b22-bb0f-1af8a57ac334/image.png#%7B%22uuid%22%3A%225408a08c-1ebc-4de7-a8b8-3d387a3573c1%22%2C%22w%22%3A1229%2C%22h%22%3A645%7D"></figure><figure class="image image_resized" style="width:66.36%;"><img src="https://media.prusaprinters.org/media/prints/131142/rich_content/5b230c38-5af9-4d46-904e-cbda1117a59c/image.png#%7B%22uuid%22%3A%2211a0c3ff-02dc-44c1-a587-d277acab5928%22%2C%22w%22%3A1200%2C%22h%22%3A803%7D"></figure><figure class="image image_resized" style="width:53.48%;"><img src="https://media.prusaprinters.org/media/prints/131142/rich_content/3581b351-80e2-491a-95be-0f8a56542576/image.png#%7B%22uuid%22%3A%226c929981-2ed4-4f9d-b3e9-0293bdd212fa%22%2C%22w%22%3A876%2C%22h%22%3A861%7D"></figure><h5>Filters</h5><p>Insert the four filters into the base similar to the image below with the air flow arrows pointing inward.</p><figure class="image image_resized" style="width:58.02%;"><img src="https://media.prusaprinters.org/media/prints/131142/rich_content/745b18cf-61d3-42c2-80a5-467f4fdbe9cc/image.png#%7B%22uuid%22%3A%22a8effdbe-6aa8-43b4-9041-d32cc6d033e8%22%2C%22w%22%3A789%2C%22h%22%3A1144%7D"></figure><h5>Top Frame</h5><p>Place the corner pieces on top of the filters so that the chamfer running around the inside is continuous, see image below. Ensure all four locking tabs are properly engaged. The chamfer is at an angle because of the unique geometry of the fan.</p><figure class="image"><img src="https://media.prusaprinters.org/media/prints/131142/rich_content/ae3874ed-7e66-4c0a-9a6a-79411b7a587d/image.png#%7B%22uuid%22%3A%225dc8decf-6ea6-4c19-bbdb-f3b120d62266%22%2C%22w%22%3A1329%2C%22h%22%3A580%7D"></figure><h5>Fan</h5><p>Insert the cord through the hole in the bottom of the base.</p><figure class="image image_resized" style="width:68.96%;"><img src="https://media.prusaprinters.org/media/prints/131142/rich_content/cb55b019-4282-4509-808d-4b7454e49f41/image.png#%7B%22uuid%22%3A%226c7d1b92-ca61-48f0-af05-b399203beb46%22%2C%22w%22%3A1196%2C%22h%22%3A827%7D"></figure><p>Align the fan so the outer rim will sit on the chamfer and the fan blade and housing will point vertically. The fan feet fit into the notches seen below. You may need to pull some of the upper frame pieces apart to get it started. Once the fan is seated you can push them all back together.</p><figure class="image image_resized" style="width:76.69%;"><img src="https://media.prusaprinters.org/media/prints/131142/rich_content/b5adb672-781d-4389-b1f8-44874698e8d4/image.png#%7B%22uuid%22%3A%22722da419-9946-442b-bb37-f2ecdb26a229%22%2C%22w%22%3A1446%2C%22h%22%3A878%7D"></figure><p>Run the cord through the two notches in the base piece to help hold it in place. Depending on the surface you place it on you may need to trim a small part of the filter cardboard to make room for the cord.</p><figure class="image image_resized" style="width:76.25%;"><img src="https://media.prusaprinters.org/media/prints/131142/rich_content/54cfd6f3-cd13-4932-9483-bc791349dad9/image.png#%7B%22uuid%22%3A%22e8aea1ea-9c23-460c-8eb8-2354fde3d845%22%2C%22w%22%3A1027%2C%22h%22%3A649%7D"></figure><h3> </h3><h3>Encouragement</h3><p>If you like what I'm doing consider buying me a coffee:</p><p><img src="https://cdn.buymeacoffee.com/buttons/bmc-new-btn-logo.svg" alt="Buy me a coffee"><a href="https://www.buymeacoffee.com/sj5pEfMZq">Buy me a coffee</a></p>
With this file you will be able to print DIY Mini Air Purifier with your 3D printer. Click on the button and save the file on your computer to work, edit or customize your design. You can also find more 3D designs for printers on DIY Mini Air Purifier.