DIY Nanoleaf light pannels
prusaprinters
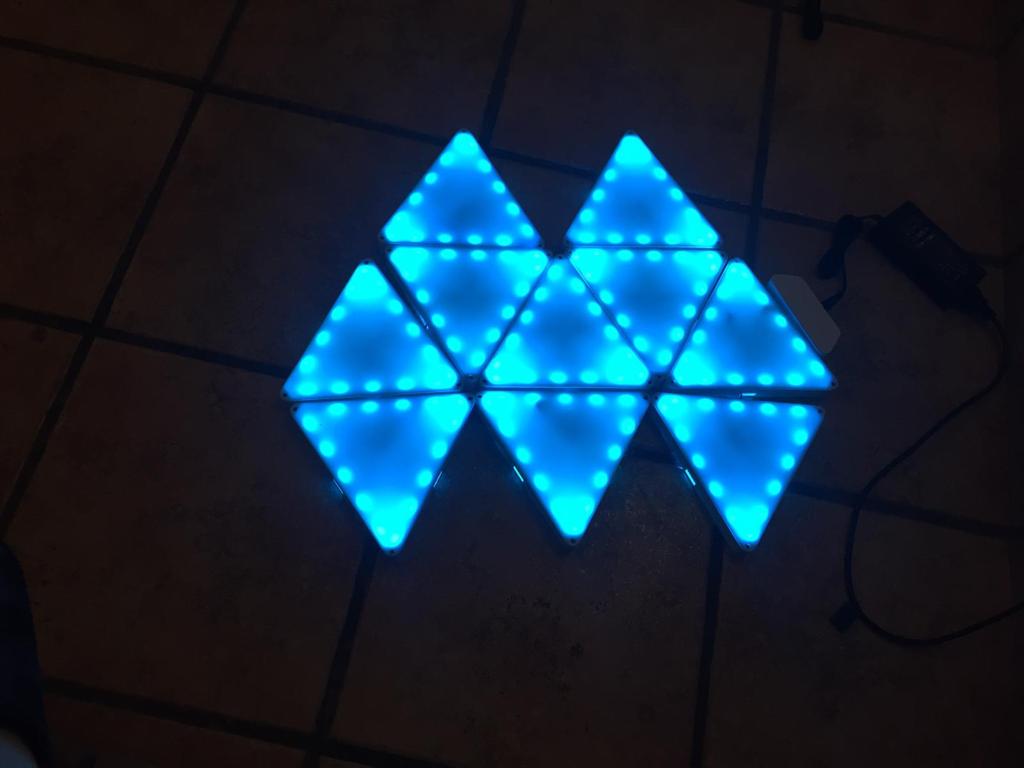
<p>This is a DIY kit to 3d print and make your own nanoleaf aurora led lights.</p><p>In the files you will find almost everything that you will need to make your lights, with the exception of the LED's and the front pannel.</p><p>For the front pannel I used a 2.5mm translucid white plexyglass, that you can cut to its final shape, printing the template in the pdf file, and the help of some tools. If you don't think that you will get a neat result, you can also cut the plexyglass with a laser cutter or a cnc machine with the dxf file included.</p><p>For the LED's, i used a regular RGB strip, but you can also use some adressable strips to achieve a more similar result to the original Nanoleaf Aurora. </p><p>Parts included:</p><ul><li>DIY nanoleaf BODY:<ul><li>It's the main part of the light, and its designed to hold and LED strip arround the inner walls. </li><li>As you may have noticed the back part has some big holes, those are mainly for saving print time and print material, and since the ha to be mounted on a wall, the same wall will prevent the light from leaking. </li><li>If you mount them in a dark wall i recomend you to put a white paper in those holes in order to get more reflection and have a nicer result.</li></ul></li><li>DIY nanoleaf led controller case:<ul><li>This case it's designed to house the LED controller, and has the holes for the DC input and the IR reciever.</li><li>The controller that i used is <a href="https://www.amazon.es/Controlador-control-LUXONIC-cintas-luces/dp/B08VN3NGZC/ref=pd_sbs_6/257-7081344-6076736?pd_rd_w=eJQ3P&pf_rd_p=dcd633b7-cb38-4615-862b-a9bd1fbbb388&pf_rd_r=MYBMW5M542MP0MVXX443&pd_rd_r=26637082-7f5d-46da-a95c-eba3ee200b8f&pd_rd_wg=ALGqp&pd_rd_i=B08VN3NGZC&psc=1">this one</a> and the holes are made for it, if you use a different one you may have to tweak it a little bit.</li></ul></li><li>DIY nanoleaf hole plug:<ul><li>Its a little piece designed to cover the sides holes that are not in contact with another light, this way we prevent light leaks. These holes are made to connect the lights together with some cables. </li></ul></li><li>DIY nanoleaf plexyglass pin:<ul><li>It's a pin that goes through the plexyglass hole, and perfectly fits on the rounded hole of the body, this way you cand hold the plexy on its place and have the abilty to removeit any time for reconfiguration or repairs.</li></ul></li><li>DIY nanolead alignment tool:<ul><li>This is a little rectangle that has the same size of the side holes, and its function is to perfectly align all the lights by passing it through these side holes.</li></ul></li><li>DIY nanoleaf cableconnectors cover - cover:<ul><li>These two parts are not essential, but are useful in the case that you want to interconnect the lights with the tipicall 4 pin connector. If you made the cables yourslf this will house the sodering and protect it a little bit more. The way to assamble them is tup put the connector in and then fill the rest with hot glue and colse it with the other part, the hot glue will hold everything together. </li></ul></li></ul><p>I hope it's useful !!!</p>
With this file you will be able to print DIY Nanoleaf light pannels with your 3D printer. Click on the button and save the file on your computer to work, edit or customize your design. You can also find more 3D designs for printers on DIY Nanoleaf light pannels.