DIY posture monitor
thingiverse
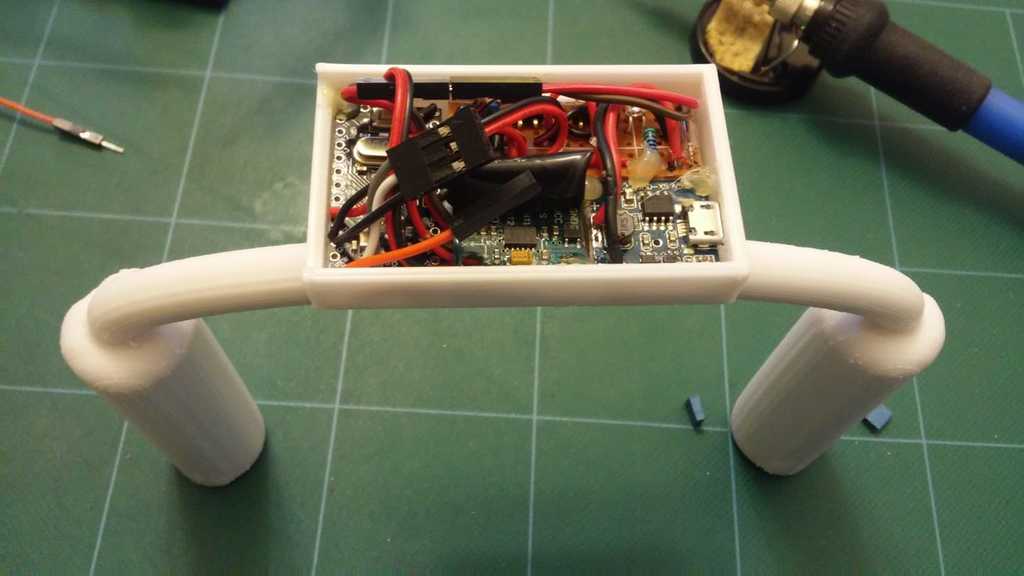
We noticed my son's uneven shoulders since last year. Turns out he has the scoliosis with a 19 degree curve from the mid back, as you can see from the Xray picture. There're other posture monitors(both DIY and commercial), but they all focus on leaning forward. That is not what we need. Since this project looks doable with the things/knowledge that I have, I created this monitor in about 3 days with some trial/error. His right shoulder is lower, so I allow it has more tolerance on the left than the right tilt(the sample code attached is written this way), see https://youtu.be/wVatEt73x_g. There might be issues within the circuit or the code and each individual's condition is different, not sure what's the impact of correcting posture with scoliosis, make your own best judgement and consult with your doctor if you have any doubts. For us, everything works out well at the end and his scoliosis has now reduced to ~10° with all the measures we did, see the last section. I printed it with the ABS, but PLA or others should work fine as well. To make sure it is strong and not break easily on my 1st prototype, I use 50% infill(and 4 layer wall) and might use less if I build another one. There's a conduit within the band to allow wires to pass through. Use support with the "Touching build plate only", do not use "Everywhere". The uploaded one is a thicker box, because I can't cover the thinner box with all the messy wires that I have. You can also make your own box if you want to. I connected the ADXL345 to 5V, since mine has a voltage regulator. I use I2C, because of less wiring. I also left the serial connector(TX, RX, GND, DTR) connected on the Arduino for easier programming(not drew out on the schematics). Use hot glue to fix the serial connector, otherwise the wires tend to break after awhile. Forgot to draw out the capacitor in the schematics picture, see http://www.learningaboutelectronics.com/Articles/Vibration-motor-circuit.php. Before it is turned on every time, it needs to rest on a level surface in order to calibrate and offset the sensor readings. Basically you wear it on the neck and the batteries rest on the shoulders. It works really well and the sensitivity is good enough, but only if your kid cooperates. If the posture is tilting right / left or leaning forward, it will beeps with different tones. The more he tilts, the faster and shorter of the beeps. I uncover the buzzer, so that it is louder for the recording. Otherwise, we covered the buzzer with the original sticker on top and only need tiny audible sound to remind him. Some cheap buzzer does not seal the back, so the buzzer will be loud regardless of the front cover. You'll need to use epoxy or some solid glue to seal the back. Since I do not have a micro switch at the time, I used a 3-pin jumper to select LED/Buzzer vs vibrator. Also you can cover the battery tubes with some soft materials, so that it feels more comfortable. Materials (Total cost $10~15): Arduino pro mini (or any Arduino flavors) USB-Serial module (only if Arduino has no buildin USB) ADXL345 module Battery charger board (salvage from dollar store single cell power bank) 18650 battery x2 (from used laptop batteries or power bank) Buzzer some wires Optional materials Switch / Jumper 500ohm Resistor x2 (any values below 1K just to limit current for LED and 2N222A) Vibrator motor prototype board (when more components are used) 1N4001 diode or other diodes (when vibrator is used) 0.1uf capacitor or larger values (when vibrator is used) 2N222(A) or other transistors (when vibrator is used) LED (plus a resistor) Fuse Jumper wires Connectors Soft cloth / wrapper Things to improve 1. Fine tune the beeping/vibrating frequencies / patterns 2. Shape / angle of the band and reduce its diameter 3. 5V(Arduino) mixed with 3.3V(ADXL345) hook up on the I2C (but it works with my current setup) 4. Might need a diode on the buzzer to prevent the current flow back 5. Remove buildin LEDs and enable low power state to save power 6. Find out the optimal battery size vs total power consumption (with buzzer < 60mA, coin vibrator < 70 mA) 7. Button(or use the tap feature from ADXL345) to toggle different modes / profiles 8. Add vibrator and switches, I didn't have those parts at first, so I only used the buzzer and the jumpers when I built it. After receiving the vibrator, I stuck the thin vibrator to the metal shield of the charging port with its backing sticker, plus some hot glue. 9. Convert the reading to the actual angle in degree 10. Add a bluetooth module and an app to collect the data for posture study / analysis.
With this file you will be able to print DIY posture monitor with your 3D printer. Click on the button and save the file on your computer to work, edit or customize your design. You can also find more 3D designs for printers on DIY posture monitor.