DIY Power Supply DPS5005
thingiverse
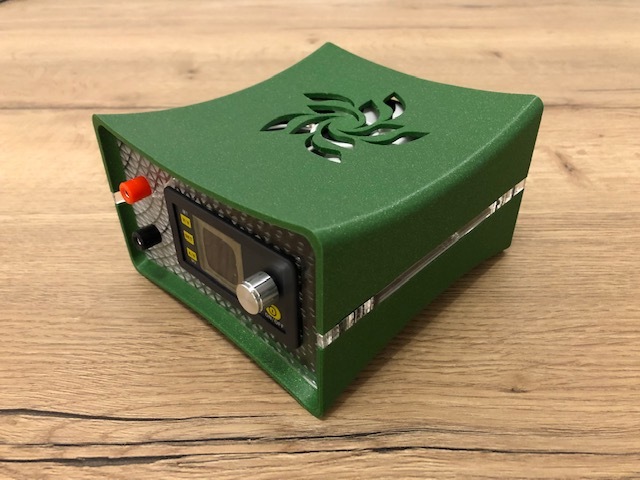
A compact DIY power supply based around the DPS5005 module. **Specs** - Output voltage range: 0 - 36 V - Output current range: 0 - 5 A **Required hardware** *Electronics* - [DPS5005 module](https://www.banggood.com/RIDEN-DPS5005-50V-5A-Buck-Adjustable-DC-Constant-Voltage-Power-Supply-Module-Integrated-Voltmeter-Ammeter-With-Color-Display-p-1062473.html?cur_warehouse=CN) (can be found on banggood or other online electronic stores) - [AC-DC converter](https://nl.banggood.com/Geekcreit-36V-180W-AC-DC-Switching-Power-Supply-Board-High-Power-Industrial-Power-Supply-Module-p-1111658.html?akmClientCountry=BE&cur_warehouse=CN) (Geekcreit 36V 180W AC-DC or similar form factor/hole spacing) - [On/off switch](https://www.reichelt.de/be/nl/wipschakelaar-1x-uit-zwart-i-o-wippe-1801-1146-p36770.html?&nbc=1&trstct=lsbght_sldr::154411) (rocker switch) - [Fuse holder](https://www.reichelt.de/be/nl/zekeringhouder-5x20mm-max-10a-250v-pl-fpg1-40-p35185.html?&trstct=pol_3&nbc=1) (5x20mm fuse, panel mount, 250V rated) - Fuse (quick fuse, 5x20mm, 5.0 A) - [Power cord](https://www.reichelt.de/be/nl/aansluitkabel-koude-apparaten-1-8m-grijs-nksk-200-gr-p13489.html?&trstct=pol_3&nbc=1) - [Female power socket](https://www.reichelt.de/be/nl/apparaat-inbouwstekker-c13-kes-1-s-p131946.html?&trstct=pol_3&nbc=1) - [4mm female banana plugs](https://www.reichelt.de/be/nl/bananenbus-4mm-geheel-ge-soleerd-rood-bb-4-rt-bd-p184347.html?&trstct=pol_7&nbc=1) - panel mount version - [DC-DC converter](https://www.banggood.com/1pcs-2596S-LM2596S-3A-Adjustable-Step-down-DC-DC-Power-Supply-Module-p-1213135.html) (if a fan/leds are desired, but this is not required otherwise) - [92mm fan](https://www.banggood.com/ID-COOLING-92+15mm-Slim-Cooling-Fan-4Pin-PWM-High-Air-Pressure-Low-Noise-Big-Airflow-For-CPU-or-GPU-or-VGA-Cooler-p-1795716.html?cur_warehouse=CN) if desired (maximum height of 15 mm or else won't fit in the casing!) - Led strips if desired (input voltage of 12V) *Nuts & bolts* - M4 screw inserts (insert in the 4 outer holes on the top casing --> keep the case close with 4 bolts coming through the bottom case) - 4 x M4x16mm (or slightly longer, go through bottom shell into screw inserts in the top shell) - 3 x M4x18mm (if using 15mm fan, only 3 of the 4 mounting holes can be used) - 2 x M3x6/8mm (mounting of DC-DC converter) - 4 x M4x6mm (mounting of AC-DC converter) - 2 x M3x10mm (mounting of the power socket) **Printing** Both the lower and upper shell have to be printed on either the front or rear face. Make sure to use supports for all overhangs! The front panel, rear panel and spacers can either be 3d printed, or they can be lasercut out of 3mm thick plastic sheeting (I used plexiglass for my parts). Both the stl files for 3d printing and the svg files for lasercutting are included. **Assembly** First mount the electronics to the rear and front panel. For the front panel, solder a wire to each of the female banana plugs, long enough to plug into the bottom of the DPS module. For the rear panel, solder a wire to each of the three pins of the power socket. The middle wire (ground) should be soldered to the ground on the corner of the AC-DC converter. One of the other 2 wires should be wired to one of the poles of the switch, and the third wire should be connected to one of the poles of the fuse holder. Next connect the other pole of the fuse holder and the switch to the input pins of the AC-DC converter. Next connect the DC output of the AC-DC converter to the input of the DPS module using 2 wires. The DC-DC converter input has to be connected to the same DC output of the AC-DC converter using 2 more wires. The output of the DC-DC converter can then be wired to the fan and/or the leds. I used a 4 pin fan, in which case only 2 of the 4 leads have to be connected (the ground and input voltage wire). The rpm and pwm wire can in this case be left unconnected. Make sure to adjust the output voltage (using the onboard potentiometer) of the DC-DC converter to be below 12V, as otherwise the fan and leds will get damaged! **Final words** If you plan on making one, be sure to post a make as I would love to see the finished result!
With this file you will be able to print DIY Power Supply DPS5005 with your 3D printer. Click on the button and save the file on your computer to work, edit or customize your design. You can also find more 3D designs for printers on DIY Power Supply DPS5005.