DIY Ryobi 18V One+ Powerstation
prusaprinters
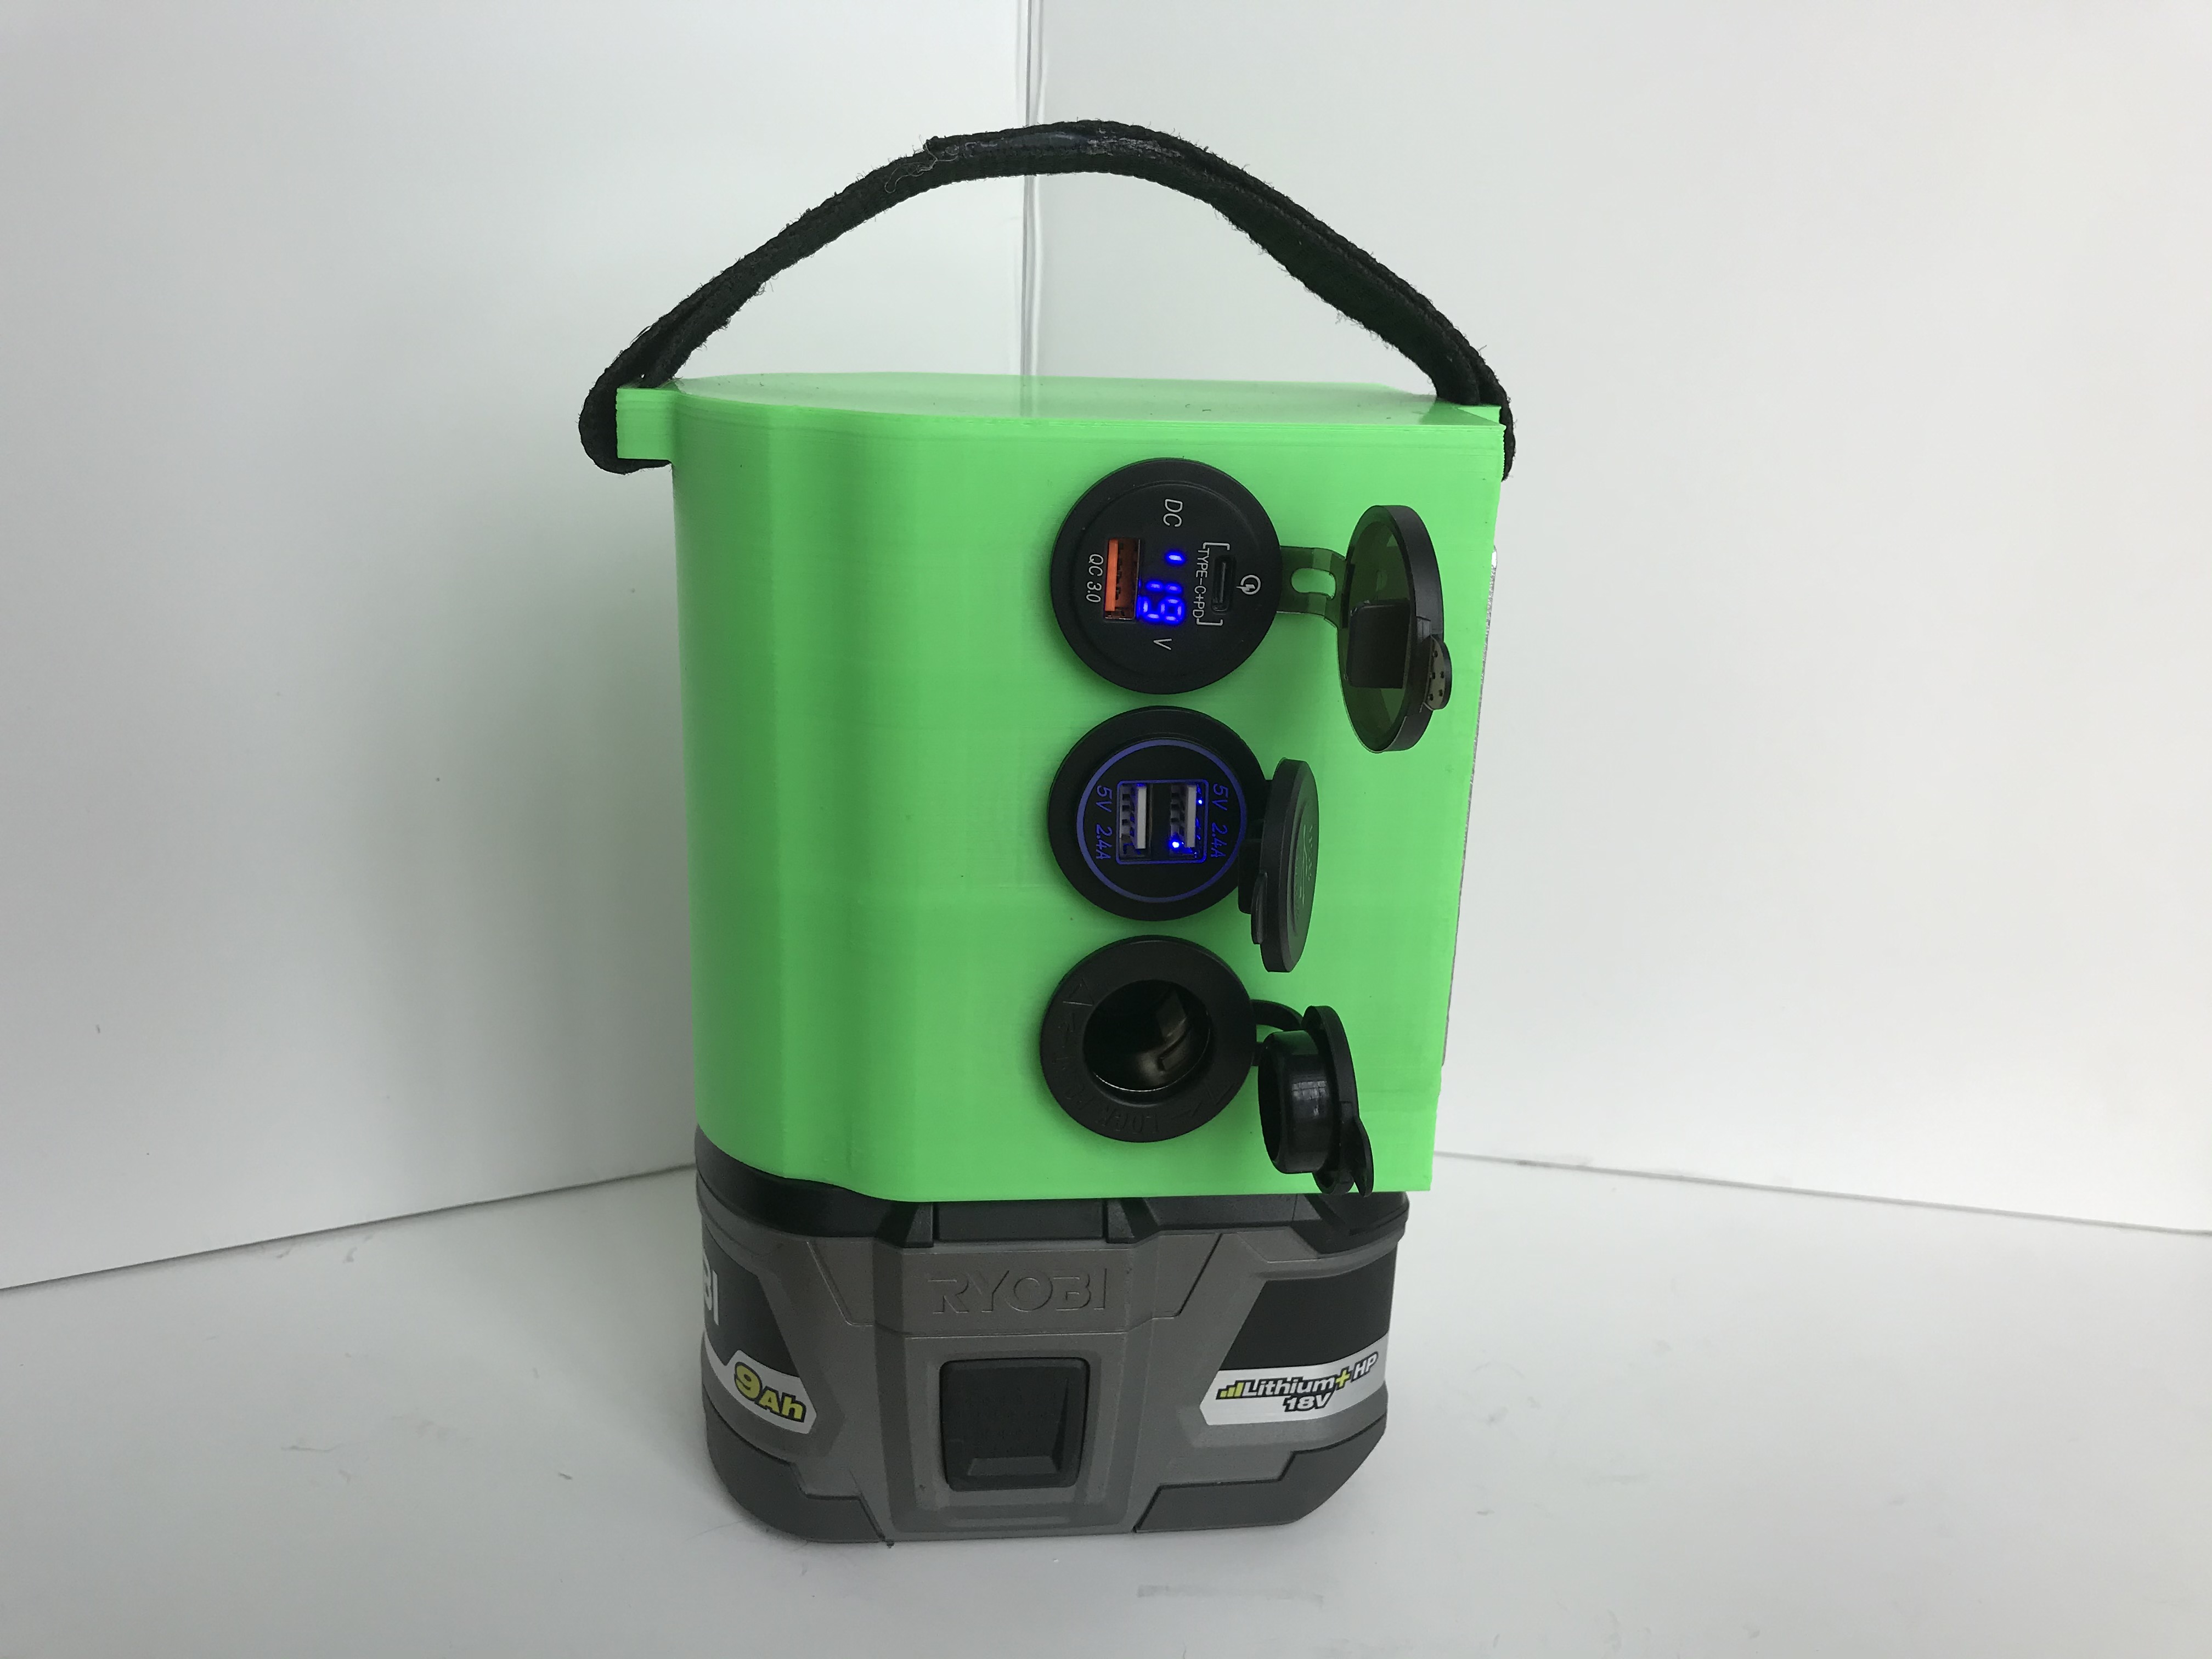
<p>I have a bunch of different Ryobi 18V Power tools and an assortment of One+ Lithium batteries. I thought it would be great to make use of these batteries for other things. I decided to make a Power station that could charge USB devices and run 12V cigarette lighter socket devices. I also added an LED light for emergencies. It has room for 3 different sockets. I currently use one that has two 2.4A USB connections, another that has a QC 3.0 and Type C connectors, and a third that is a 12V cigarette light socket.</p><p>This can easily charge your cell phone or run a laptop<br/>You could use the 12V socket to run a small AC inverter or a CPAP machine when you are camping or traveling</p><p>Here is a movie of the build process: <a href="https://youtu.be/p9G_shkDBt4">https://youtu.be/p9G_shkDBt4</a><br/>An earlier prototype can be viewed at: <a href="https://youtu.be/rdvFLKf1roE">https://youtu.be/rdvFLKf1roE</a></p><p>I just tested all my Ryobi tool batteries for capacity. I used a load tester ( <a href="https://amzn.to/2SOyXcg">https://amzn.to/2SOyXcg</a> ) running at 10A/12V regulated load ( <a href="https://amzn.to/2SGAoei">https://amzn.to/2SGAoei</a> ):</p><ul><li>Ryobi 9Ah/162Wh P194 got 133Wh</li><li>Ryobi 6Ah/108Wh P193 got 98Wh</li><li>Vanon 6Ah / 108Wh got ONLY 58 Wh</li><li>Ryobi 4Ah/74 Wh P108 got 55Wh</li><li>Ryobi 3Ah/54 Wh P191 got 42Wh</li><li>Ryobi 1.5Ah/28 Wh P107 got 19Wh</li><li>Ryobi ?Ah/24 Wh P102 got 13Wh</li></ul><p> </p><p>Here is the parts list:<br/> </p><ul><li>Ryobi 18V 9Ah Lithium battery ( <a href="https://amzn.to/38oLFFm">https://amzn.to/38oLFFm</a> )</li><li>Bestek 300Watt Pure Sine wave AC inverter ( <a href="https://amzn.to/37kdnBQ">https://amzn.to/37kdnBQ</a> )</li><li>Ryobi 150-Watt Powered Inverter, with 2 USB Ports and One 120-Volt Outlet ( <a href="https://amzn.to/2Shahu1">https://amzn.to/2Shahu1</a> )</li><li>Ryobi 18V One+ Dual Chemistry Vehicle charger ( <a href="https://amzn.to/2vouV2n">https://amzn.to/2vouV2n</a> )</li><li>DC-DC 10A 12V buck converter ( <a href="https://amzn.to/2SjwSGn">https://amzn.to/2SjwSGn</a> )</li><li>cigarette lighter socket ( <a href="https://amzn.to/3byDuYX">https://amzn.to/3byDuYX</a> )</li><li>dual 2.4A USB ports ( <a href="https://amzn.to/31MaZ5x">https://amzn.to/31MaZ5x</a> )</li><li>QC 3.0 and type C socket ( <a href="https://amzn.to/3buZkwz">https://amzn.to/3buZkwz</a> )</li><li>toggle switch ( <a href="https://amzn.to/2uGV8ZU">https://amzn.to/2uGV8ZU</a> )</li><li>LED puck light ( <a href="https://amzn.to/2vmlSz8">https://amzn.to/2vmlSz8</a> )</li><li>Battery Leaf springs ( <a href="https://amzn.to/31KSCy5">https://amzn.to/31KSCy5</a> )</li><li>2.85mm ABS Filament 1kg for 3D Printers, Fluorescent Green ( <a href="https://amzn.to/38B0W6f">https://amzn.to/38B0W6f</a> )</li><li>Flexible 12 AWG Stranded Copper Wire ( <a href="https://amzn.to/38Ni1JW">https://amzn.to/38Ni1JW</a> )</li><li>3/4" strap / Heavyweight Polypropylene Webbing ( <a href="https://amzn.to/39Lom93">https://amzn.to/39Lom93</a> )</li></ul><p>As an Amazon Associate I earn from qualifying purchases.</p><p>Hackaday just picked up on this project and wrote an article! ( <a href="https://hackaday.com/2020/02/20/diy-power-station-puts-ryobi-batteries-to-work/">https://hackaday.com/2020/02/20/diy-power-station-puts-ryobi-batteries-to-work/</a> )</p><p>I went thru several prototypes making improvements on each one. That's the beauty of 3D printing. Quick turn-around to try new things!</p><p>Revision History (see photo):<br/>prototype -- tested battery connection<br/>prototype V1 -- functional test of DC-DC converter, USB ports / 12V cigarette socket<br/>prototype V2 - New tower shape with 3 socket holes<br/>prototype V2a - added handle strap<br/>prototype V2b - added second switch to turn all power off, thickened strap holder<br/>prototype V2c - lengthened DC converter opening, beveled edges, widened strap holder opening<br/>future improvements: label switches with icons, put switch notches in model</p><p>I put the 3D geometry model on thingiverse to make it easier to adapt: <a href="https://www.thingiverse.com/thing:4168822">https://www.thingiverse.com/thing:4168822</a><br/>(Didn't know how to load STEP file here :-( )<br/>You can try loading it from: <a href="http://howmuchsnow.com/batterypowersystem/ryobipowerstationV3c.stp">http://howmuchsnow.com/batterypowersystem/ryobipowerstationV3c.stp</a></p><figure class="media"><oembed url="https://youtu.be/p9G_shkDBt4"></oembed></figure><h3>Print instructions</h3><p>I don't have a 3D printer, so I borrowed time on my friends Airwolf printer. The prototypes were printed with ABS on a heated platform in a heated chamber. The nozzle size was 0.5mm and the build strength was strong.</p><p>Make sure you orient the model so that the strap holders are down on the printer bed.</p><p>I used a wood file to put notches in the switch holes for the clips and for the switch tab that clocks the switch. Other switches may not require this. I also add hot glue to the back of the switches once installed.</p><p>After inserting the battery spring clips and getting them aligned / tested, I use hot glue to secure/insulate them</p>
With this file you will be able to print DIY Ryobi 18V One+ Powerstation with your 3D printer. Click on the button and save the file on your computer to work, edit or customize your design. You can also find more 3D designs for printers on DIY Ryobi 18V One+ Powerstation.