DIY SLA / DLP Printer Termin8tor
thingiverse
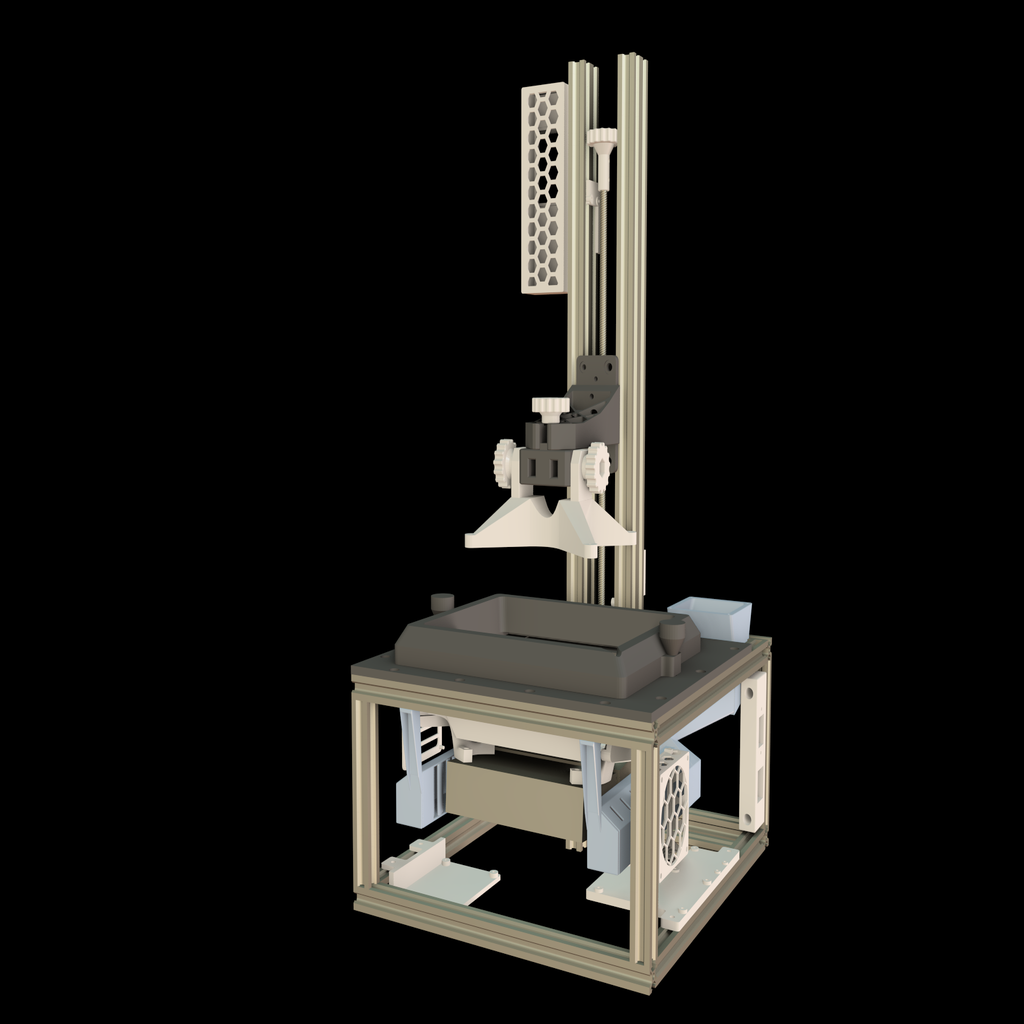
https://www.youtube.com/watch?v=ubN1TeuaJQg&list=PLMDSLeB1XmHGC30FFVFAGmgUnaJl57ICp This is a full build for the DIY SLA / DLP Termin8tor Resin printer 200x160x400mm build volume. Is is designed using the Open Builds V-slot rail system. It is a Daylight Resin printer, No UV resins but the LCD and backlights could be easily swapped for a UV settup without changing anything else. The Ipad 4 screen is fairly large meaning that the LCD could be basically any smaller or different shape screen since it sets on top of the acrylic window and non used portions will simply be blocked with light absorbing materials. Total cost around $1K. You must have a 300x300mm FDM printer for some parts in the build. Check individual parts in the group below for more part specific details. Build group with full BOM and Marlin sketch for GT2560. https://www.thingiverse.com/groups/termin8tor-sla-dlp-resin-printer UPDATE 9/19/19 The current printer in the videos had some issues with hot and cold zones after running 1.5 hours or longer. Although not easily apparent, the extra - unevenly hot air under the LCD platform and the much cooler air above the platform and resin was causing parts to stick. As the hot part progressed and the resin level dropped during the print. Eventually, the part rises completely out of the resin and the much colder air hitting the plastic causes an adverse reaction such that it lowers back into the hot resin and then as it rises up the next layer it sticks to the FEP film. This sticking makes audible popping sounds and it worsens as the temperature differential between the lower and upper compartments progressively becomes greater the longer the printer runs. Eventually it can tear smaller more delicate prints apart from the excess peeling forces. To solve this problem, an extra High Pressure 80mm fan replaced the fan lying in the back of the case and a complete duct system was created that efficiently transfers the hotter air below the platform to the space above. This solves the part sticking issues as the air above the resin is now much warmer and below is cooler. Also much better for the life of the electronics and LCD as the temps are much lower. NOTE: The fan required is a Delta FFB0812EHE (80mm high pressure ) You may have to lower the mounting point of the main Z stepper motor. There is a slot in the back of the duct to help but the bottom of the motor must be 50mm or less from the base. Print the ducts with 2x 0.7mm perimeters. This should yield light sturdy duct parts. On the duct arms, use a filament that has a filler such as cabon fiber or wood or any other filled filament. The geometry of the arms is complex and prone to warp as the print progresses to the sloping upper part. You need a really dialed filament profile with perfect retraction and maybe slightly under extruding. The lower warp the filament the better.
With this file you will be able to print DIY SLA / DLP Printer Termin8tor with your 3D printer. Click on the button and save the file on your computer to work, edit or customize your design. You can also find more 3D designs for printers on DIY SLA / DLP Printer Termin8tor.