DIY Wedding Photo Booth - Low cost | Arduino | 3D Printable Parts | Personalise | Low Cost | Budget
thingiverse
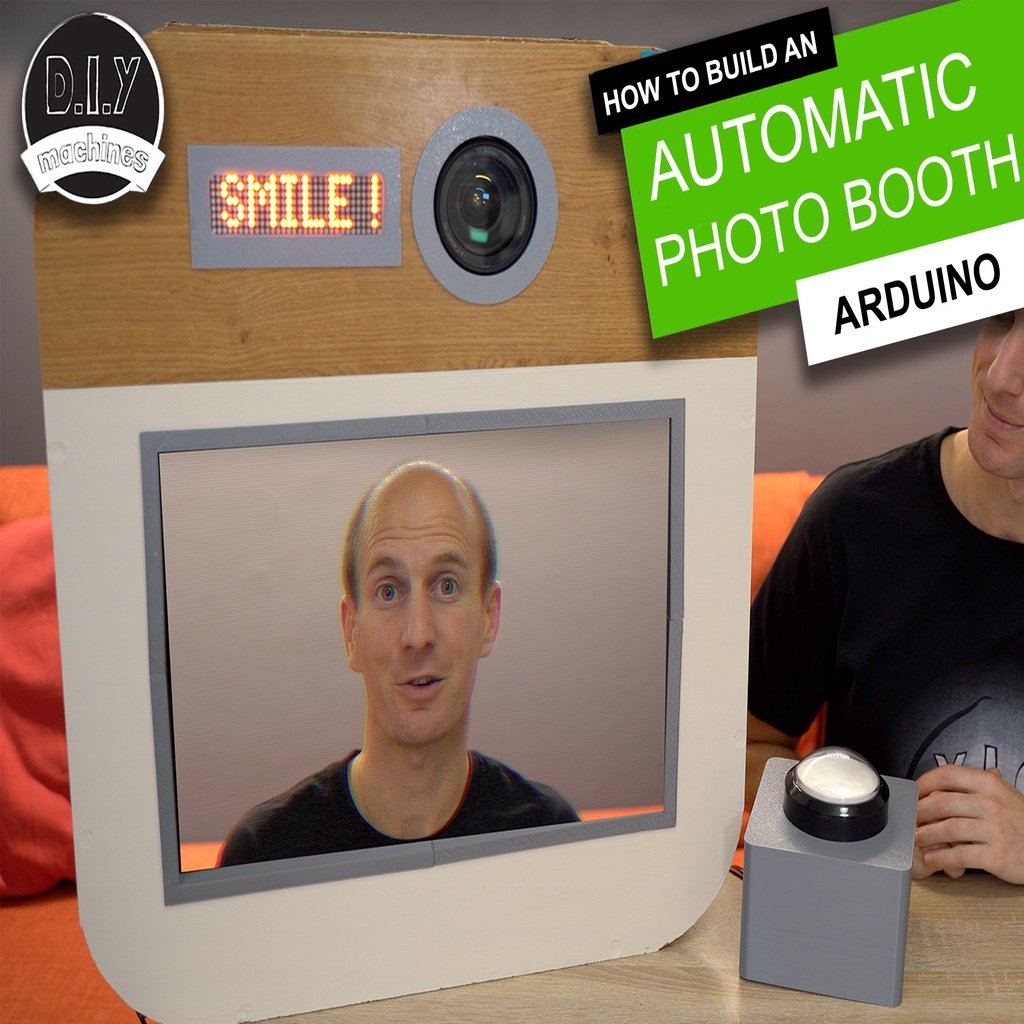
I'll show you how to build your own Automated Photo Booth for less than hiring one (if you can lay your hands on a DSLR). You can customise the housing to suit your event/wedding and as it's controlled by an Arduino Nano you don't need anyone to 'man it' throughout the night. Your guests just press the giant arcade button and the photo booth guides them through their own photoshoot sequence. :) List of items used in this project and where to find them (the links are Amazon affiliate links and help to support this channel at no cost to you): ■ An Arduino Nano(x1): https://geni.us/ArduinoNanoV3 ■ 2.2k and 1k resistor (x1 of each): https://geni.us/Ufa2s ■ Giant illuminated arcade button: https://geni.us/GiantArcadeButton ■ MAX7219 Display Matrix: https://geni.us/MAX7219DotMatrix ■ A shutter release cable for your SLR camera - I've built and tested this photo booth with a Canon camera. ■ Canon SLR - https://geni.us/CanonSLR ■ Canon EOS/Rebel SLR https://geni.us/CanonEOSSLR ■ Nikon SLR: https://geni.us/NikonSLR ■ Sony SLR: https://geni.us/SonySLR ■ Breadboard or some perforated board - I’ll show you how to connect everything together using either one. ■ Breadboard: https://geni.us/BreadboardMedium ■ Perfboard: https://geni.us/PCBPerfBoard ■ A screen or monitor (I’m using this 23” ASUS VC239H): https://geni.us/ASUSMonitor23 ■ Some small lengths of hook up wire for the internal electronics: https://geni.us/22AWGWire ■ Four longer lengths of wire for connecting to the arcade button (I used two lengths of speaker wire): https://geni.us/SpeakerWire ■ Some filament for the 3D printed parts: https://geni.us/ElegooPLA ■ And a digital SLR camera: https://geni.us/SLRCameras For the housing ■ Some wooden panels Some screws Paint and other materials for decoration. These are some of my favorite tools I use and can recommend: ■ Battery-powered glue gun: http://geni.us/BoschBatteryGlueGun ■ Bosch Bit Driver: https://geni.us/Bosch-Screwdriver ========== I made a tutorial video that guides you through the assembly step by step: https://youtu.be/Fu5Gbpv4EYs Download code from here: https://github.com/DIY-Machines/PhotoBooth Arcade button mount can be bought from here: https://lewisaburrow.selz.com https://diymachines.co.uk/ ========== SAY THANKS: Provide continual and dependable support through Patreon: Support us on Patreon: https://www.patreon.com/diymachines Buy me a coffee to say thanks: https://ko-fi.com/diymachines SUBSCRIBE: ■ https://www.youtube.com/channel/UC3jc4X-kEq-dEDYhQ8QoYnQ?sub_confirmation=1 INSTAGRAM: https://www.instagram.com/diy_machines/?hl=en FACEBOOK: https://www.facebook.com/diymachines/ Disclaimer: This video is shared for demonstration purposes only.
With this file you will be able to print DIY Wedding Photo Booth - Low cost | Arduino | 3D Printable Parts | Personalise | Low Cost | Budget with your 3D printer. Click on the button and save the file on your computer to work, edit or customize your design. You can also find more 3D designs for printers on DIY Wedding Photo Booth - Low cost | Arduino | 3D Printable Parts | Personalise | Low Cost | Budget.