DJI arm to 16 or 12 mm carbon arm conversion(TBS Disco) - Rugged Edition.
thingiverse
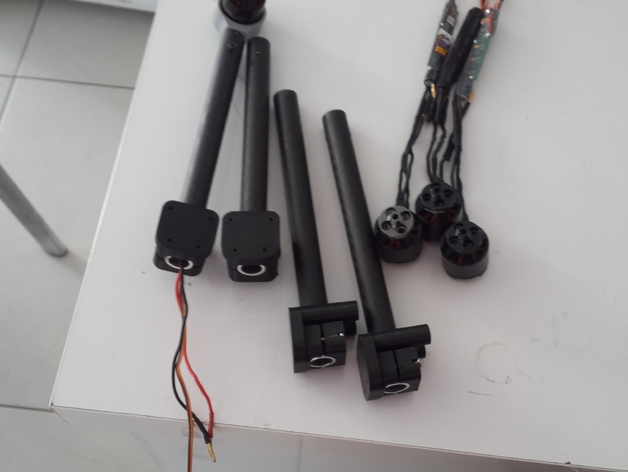
IMPORTANT: I highly recommend using ABS for all parts. If you're gonna use PLA, make sure your motors and ESCs don't even get warm after a full flight. These are upgrade parts for dji f450 arms we all know and love. You can use any lenght of carbon tube you want provided they have 16mm OD and 14mm ID. Also you need to drill a whole at one end of the tube. Use the motor mount itself as drill guide. I've played with design that didn't require drilling, but I found out that in a few weeks, the motor's torque would twist the mount. There are other designs on thingiverse that does the same job and I've tested most of them. Some of them are impossible to print with my printer. Some are beautiful but fragile. Some have plain wrong dimensions. So I decided to combine them all and design my own. I've been flying with them for 2 weeks now. They are holding up great! No warping, no loosening, no bending. NOTE:There is a hole on top of (or rather at the bottom) of the Main Body. That hole was put there to add another screw to clamp down the boom. I never needed it. If your printers tolerances are good, you shouldn't either. , Update1: Added 12mm variant for body side. Motor mount for 12mm tube will require some thinking. Print Settings Printer Brand: RepRap Printer: i3 Rafts: No Supports: No Resolution: 0.2mm Infill: 100% Notes: Motor Bolt Hole Spacing: Standart 16mm - 19mm arrangement. Any motor in 900-1200kv range should fit. Bolts: M3 everywhere. Material: I recommend using ABS all the way through if possible. If not, I'd highly advise to use ABS for at least the motor mount part. I used PLA for clamps. While it is rock solid, It just cant stand heat. And if you have your ESC's in the booms, there is a serious possibility of arm getting hot and melting(or more likely warping) the clamp. Infill: Motor Mounts: 100% infill. I used 3 outer perimeters, 3 top and bottom layers. These needs to be very solid. Clamps and Main body: If you go with PLA, You could go with as low as 20% infill. For ABS, I'd recommend 30-40% Orientation: Print them as they are. I oriented them for maximum tensile strength. Item Count:For each arm you need 1 Main Body, 1 Clamp, 1 Motor mount. Support&Raft:I printed without any support, but the motor mounts were kinda droopy. Since they are inside the tube and their only purpose is to provide strength and a place for the screw to go through, as long as you can shove it through the arm, It doesn't matter. If you just can't live with that, use support for motor mount. Post-Printing Acetone polished. Mostly just for cosmetic purposes. Order of assembly is important. While it should be pretty self evident, I'll still detail the process. Step 1: Put the arm through the Main Body. It will be hard and that is intentional. Use a mallet to tap it gently. Don't go all the way. If you do, you won't be able to twist it again. If your CF tube hes a metal end cap thingy, it should be on this side. Step 2: Put something long, thin and straight (not that, you filthy pirate) through the hole at the other end of the boom. Now put the body on a table and twist it until the thing you put through is perfectly perpendicular to the floor. Step 3: Use mallet and tap the arm all the way through. Check for the angle of the hole once more. If it's all right, put the clamp on. Use M3X~8 bolts. You can go as long as you wish really. If you used PLA and printed with 100%infill chances are you won't be able to strip it using you hands. So go gorilla on those screws. Clamp that thing really tight. Step 4: Bolt the motor to the motor mount. USE SHORT BOLTS or else you will destroy the windings. Bottom of the motor mount is 3mm thick. So an M3X5 or M3X6 bolt should do the trick Step 5: Connect the motor cables to the ESC. BE SURE THE MOTOR IS TURNING IN RIGHT DIRECTION. If you don't do this right, you'll have to undo everything later on. Step 6: Put the ESC into the boom and fit the motor mount to the arm. Line up the holes and put a screw(M3X20) with locking nut. Be very careful not to cut ESC's cables while you thread the bolt. Push a thin rod to clear the way from the cables before threading the bolt. Now do this 3 more times(if you are flying a quad) and you are golden.
With this file you will be able to print DJI arm to 16 or 12 mm carbon arm conversion(TBS Disco) - Rugged Edition. with your 3D printer. Click on the button and save the file on your computer to work, edit or customize your design. You can also find more 3D designs for printers on DJI arm to 16 or 12 mm carbon arm conversion(TBS Disco) - Rugged Edition..