DJI Mavic Controller and iPad Holder
thingiverse
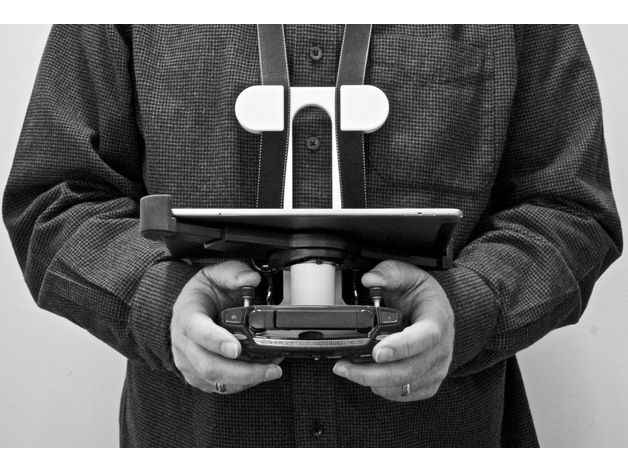
As great as the DJI Mavic drone is, the controller is designed to only hold a smart phone or a small tablet. I have the iPad Air 2 and the view is so much better that I wanted to use it instead of my iPhone. There are iPad holders on the market, but you need to hold them up and can’t easily use neck straps. Just the controller and iPad weigh almost two pounds and it gets heavy holding them out in front of you while flying. If you use a neck strap, it will block the iPad which defeats the whole point in using it. This design solves these problems by using one part to hold the iPad and the controller and another part to guide and restrain the straps against your chest. Even if you let go of the controller, everything stays in place. Also the base part hooks over the lip under the controller display for more stability. There is a 10 degree back tilt on the iPad and controller for the optimum viewing angle. And you can use a sunshade on the iPad as long as it fits inside the G10 mount. I found a couple of straps from camera and computer bags that fit nicely in this holder. A wide, padded one is best to distribute the weight across your neck. Because this holder is made in two parts, it is easily collapsed for traveling. I used the 1/4-20 standard for all the hardware so that extra nuts and washers would work in both places. Here is the bill of materials: 1) iShot G10 Pro Universal iPad Tablet Tripod Mounthttps://www.amazon.com/G10-Universal-Tablet-Tripod-Monopod/dp/B00ZDPPIR2/ 2) One 1/4-20 threaded rod 70mm (2.75”) long 3) One 1/4-20 x 1 in machine bolt 4) Three 1/4 in flat washers 5) Two 1/4-20 wing nuts I suggest packing spare hardware in case something is misplaced. Print Settings Printer Brand: MakerBot Printer: MakerBot Replicator 2 Rafts: Yes Supports: Yes Resolution: 0.2 Infill: 15% Notes: I used the raft just for the base part as I had trouble with adhesion in one area and without a brim so it would fit on my printer. I used four layers on the top, bottom and sides to increase the strength. Post-Printing Cleanup and Assembly I lightly sanded some areas to smooth them out, especially the parts that will slide into the sides of the controller. Assemble the two printed parts with the 1" bolt, wing nut and two flat washers. Screw the threaded rod into the G10 holder first, then slide the bolt through the base and use a flat washer and wing nut to hold it in place. Once that is assembled, add the controller and then the iPad. Make sure the threaded rod isn't too long or it may interfere with the USB connector on the bottom of the controller. How I Designed This Design Process My first version was made in cardboard and tape. Although it was crude, I was able to rough out the positions of the devices. Then I used Autodesk Fusion 360 to design multiple iterations. Each time I printed the parts, assembled them and then tried out the ergonomics. After all those designs, I tried flying with it and tweaked the design several more times after that. I estimate I made at least a dozen different versions before I ended up with this final one. Update August 16, 2017: I uploaded the Fusion 360 file for those that want to work directly with the design. Please keep in mind the licensing terms.
With this file you will be able to print DJI Mavic Controller and iPad Holder with your 3D printer. Click on the button and save the file on your computer to work, edit or customize your design. You can also find more 3D designs for printers on DJI Mavic Controller and iPad Holder.