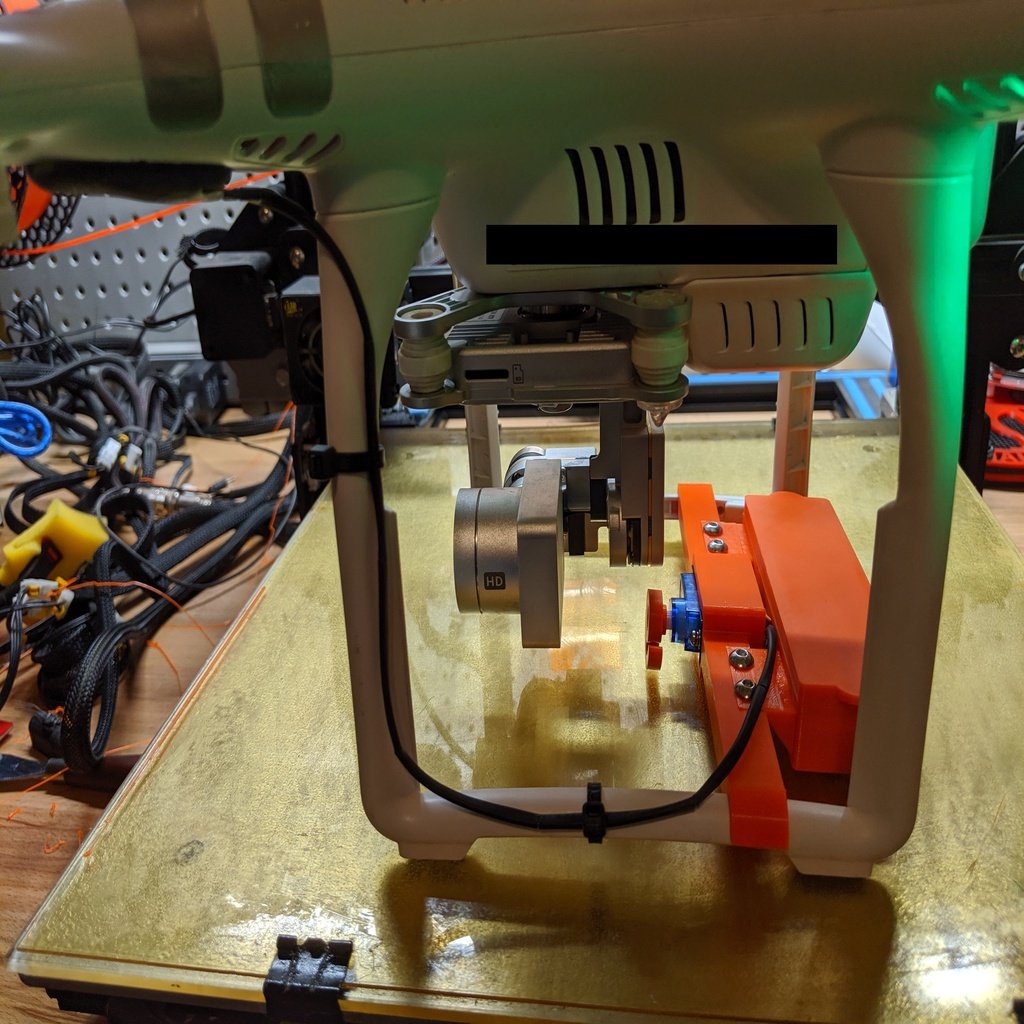
DJI Phantom 3 Payload Drop Release Mechanism
thingiverse
Introduction:\r\n\r\n*** This mod blocks the vision positioning system (VPS). Keep this in mind, and you may want to disable VPS *** I personally have not had any problems. Please be safe with this project. Never fly a drone directly over people or property that can be damaged. The instructions provided are a guide only. They are not intended to be an all-inclusive step-by-step build. Only take on this project if you are experienced with microcontrollers and the required components.\r\n\r\nThis is a system used to drop things from a DJI Phantom 3 drone. The inspiration for this project came from the adafruit project for the DJI Mavic:\r\n\r\nhttps://learn.adafruit.com/drone-claw\r\n\r\nThere is no modification required to the drone, and this system is totally independent of the Drone's systems. The system uses a photoresistor attached to one of the front LED's on the drone. When the light is turned on through the controller (*assign the C2 button on the back of the controller to turn the lights on & off*), the microcontroller actuates the servo.\r\n\r\nParts:\r\n\r\n-LED light cover (printed)\r\n-Hook (printed)\r\n-Load bar (printed)\r\n-Avionics box & lid (printed)\r\n-Photo resistor \r\n-1Ok resistor used for a pulldown with the photo resistor\r\n-Servo\r\n-Power source I used two successfully:\r\n -9 volt battery\r\n -3.7 volt lithium battery with a battery/power booster board: http://tiny.cc/v9kmfz\r\n-470 µf capacitor across the servo power and ground\r\n-Mini microcontroller (I used a metro mini)\r\n\r\nInstructions:\r\n\r\n1. Print all of the parts. I recommend that the light cover is printed in black to reduce ambient light noise.\r\n2. Install the photo resistor to the LED cover. I placed it in the hole, and then used a 3d pen to weld it in place and eliminate light leaks. After that, I gave it a bit of hot glue to stake the wires down.\r\n3. Assemble the servo to the load bar, and the hook to the servo. The servo that I used to design the load bar fit with no problem. Another servo I had that was a similar size did not. Please check the dimensions before printing to ensure your servo will fit. If it doesn’t you may want to enlarge the cutout or sand/file after printing.\r\n4. Attach the avionics box to the load bar. You can use fasteners, or alternatively you can weld it. Welding it may reduce weight.\r\n5. Attach the load bar to the drone. The load bar should be positioned aft of the drone, behind the vertical stiffeners in the legs. As you are looking at the rear of the drone, start with the load bar under the drone. Place the right side by inserting it on the top of the leg and rotating upward. After the right leg is seated, rotate the left side of the load bar over the leg and push down until it snaps into place.\r\n6. Remove one of the front LED light covers and place the photoresistor light cover. Route the wires down and across the legs and in to the avionics box. You may want to use zip ties to secure the wires. The light cover should hold with friction, but you can use a zip tie to secure it if desired.\r\n7. Make all of the electrical connections and place the electronics in the avionics box. Place the lid on the box. The lid should hold fine with friction, but you may use a rubber band to secure it if desired.\r\n\r\n*NOTES:\r\n\r\n- After I completed my project, I realized I forgot a power slider. I may revise this in the future with a power slider cutout in the avionics box.\r\n- The system worked well with both the 9v and the Lithium battery. You probably won’t get much life out of the 9 volt, and make sure it’s a fresh battery.\r\n- The avionics bay was designed with a 9v battery compartment. You can break out the divider to accommodate your specific application.\r\n- A sample sketch for the micro-controller is provided in the files.
With this file you will be able to print DJI Phantom 3 Payload Drop Release Mechanism with your 3D printer. Click on the button and save the file on your computer to work, edit or customize your design. You can also find more 3D designs for printers on DJI Phantom 3 Payload Drop Release Mechanism.
