Dobby - Life Size (80cm)
thingiverse
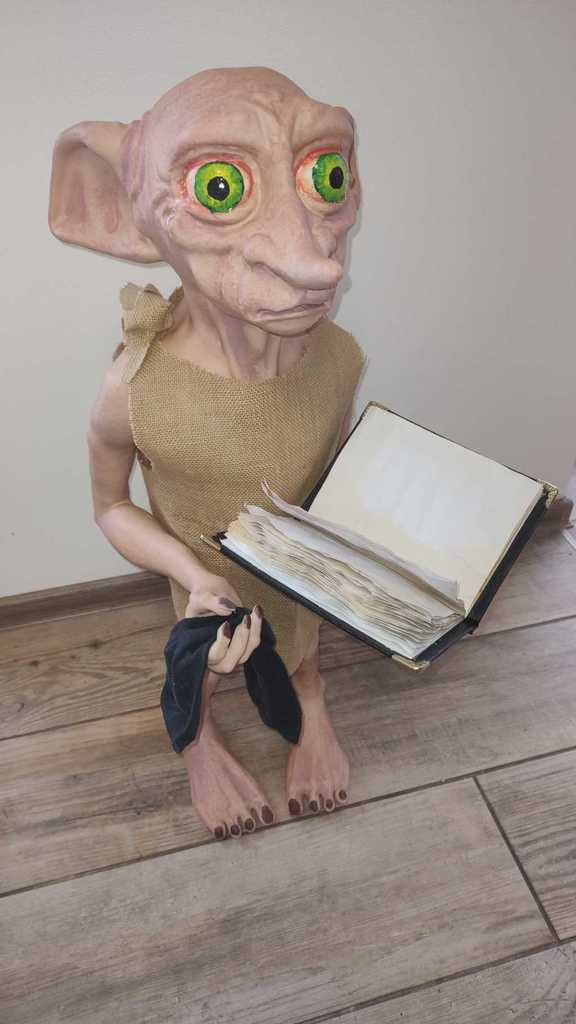
<b><u>CZ:</u></b> Když jsem narazil na https://www.thingiverse.com/thing:4160836 , bylo rozhodnuto o vánočním dárku, ale autor se o projekt moc nestaral, ačkoliv v diskuzi byly zmínky o chybějící dolní polovině těla, soubor nedoplnil. Navíc jsem se rozhodl postavičku tisknout v životní velikosti, což znamenalo nejen vše zvětšit, ale navíc i rozřezat nohy, které se na výšku do mé tiskárny po zvětšení nevešly. Můj tiskový prostor dovoloval bez řezání dalších dílů zvětšení na 190% (tisková plocha 215 x 215mm x 220mm). Chybějící spodní polovinu těla jsem na internetu sice našel, ale model byl v hrozném stavu - nepasoval k horní polovině těla, plocha kterou se měly části těla k sobě spojit ani nebyla plochou - velká část plochy se tiskla do vzduchu. Nakonec jsem musel tento díl domodelovat tak, aby byl alespoň trochu vyhovující. Tmelení se vyhnout nelze, ale nyní alespoň díly na sebe navazují. S hladším povrchem by se asi dalo také něco udělat, aby byl více podobný ostatním částem těla, ale nakonec jsem to neřešil, protože záměrem bylo postavu obléct a tato část těla vlastně není vůbec podstatná, protože není pod oblečením vidět. Vlastně bych se ani nedivil, kdyby jí někdo vůbec netiskl a horní část těla propojil s nohama kusy jakéhokoliv materiálu co bude po ruce. Tisk jsem nastavil na tloušťku vrstvy 0.2mm s tryskou 0.4mm, počtem 4 perimetrů a výplní nastavenou na 15%. Je to velmi přehnaná kvalita, která by se ve většině částí ani nemusela tmelit a spotřeboval jsem při tom asi 3.5 kg filamentu. Doba tisku byla samozřejmě také ultimátní - přes 250 hodin. Ke slicování jsem použil PrusaSlicer a netrápil jsem se s ručním umisťováním podpěr - použil jsem defaultní nastavení a automatiku. Celková spotřeba materiálu i času je taková, že podpěry na tom už moc nezmění. Jedna z věcí, které mě trápily byla, jak si poradím s nakreslením očí. Proto jsem z hlavy vyřízl část, která s minimální spotřebou filamentu umožní nacvičit techniku jejich kreslení. Bude to o pevné ruce, barvách, výběru štětců i postupu, takže si nemyslím, že by šlo o zbytečný krok. Vždyť to je část, která na celé postavě upoutá jako první. Povrchovou úpravu po nezbytném očištění od zbytků podpěr, vytmelení a vybroušení tmelu je třeba zahájit plničem, po sjednocení povrchu se dá použít klasická technika natírání, nebo stříkání tělové barvy. Kdo si chce vyhrát, použije světlejší a tmavší odstín a nanese houbičkou či jinou technikou stíny. Oči nechám na Vás - není to ani jednoduché, ani snadno popsatelné a ideálním zdrojem informací jsou obecná videa na youtube, kde je technika kreslení očí popsána. Na obleček jsem použil jemnější pytlovinu - takzvanou jutu. V podstatě jde o to sešít pytel, prostřihnout otvory na ruce a hlavu, jedno ramínko rozdělit a zajistit na něm uzel, což se s krátkými konci po rozstřižení nedá, takže aby to vypadalo jako originál, je možné buď našít na vzniklé rohy delší pásky stejného materiálu a zauzlovat, nebo udělat uzel jako samostatný díl z kusu extra materiálu. Podstavec pod nohy je nutnost - nohy nejsou uzpůsobeny pro stání - Dobby by padal. Ponožka do ruky je jasná věc a levá ruka je připravena pro umístění deníku, se kterým si jistě vyhrajete - kovové růžky lze koupit a deník si buď amatérsky svázat, nebo použít hotový s prázdnými listy a upravit jej do požadované podoby. Viděl jsem i umístění elektronického hlasového modulu s úryvky z filmu, takže další možnosti jsou na Vás. <b><u>EN (Google translatror):</u></b> When I came across https://www.thingiverse.com/thing:4160836 , a Christmas present was decided, but the author didn't really care about the project, although the discussion mentioned the missing lower half of the body, he did not complete the file. In addition, I decided to print the figure in life size, which meant not only enlarging everything, but also cutting out the legs, which did not fit vertically in my printer after enlarging. My printing space allowed without cutting other parts to be enlarged to 190% (printing area 215 x 215mm x 220mm). I did find the missing lower half of the body on the internet, but the model was in terrible condition - it didn't fit the upper half of the body, the surface where the parts of the body were supposed to connect to each other was not even flat - a large part of the surface was pressed into the air. In the end, I had to model this part so that it was at least somewhat satisfactory. Sealing cannot be avoided, but now at least the parts connect to each other. With a smoother surface, something could probably also be done to make it more similar to the other parts of the body, but in the end I didn't deal with it, because the intention was to dress the figure and this part of the body is actually not important at all, because it is not visible under the clothes. Actually, I wouldn't even be surprised if someone didn't press her at all and connected the upper part of the body to the legs with pieces of whatever material was at hand. I set the print to a layer thickness of 0.2mm with a nozzle of 0.4mm, the number of 4 perimeters and the fill set to 15%. It's a very exaggerated quality that wouldn't even need to be puttyed in most parts and I used about 3.5 kg of filament. Of course, the printing time was also ultimate - over 250 hours. I used PrusaSlicer for slicing and didn't bother with manual placement of supports - I used default settings and automatic. The total consumption of material and time is such that the supports will not make much of a difference. One of the things that bothered me was how to deal with drawing the eyes. That's why I cut out a part from the head, which will allow you to practice the technique of drawing them with minimal filament consumption. It will be about a steady hand, colors, choice of brushes and the process, so I don't think it would be an unnecessary step. After all, it is the part that catches the eye first on the entire figure. Surface treatment after the necessary cleaning from the remains of the supports, filling and sanding of the putty must be started with a filler, after unifying the surface, you can use the classic technique of painting or spraying body paint. Whoever wants to win will use a lighter and darker shade and apply shadows with a sponge or other technique. I'll leave the eyes to you - it's neither simple nor easy to describe, and the ideal source of information is general videos on YouTube where the technique of drawing eyes is described. I used softer burlap for the dress - so-called jute. Basically, it involves sewing the bag, cutting holes for the arms and head, splitting one shoulder strap and securing a knot on it, which is impossible with the short ends after cutting, so to make it look like the original, it is possible to either sew longer strips of the same of material and knot it, or make a knot as a separate part from a piece of extra material. A footrest is a must - the legs are not designed for standing - Dobby would fall. A sock in the hand is an obvious thing, and the left hand is ready to place a diary, which you will surely win with - metal corners can be bought and the diary can be tied amateurishly, or you can use a ready-made one with blank pages and adjust it to the desired shape.
With this file you will be able to print Dobby - Life Size (80cm) with your 3D printer. Click on the button and save the file on your computer to work, edit or customize your design. You can also find more 3D designs for printers on Dobby - Life Size (80cm).