Dobsonian Telescope (Go-to or manual)
thingiverse
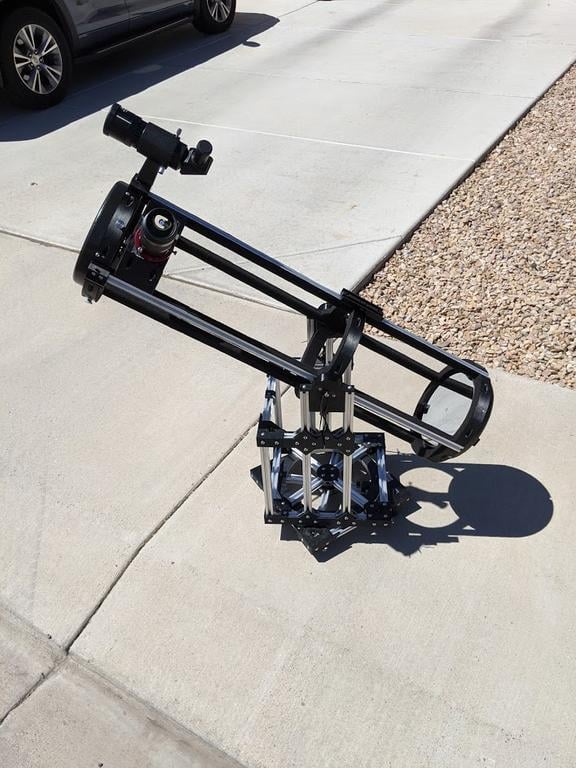
This is a motorized ('go-to') Dobsonian-style telescope constructed mostly from aluminum extrusion and 3D-printed parts. It also makes use of donor parts from a Celestron C8N - specifically, the primary mirror, primary mirror cell, secondary mirror, secondary mirror spider, top 'beauty' ring, and telescope cap. You could easily leave out the 'beauty' ring and cap, and the files could be modified for using a different secondary and/or primary setup. By changing the length of the extrusion, you could also adjust for differing focal lengths. I designed it around C8N parts because that is what I had on hand after being generously given them by a friend. You'll likely want to change the lettering on the focuser plate if you go with a different focal length, however. I'm posting enough files for two iterations of this telescope - one that is manual-mode only and one that makes use of electronics and the wonderful OnStep software for go-to capability, tracking, and syncing with a smartphone, computer, or tablet. I initially designed this for manual-mode only, so the majority of the 'OnStep upgrade' parts fit over or around the manual configuration for relatively simple upgrading in the future. The manual version uses a small braking mechanism to adjust friction for the azimuth bearing. Two parts are included in the file list, but you will also need a small pen spring and a knob for the bolt head (I used one I had on hand, and there are plenty on Thingiverse to choose from). Upgrading from the manual version to the OnStep version makes the braking mechanism unnecessary. The altitude bearing is dampened with strips of vinyl tape and held up well when properly balanced. I tried many materials to find appropriate friction for the altitude bearing. Larger bearings using laminate or FRP on teflon squares would work best, but this design uses smaller bearings. Bare PETG on PETG parts have very little friction, so some kind of modifier material is necessary. It is absolutely required for the manual version and may not be necessary for the OnStep version but I left mine in there. Please note that the altitude bearings also have a center hole that is not used for mounting. Instead, I installed an overlong M5 bolt through this hole that is allowed to spin freely. Attaching a spring to the outside of this bolt with the other side mounted to a bolt in the extrusion beneath allows you to further adjust tension on the altitude bearings (this is similar to some commercially-produced Dobsonians). Upgrading from the manual version to the OnStep version requires drilling out the center cross bars on the base and installing an M8 bolt for a center pivot. There are special versions of the center pucks that must be installed (where the pucks on the manual version are purely decorative). There is a groundboard bottom-specific puck, groundboard-top puck, and two rocker board pucks. 608ZZ bearings are installed during this process, along with small glue-in bushings. Feel free to remix the rocker pucks and merge them with the glue-in bushings if you like, but it'll probably require supports to print. I found my method a bit easier, but YMMV. The adjustable feet were tapped with M5 threads and move up and down overlong bolts installed in three locations under the ground board. One is long as it mounts direct to the extrusion bar, the others are slightly shorter as they mount to bolts that pass through brackets. This way they remain level when screwed all the way down. The easiest way to install these is with a headless M5 bolt into a t nut in the extrusion. There are other adjustable feet designs out there though that are likely better. There are several 'optional' parts in this build I've included. There are snap-in locks for the azimuth and altitude axes (90 and 180 degrees for the latter) that help stabilize the telescope when transporting. There are wire clips that snap into the extrusion and help hold wiring out of the way, as well as a snap-in, sliding cover that protects the USB port of the control board when not in use. I also designed a very small, very basic hand controller for when I didn't want to get my phone, computer, or tablet out. You could also build any number of simple or complex hand controllers from the plans available on the OnStep website. I've also included a Synta-style finder bracket that mounts to the extrusion bars. Lastly, there is a vixen-style dovetail clamp that is designed to attach to one (or both) of the altitude bearings for mounting a small refractor that will move along with the dobsonian when tracking (though I'll admit that alignment will not be perfect). I don't think I'll ever see this project as 'finished', so I'm guessing it'll get left in the 'work in progress' mode perpetually. All told, it works and tracks well. But it will always be a work in progress to me. I've tried to be as thorough as I can with the parts list but it's possible I've missed some things. More detailed information regarding the build is available at [Cloudy Nights](https://www.cloudynights.com/topic/703375-3d-printedaluminum-extrusion-goto-dob/) or on [Imgur](https://imgur.com/gallery/NX1yaJ8). PARTS KineOptics HC-2 helical focuser 12" heavy duty lazy susan BBQ bearing ([link](https://www.amazon.com/gp/product/B071CPFGJT/ref=ppx_yo_dt_b_search_asin_image?ie=UTF8&psc=1)) 5mm barrel nuts (to extend spider mount into top ribs) 5mm knurled screws (for adjusting secondary spider tension) M5 button head screws (various lengths between 5mm and 45mm*) M5 pan head screws (for countersinking the mount to the azimuth bearing) M5 t nuts M3 button head screws (for mounting C8N rings, assembling the optional control cube) Small spring (for optional brake mechanism, I took mine from a pen) Adhesive-backed felt (for flocking) (2) NEMA 17 200 step motors with integrated 100:1 planetary gears (1) MKS Gen L v2.0 3D printer board (1) WeMos D1 wifi board (2) TMC2130 stepper motor drivers (2) 20 tooth GT2 gears (1) 500 tooth GT2 timing belt (1) 470 tooth GT2 timing belt (4) 8mm bearings (1) 8mm bolt (1) 8mm locking nut (1) 24v PSU brick (4) momentary mini push-buttons (for optional hand controller) *I assembled this while designing it, so I do not have an exact count list on bolts and t-nuts. I also used printed or purchased washers/spacers where necessary. Note that the gear design is a derivative from [here](https://www.thingiverse.com/thing:3544542). The extrusion is 2020 standard profile that uses a 6mm center channel (which allows standard M5 t-nuts). Beware of 2020 profiles from other sellers that uses a more narrow (often 5mm channel), which requires special (and unnecessarily expensive) t nuts. The cut list is very much dependent upon how high you want the OTA mounted, which is also dependent upon balance. I started with these figures and eventually slid the altitude brackets and mid ribs on my OTA down approximately 35mm for balancing purposes. While I could have left the base as-is, I elected to cut the vertical bars on the base down so as to lower the OTA on the base. Extrusion Cuts OTA (4) 921mm rocker board (2) 303.5mm (2) 283.5mm (2) 180.5mm (1) 381mm ground board (2) 323.5mm (2) 283.5mm (2) 180.5mm (1) 381mm upper base assembly (4) 430mm (2) 80.5mm (2) 81.5mm (2) 305mm (2) 85mm (1) 283.5mm OTA - 15 printed parts, 4 extruded bars Base - 45 printed parts, 13 extruded bars OnStep - 18 printed parts Optional add-ons - 14 printed parts
With this file you will be able to print Dobsonian Telescope (Go-to or manual) with your 3D printer. Click on the button and save the file on your computer to work, edit or customize your design. You can also find more 3D designs for printers on Dobsonian Telescope (Go-to or manual).