Dog PET feeder with step motor 28BYJ-48
thingiverse
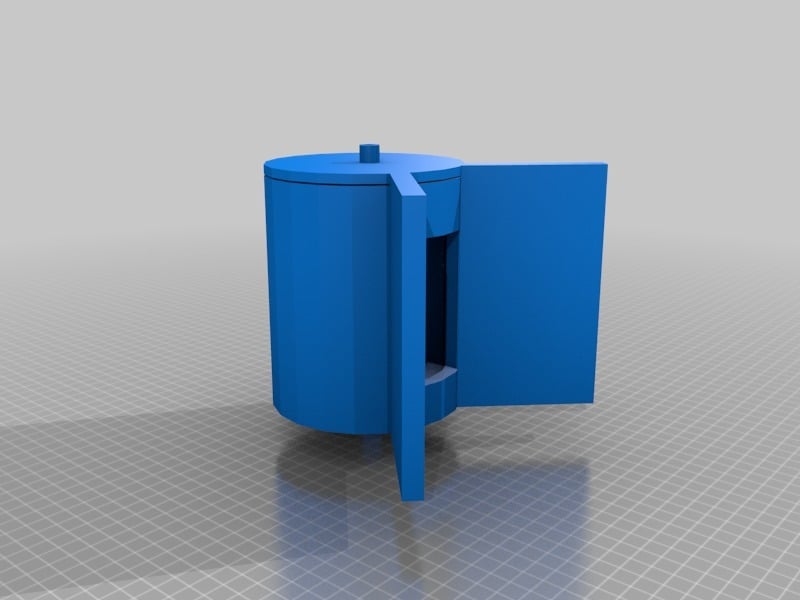
This thing was made with Tinkercad: https://www.tinkercad.com/things/drpsvhq0YkR This is a simple design of a pet feeder system using Step Motor 28BYJ-48 5VDC. It's a starting project which will be updated. You must divide this item in two parts: - Inside part which will rotate with a step motor. - Outside part with the hooper and a envelope of the inside part (to allow inside part rotating free). You can put this hooper downside a manual hooper and transform it in a automatic hooper. It will be a pleasure if this item is useful for any of you. If you made one please also post a picture of your setup with the cover. Thanks. Here you have an arduino example (with arduino mini, step motor and a clock credit to: https://www.luisllamas.es/motor-paso-paso-28byj-48-arduino-driver-uln2003/): //AJUSTES / MANUAL ADJUST const int ajustefino_cw = 10; // adjust input: one cw step const int ajustefino_ccw = 11; // adjust input: one ccw step const int alimentarmanual = 13; // manual feed //TEMPORIZADOR / TIMER include "Wire.h" include "RTClib.h" // A4 -> SDA // A5 -> SCL // RTC_DS1307 rtc; RTC_DS3231 rtc; //String daysOfTheWeek[7] = { "Sunday", "Monday", "Tuesday", "Wednesday", "Thursday", "Friday", "Saturday" }; //String monthsNames[12] = { "January", "February", "March", "April", "May", "June", "July","August","September","October","November","December" }; String daysOfTheWeek[7] = { "Domingo", "Lunes", "Martes", "Miercoles", "Jueves", "Viernes", "Sabado" }; String monthsNames[12] = { "Enero", "Febrero", "Marzo", "Abril", "Mayo", "Junio", "Julio","Agosto","Septiembre","Octubre","Noviembre","Diciembre" }; const int outputPin = LED_BUILTIN; bool state = false; //STEP MOTOR //----- //definicion de pins const int motorPin1 = 6; // 28BYJ48 In1 const int motorPin2 = 7; // 28BYJ48 In2 const int motorPin3 = 8; // 28BYJ48 In3 const int motorPin4 = 9; // 28BYJ48 In4 // variable definition int motorSpeed = 1200; //variable para fijar la velocidad / step motor velocity int stepCounter = 0; // contador para los pasos / step counter int stepsPerRev = 4076; // pasos para una vuelta completa / steps/turn //tablas con la secuencia de encendido (descomentar la que necesiteis) / tables with the secuence //secuencia 1-fase / 1 phase //const int numSteps = 4; //const int stepsLookup[4] = { B1000, B0100, B0010, B0001 }; //secuencia 2-fases / 2 phases //const int numSteps = 4; //const int stepsLookup[4] = { B1100, B0110, B0011, B1001 }; //secuencia media fase / Half phase const int numSteps = 8; const int stepsLookup[8] = { B1000, B1100, B0100, B0110, B0010, B0011, B0001, B1001 }; void setup() { //AJUSTE FINO / FINE ADJUST pinMode(ajustefino_cw, INPUT); pinMode(ajustefino_ccw, INPUT); pinMode(alimentarmanual, INPUT); //TEMPORIZADOR / TIMER Serial.begin(9600); delay(1000); if (!rtc.begin()) { Serial.println(F("Couldn't find RTC")); while (1); } // Si se ha perdido la corriente, fijar fecha y hora / If lose current set time and date if (rtc.lostPower()) { // Fijar a fecha y hora de compilacion rtc.adjust(DateTime(F(DATE), F(TIME))); // Fijar a fecha y hora específica. En el ejemplo, 21 de Enero de 2019 a las 03:00:00 / to set hour and date, pe 21 january 2019 // rtc.adjust(DateTime(2019, 1, 21, 3, 0, 0)); } state = false; //STEP MOTOR //declarar pines como salida / declaration of the pins pinMode(motorPin1, OUTPUT); pinMode(motorPin2, OUTPUT); pinMode(motorPin3, OUTPUT); pinMode(motorPin4, OUTPUT); } void loop() { //AJUSTE FINO / FINE ADJUST if (digitalRead(ajustefino_cw)==HIGH) pasoclockwise(); if (digitalRead(ajustefino_ccw)==HIGH) pasoanticlockwise(); // Obtener fecha actual y mostrar por Serial / obtain and serial pushish actual time and date DateTime now = rtc.now(); printDate(now); if (digitalRead(alimentarmanual)==true || (state == false && isScheduledON(now))) // Apagado y debería estar encendido / Check it if it must be on { digitalWrite(outputPin, HIGH); state = true; Serial.print("Activado"); for (int i = 0; i < stepsPerRev 0.7; i++) { clockwise(); delayMicroseconds(motorSpeed); } for (int i = 0; i < stepsPerRev 0.7; i++) { anticlockwise(); delayMicroseconds(motorSpeed); } } else if (state == true && !isScheduledON(now)) // Encendido y deberia estar apagado / Check it if it must be off { digitalWrite(outputPin, LOW); state = false; Serial.print("Desactivar"); } delay(5000); } //AJUSTE FINO / FINE ADJUST // Function to adjust a bit in ccw void pasoclockwise() { for (int i = 0; i < 100; i++) { clockwise(); delayMicroseconds(motorSpeed); } } // Function to adjust a bit in cw void pasoanticlockwise() { for (int i = 0; i < 100; i++) { anticlockwise(); delayMicroseconds(motorSpeed); } } //TEMPORIZADOR / TIMER void printDate(DateTime date) { Serial.print(date.year(), DEC); Serial.print('/'); Serial.print(date.month(), DEC); Serial.print('/'); Serial.print(date.day(), DEC); Serial.print(" ("); Serial.print(daysOfTheWeek[date.dayOfTheWeek()]); Serial.print(") "); Serial.print(date.hour(), DEC); Serial.print(':'); Serial.print(date.minute(), DEC); Serial.print(':'); Serial.print(date.second(), DEC); Serial.println(); } // Comprobar si esta programado el encendido bool isScheduledON(DateTime date) { int weekDay = date.dayOfTheWeek(); float hours = date.hour() + date.minute() / 60.0; // De 10:30 a 11:30 y de 20:15 a 23:15 bool hourCondition = (hours > 10.50 && hours < 11.50) || (hours > 20.25 && hours < 23.25); Serial.println(); // Lunes, Viernes o Domingo bool dayCondition = (weekDay == 1 || weekDay == 5 || weekDay == 0); if (hourCondition && dayCondition) { return true; } return false; } //STEP MOTOR void clockwise() { stepCounter++; if (stepCounter >= numSteps) stepCounter = 0; setOutput(stepCounter); } void anticlockwise() { stepCounter--; if (stepCounter < 0) stepCounter = numSteps - 1; setOutput(stepCounter); } void setOutput(int step) { digitalWrite(motorPin1, bitRead(stepsLookup[step], 0)); digitalWrite(motorPin2, bitRead(stepsLookup[step], 1)); digitalWrite(motorPin3, bitRead(stepsLookup[step], 2)); digitalWrite(motorPin4, bitRead(stepsLookup[step], 3)); }
With this file you will be able to print Dog PET feeder with step motor 28BYJ-48 with your 3D printer. Click on the button and save the file on your computer to work, edit or customize your design. You can also find more 3D designs for printers on Dog PET feeder with step motor 28BYJ-48.