Doomhammer
thingiverse
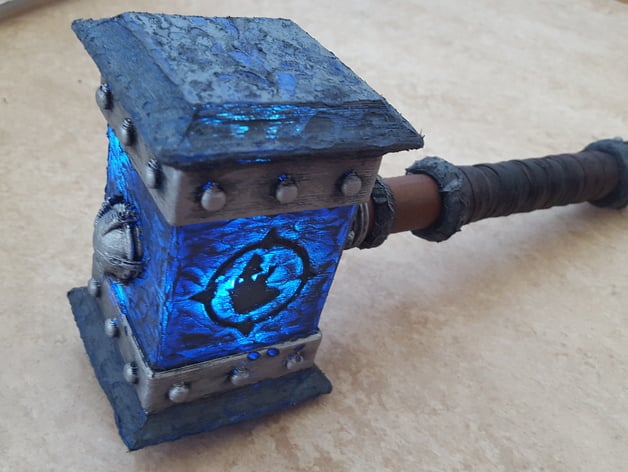
"It is called the Doomhammer because when its owner takes it into battle, it spells doom for the enemy. The last of the Doomhammer line will use it to bring first salvation and then doom to the orc people. Then it will pass into the hands of one who is not of the Blackrock clan, all will change again, and it will once again be used in the cause of justice." The legendary Doomhammer seems like a fitting last item to my series of Warcraft related PETG printables at least for now. Design was made combining features from many fan-art pictures as well as short cinematic in the game of Warcraft III. I tried to make it as easily printable as possible while still keeping the original look of the item. This was by far the most difficult of the three Warcraft items I have printed during the past weeks; not because of the printing though, but because of the post processing to get the "granite stone look" to certain parts and the gradient glow to the whole hammer head. Would have been easier with lighter blue PETG, but the one I ordered happened to be quite dark, so even with pure white LED's the glow is quite dim in comparison to the other two I made before. Another option would be to use colorless PETG and blue LED's. I think that'd have been easier as well. Hammer head printed from blue PETG. Rest of the parts PLA. Post processing and details done with Citadel miniature paints and melting the surface with a soldering iron to achieve the "chiseled stone" texture. Handle also has fake-leather strips wrapped around it. Instructions Hammer head printed from blue PETG in two parts (cuts 1 & 2) with following settings: Layer height: 0.3mm First layer height: 0.3mm Perimeters: 2 Infill: 0% No support/raft Rest of the parts printed from PLA with following settings: Layer height: 0.2mm First layer height: 0.25mm Perimeters: 2 Infill: 10% No support/raft Assembly as follows: Glue the hammer head parts 1 and 2 together. Glue a piece of scrap metal with a positive wire attached to the bottom of the electronics holder, then push the holder to its place Insert the negative wire through its channel inside the handle, leave plenty to work with on both ends. Insert the decorative ring to the handle just below the power switch place. Insert LED's to the handle_base. I used 3 x pure white. Wire the leads through the channel and glue the LED's to their place. Insert power switch to its place. Connect to the positive wire coming from the bottom of the electronics holder, and to the positive leads of LED's. Remember to use resistors in between if needed. Connect the negative wire to the negative leads of LED's. Attach the other end of the negative lead to a piece of scrap metal, preferably with a spring, and glue it to the handle_bottom with a bit of extra wire to allow removing the end cap when replacing batteries. Assemble the handle by inserting 2 x AA batteries in and pushing the bottom cap to its place as well as the handle_base. Push the assembled handle into its place in hammer_bottom, and the hammer_bottom to the main hammer head. Secure with glue. Paint and decorate however you like. :)
With this file you will be able to print Doomhammer with your 3D printer. Click on the button and save the file on your computer to work, edit or customize your design. You can also find more 3D designs for printers on Doomhammer.