Double Layer Maze Cube
thingiverse
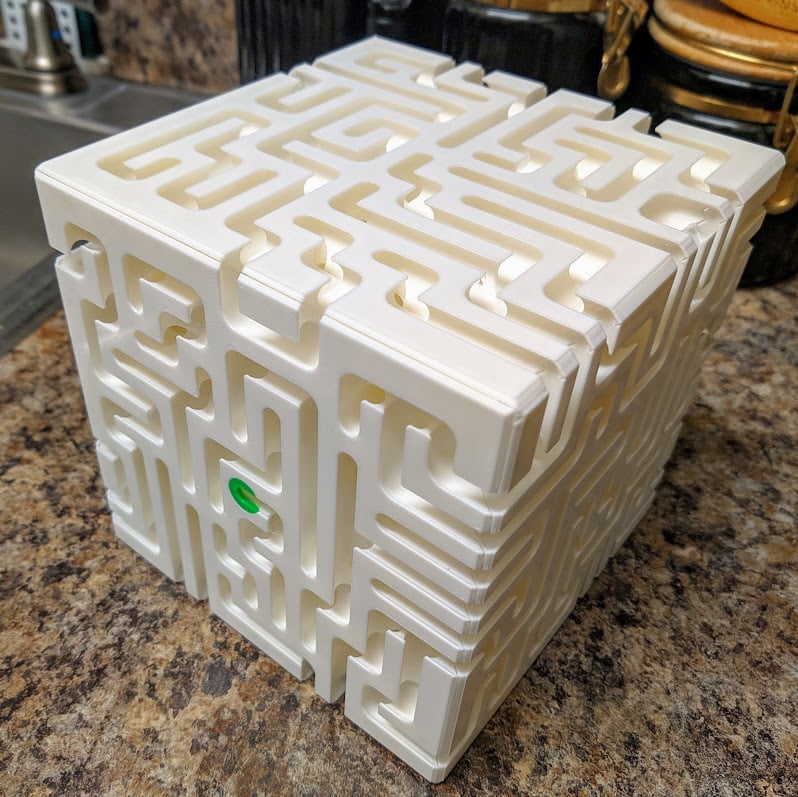
This is the mother of all mazes. The paths you see on the outside are just that, The ones on the outside. There is also a second level of paths below the surface. You’ll need to drop the ball down into the second level, where it will travel underneath, and come up at another location in the maze. FYI, there is an occasional path split on the underside, that you can’t see. Good luck figuring out where. This all has the effect of making it impossible to follow the maze around with your finger, ahead of the ball or going backwards from the finish. You’ll never know where the ball is going to resurface. If you think THAT sounds hard, the dead-ends that you’re used to in typical mazes are even more devious. They aren’t dead-ends at all. They are holes that go into the hollow center of the cube. All these holes are one-way. You can’t get your ball back once it has dropped in. Well, there is ONE way, a hole that leads from the center to very beginning of the maze. So every time you mess up, you have to start all over again. In essence, you have to memorize every path and every hole in order to win. I designed the thing and was only ever able to beat it after looking at the original paper I used to map the paths and memorize it. Instructions: On the top of the cube there is a knob. On that same side there is a colored cut-out that indicates the hole the ball will come through when you lose. If the ball has fallen in the center, turn the cube so that side is facing down. It’s funnel shaped on the inside, so it should naturally roll toward the hole. If not, give it a shake and tilt it toward that corner to get the ball moving. After a couple times, you’ll get the hang of it. Once/If you get the ball to the end of the maze, it follows an internal path that leads to the knob on the top. Turn the knob so it lines up with the grove and slide it down the path. This allows the ball to come back into the maze. This takes a full roll of filament or more to print. Each side of the cube takes me 12-13 hours to print on my machine. You need to print nice and slow. If you go to fast, the path wall get distorted on the end and the ball won't fit. You'll also want ZERO stringing. You can't clean up where you can't get to. And there's a lot of places to can't get to on this print. Get that solved on something else before printing this. You've been warned. Don't cry to me when you waste a ton of plastic. Test the paths after you pull them off the printer and before assembly to verify that the ball passes through all of the paths. It's easier to file down any offending goobers if you can get to the sides. Later, should you find a spot where the ball sticks, you can use a pen to push it along. Sometimes shaking it will be enough to force it through. It uses a 7/16" ~ 11mm ball bearing. I designed it around that exact size. The wall thickness between two paths is .8mm. If you decrease the size of the model, you will end up with less than 2 layers which might decrease the integrity of the maze. You should be OK increasing the size, but the maze walls may not fuse in the middle using 2 layers. You'll need to print 3x End Caps, 44x Flipper 1, 4x Flipper 2, 3x Flipper 3, 1 Knob, and 28 Flipper Mounts. It works best to print the end caps with different colors that will make it easier to identify the start and the end of the maze. The flippers keep people from rolling the ball back into the maze from the center. One side of the flipper mount is embedded into the maze. The other side will need to be glued into the notches after getting the flippers in place. Make sure they move freely before the glue dries and you assemble the rest of the cube. Give all the sides a test assembly. You'll want to make sure everything will go together correctly before you start gluing. Have a handful of rubber bands ready. Set the top and bottom pieces aside. Take the other 4, lay them in order on the table. Place some glue in the areas that look like they are going to touch piece next to it when put together. You don't want to get any glue into the ball path. Leave one side laying flat and attach the 2 pieces on either side of it. The last piece should go on top. While holding all the pieces together, flip it so the open spaces are now on the top and bottom. Wrap several rubber bands around it to keep it together Put some glue on the walls facing up (but not where the ball will roll) and put the corresponding piece in place. Flip it over and do the same for the last side. Wrap some more rubber band around to hold the top and bottom in place. To get the sides all tight with the smallest amount of gap between them, try using a small ratchet strap on top of the rubber bands. I printed one that used paracord as the strap. After the glue has dried, put the knob in the center hole on the top side. line it up with the grove and slide it into the path and add the end caps. When the glue has dried, the knob should be able to slide overtop the end cap and turn. This will keep the ball from falling back into the path that leads from the end to the beginning. Make sure you drop the ball in before you add the last End Cap.
With this file you will be able to print Double Layer Maze Cube with your 3D printer. Click on the button and save the file on your computer to work, edit or customize your design. You can also find more 3D designs for printers on Double Layer Maze Cube.