Double Slit Light Experiment
thingiverse
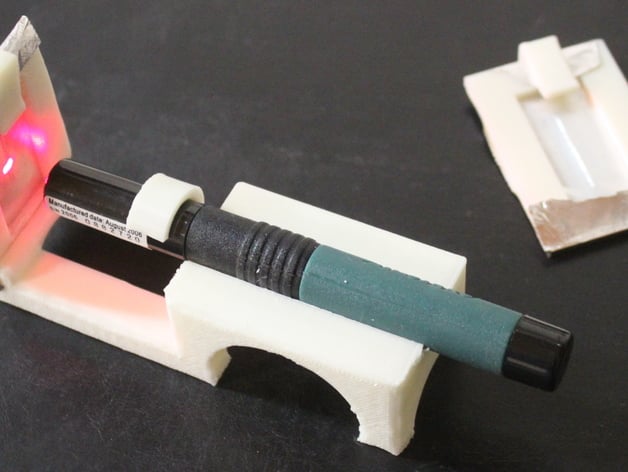
Human: Is Light a Wave, Particle, or Both? The classic "double slit experiment" using coherent light gives some insight. This design consists of a stand for a laser pointer and a single or double slit gate made of paper or aluminum foil so you can conduct your own double slit experiment. Can you predict what will happen? All you need is the printed parts, a laser pointer and some paper and/or aluminum foil. The printed parts include a stand for the laser pointer, a frame and alligator clip to hold the gate material and a circular clip to hold down the laser pointer button. Print multiple sets of frames and alligator clips and you can quickly switch back and forth between different gates. Print Settings Printer Brand: MakerBot Printer: MakerBot Replicator 2X Rafts: No Supports: Yes Resolution: Standard (0.20 mm) Infill: 15% Notes: Supports will help with printing some of the arches on the stand. The other parts do not require any supports if oriented properly. How I Designed This Fitting the parts to your laser pointer All the parts were designed with FreeCAD. The stand was designed to hold a 14 mm diameter laser pointer. If you have one that is a different size, you can make two easy adjustments to make it work with your pointer. First, go FreeCAD and open the original CAD file. Next, change the radius of the horizontal stand cutout (cylinder005) to be slightly larger than the radius of your pointer. Next, enlarge both cylinders of the button clip to fit your pointer (Cylinder_Outer and Cylinder_Inner). A tight fit is not necessary. The pointer just needs to rest easily in the stand so it doesn't move while you observe your results. Custom Section Project: Double Slit Light Experiment Objectives: Conduct a single slit and double slit light experiment, compare the results and learn about the properties of light. Audiences: 5th grade and up. Preparation: Students should have some understanding of the behavior of light: it travels in straight lines, it has can have different colors/frequencies, and sometimes it acts like a wave and sometimes it acts like a particle. Materials: printed parts; a laser pointer; paper and/or aluminum foil (aluminum foil allows you to make thinner, more precise slits, which produces a clearer interference pattern); a utility knife or scissors; a piece of white paper; tape; and a large room that can be made dark. Steps: Cut the gate material (paper or aluminum foil) into rectangles that are the same width as the frames and about 1/2" taller than the frames. Wrap the gate material around the frame and clip one end with the alligator clip. (If you are using aluminum foil, now is a good time to smooth out the foil with a finger before you start cutting). Take the knife or scissors and cut two parallel slits in the gate material. Place the single slit gate on the stand and aim it at the target screen. Document and discuss your observations. Predict what will happen when you have two slits. Repeat the experiment with the double slit gate. Document and discuss your observations with the double slit gate. After discussing the results, can you think of other experiments and predict the outcomes? What will happen if you make three slits instead of two? Results: After switching back and forth between the single and double slit screens, students should have observed the following: For the single slit gate, a plain solid pattern that was brighter at the center and then gradually got darker towards the edges. For the double slit gate, an interference pattern that had alternating bright and dark bands due to the changes in the path lengths of both waves with a resulting phase shift. Students should be able to explain why the interference pattern appears with two slits, but not with one. Web sites like these may be helpful for this discussion: https://en.wikipedia.org/wiki/Young's_interference_experiment https://www.youtube.com/watch?v=Iuv6hY6zsd0 More advanced discussions/experiments could ask: What happens to the pattern when we change the distance between the gate and the target screen? What happens to the pattern when we make the two parallel slits further apart? Try using a paper gate and an aluminum foil gate. What is the difference and why? What is the effect of changing the frequency of the light? (Try a green laser and a red laser) Would any source of light have worked or did we need a laser? Observations
With this file you will be able to print Double Slit Light Experiment with your 3D printer. Click on the button and save the file on your computer to work, edit or customize your design. You can also find more 3D designs for printers on Double Slit Light Experiment.