Drawing Machine
prusaprinters
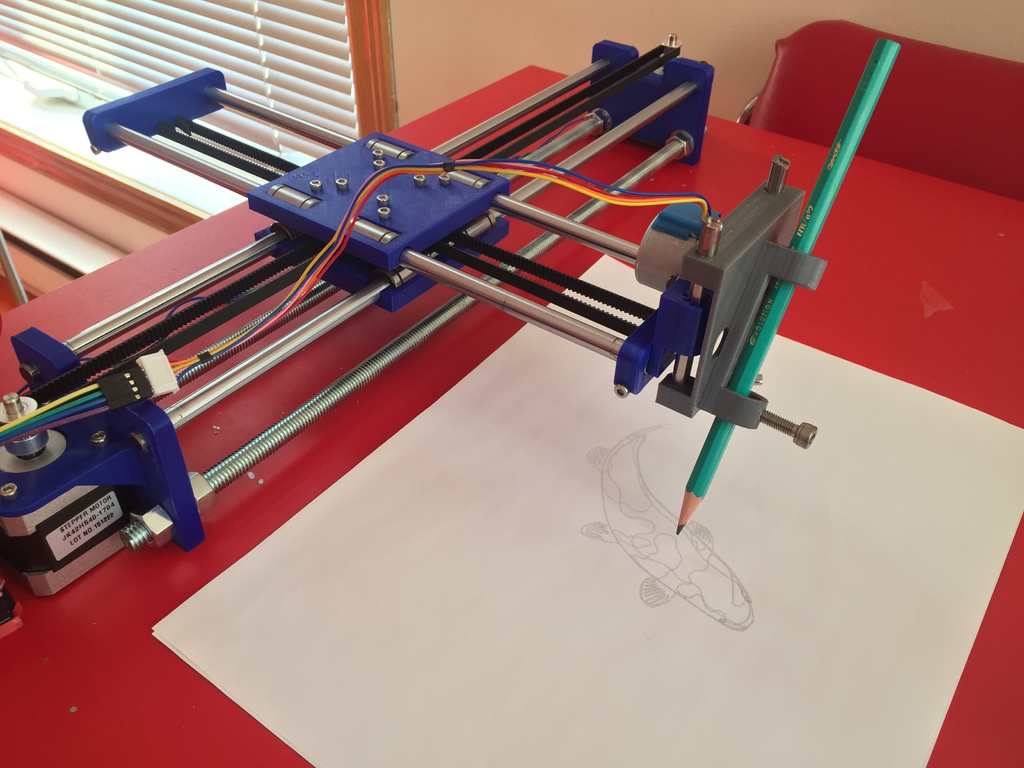
<p>My take on Misan's drawing machine. I made one with a grbl controller and a CNC shield and adapted Misan's parts to be 3D printed.</p> <p>Please read Misan's instructions as well.</p> <p>The drawing machine is a small three axis robot that controls a pen or any drawing implement over a canvas. It is a complete open source design and aims to teach the basics of robotics.</p> <p>Budget for one is about 80$. You will need a 3D printer.</p> <p>The Z stage does not use a servo, as in Misan's machine, but rather one of those cheap 28BYJ stepper motors you can find for 1.50$ on eBay.</p> <p>NOTE: The photos are of the current prototype, some of the modifications to the various bits and pieces have not yet been tested.</p> <p>If you have a question, first search in the Comments section. If you can't find an answer, then ask in a Comment. I will answer as fast and as much as I can.</p> <p>And please, share your makes!</p> <h3>Print Settings</h3> <p><strong>Printer:</strong></p> <p>Wanhao i3 Duplicator</p> <p><strong>Rafts:</strong></p> <p>Doesn't Matter</p> <p><strong>Supports:</strong></p> <p>No</p> <p><strong>Resolution:</strong></p> <p>0.2 mm</p> <p><strong>Infill:</strong></p> <p>15% minimum</p> <p><strong>Filament:</strong> Your favourite filament brand PLA</p> <p><strong>Notes:</strong></p> <p>The Y end stops take a lot of tension from the belt. Making them as strong as possible to prevent flexing is not a bad idea.</p> <h3>How I Designed This</h3> <p>This thing was made with Tinkercad. Get it <a href="https://www.tinkercad.com/things/9lmwyFJ4Kpc">here</a>.</p> <h3>How-to</h3> <p><strong>Grocery list</strong></p> <p>Definitely<strong>not</strong> <a href="http://shop.evilmadscientist.com/productsmenu/846">475$ worth of parts</a>...</p> <p>Below are some searches on eBay that you could use for your own machine. I am not affiliated with any of the vendors that those searches may yield. Please proceed with caution on eBay.</p> <h5>You will need:</h5> <p>1 x Arduino (any <a href="http://www.ebay.com/sch/i.html?_nkw=Arduino+UNO+R3+ATmega328P+CH340">cheap clone</a> will do) with USB cable</p> <p>1 x <a href="http://www.ebay.com/sch/i.html?_nkw=Arduino+CNC+Shield+GRBL">CNC shield</a>. Look for the ones with included jumpers. It's a drag when you don't have them and you need to configure microstepping.</p> <p>3 x <a href="http://www.ebay.com/sch/i.html?_nkw=Stepper+driver+A4988">Stepper drivers</a></p> <p>1 x 12V power supply (the one I have is a quite beefy 12.5A, salvaged from another project)</p> <p>4 x <a href="http://www.ebay.com/sch/i.html?_nkw=8mm+optical+rod">8 mm diameter rods</a>, any length you want (by pairs though). I used 2 x 400mm for X and 2 x 300 mm for Y (recycled from printers and scanners.) With these lengths, and the new Z stage, I get about 312(X) x 212(Y) x 23(Z) mm of workspace.</p> <p>2 x X lengths of 10 mm (or 3/8") threaded rod, with associated bolts, washers and nuts</p> <p>8 x <a href="http://www.ebay.com/sch/i.html?_nkw=LM8UU+linear+bearing">LM8UU linear bearings</a></p> <p>2 x <a href="http://www.ebay.com/sch/i.html?_nkw=nema17+stepper">NEMA 17 steppers</a></p> <p><a href="http://www.ebay.com/sch/i.html?_nkw=Ramps+Wiring++Kit">Cables and connectors</a></p> <p>5 x <a href="http://www.ebay.com/sch/i.html?_nkw=10mm+idler+pulley+smooth+gt2">smooth idler pulleys</a> (16 teeth or 10 mm, 3 mm bore)</p> <p>2 x <a href="http://www.ebay.com/sch/i.html?_nkw=GT2+timing+pulley+5mm+bore+16+teeth">pulleys</a> (16 teeth, 5 mm bore) (you can also use 20 teeth with different grbl settings)</p> <p><a href="http://www.ebay.com/sch/i.html?_nkw=GT2+belt">GT2 belt</a>: to know how much you need, add your X to your Y, multiply by two and add two inches for luck</p> <p>An assortment of M3 bolts in various length and their nuts</p> <h5>For the Z stage:</h5> <p>1 x <a href="http://www.ebay.com/sch/i.html?_nkw=28BYJ">28BYJ</a> stepper motor (5V or 12V)</p> <p>1 x M5 bolt to secure the pen to the Z carriage</p> <p>2 x 60+ mm of <a href="http://www.ebay.com/sch/i.html?_nkw=6mm+optical+rod">6 mm diameter rod</a> (I got mine from an old scanner)</p> <p><strong>Model Files</strong></p> <p>For some reason, when you upload OBJ to Thingiverse, objects are rotated 90 degrees (clockwise) around the X axis. Rotate -90 degrees in your slicer before printing. Of course, the two model files that are in the STL format (they come directly from Misan's model) are not rotated. Go figure...</p> <p>If you experience difficulties with the OBJ format, go to TinkerCad <a href="https://www.tinkercad.com/things/9lmwyFJ4Kpc">here</a>, copy the project to your account and export to STL.</p> <p><strong>Assembly</strong></p> <p>Before installing the stepper drivers on the CNC shield, install jumpers for <a href="https://blog.protoneer.co.nz/arduino-cnc-shield-v3-00-assembly-guide/#Jumpers">microstepping</a>. I installed all three jumpers on the three axis. Such precision may not be necessary for the Z axis.</p> <p>The 28BYJ can be 5V or 12V. It does not matter (see <a href="http://blog.inventables.com/p/stepper-motors.html">this article</a>).</p> <p>You may have to open the stepper to cut a trace on its PCB to disconnect the red wire (see <a href="http://www.jangeox.be/2013/10/change-unipolar-28byj-48-to-bipolar.html">here</a>) and use: orange, pink, blue, yellow, in that order (blue, yellow, orange, pink should work too) Adjust the potentiometer on A4988 counter-clockwise until the motor runs but does not overheat (<a href="https://www.pololu.com/product/1182">check this article for details</a>).</p> <p>The last model file and photograph show (hopefully) how it all fits together.</p> <p><strong>grbl</strong></p> <p>You will need to re-<a href="https://github.com/grbl/grbl/wiki/Compiling-Grbl">compile grbl</a> to activate CoreXY control.</p> <p>Before you compile, change config.h as such:</p> <p>#define HOMING_CYCLE_0 (1<<x_axis) #define="" (1<<y_axis)<="" homing_cycle_1="" p=""> <p>// and this below goes uncommented #define COREXY</p> <p><strong>Control Software</strong></p> <p>For control, I am using <a href="https://github.com/cheton/cnc">bCNC</a>. Neat package.</p> <p>I use Inkscape with <a href="http://www.cnc-club.ru/gcodetools">Gcodetools extension</a> to generate gcode. YMMV.</p> <p><strong>grbl Settings (YMMV)</strong></p> <p>$4=0 (step enable invert, bool)</p> <p>$5=0 (limit pins invert, bool)</p> <p>$6=0 (probe pin invert, bool)</p> <p>$10=3 (status report mask:00000011)</p> <p>$11=0.010 (junction deviation, mm)</p> <p>$12=0.002 (arc tolerance, mm)</p> <p>$13=0 (report inches, bool)</p> <p>$20=0 (soft limits, bool)</p> <p>$21=1 (hard limits, bool)</p> <p>$22=0 (homing cycle, bool)</p> <p>$23=0 (homing dir invert mask:00000000)</p> <p>$24=25.000 (homing feed, mm/min)</p> <p>$25=500.000 (homing seek, mm/min)</p> <p>$26=250 (homing debounce, msec)</p> <p>$27=1.000 (homing pull-off, mm)</p> <p>$100=96.000 (x, step/mm) or<em>80.000 if you used 20 teeth pulleys</em></p> <p>$101=96.000 (y, step/mm) or<em>80.000 if you used 20 teeth pulleys</em></p> <p>$102=814.000 (z, step/mm)</p> <p>$110=20000.000 (x max rate, mm/min)</p> <p>$111=20000.000 (y max rate, mm/min)</p> <p>$112=2200.000 (z max rate, mm/min)</p> <p>$120=200.000 (x accel, mm/sec^2)</p> <p>$121=50.000 (y accel, mm/sec^2)</p> <p>$122=200.000 (z accel, mm/sec^2)</p> <p>$130=212.000 (x max travel, mm)</p> <p>$131=312.000 (y max travel, mm)</p> <p>$132=23.000 (z max travel, mm)</p> <p><strong>Extensions and Derivatives</strong></p> <p>For stronger Y axis ends, see <a href="https://www.thingiverse.com/thing:1658267">Drawing Machine - thicker walls for rod fix screws</a> by FiX2k.</p> <p>For cable management see <a href="https://www.thingiverse.com/thing:2103228">Simple tube system for the Drawing machine</a> by Valiox.</p> <p>To secure the drawing machine see <a href="https://www.thingiverse.com/thing:2084664">Drawing machine brackets</a> by RC-3D, and also <a href="https://www.thingiverse.com/thing:2407274">Clamp for Drawing Machine</a> by Floppynator.</p> <p>For an alternative Z stage using LM8UU bearings see <a href="https://www.thingiverse.com/thing:1853201">Drawing Machine, LM8UU derivative</a> by gigl.</p> <p>Thank you guys for your contributions!</p> <p>This video was made by 3DMake. It shows the assembly step by step. Nice work!</p> <h3>Updates</h3> <p>20190224 Moved to new TinkerCad format</p> <p>20171118 New video by 3D Make</p> <p>20171112 New "Assembly" and "Extensions and Derivatives" sub-sections in the "How-to".</p> <p>20160910 Alternative Z stage that uses metal LM6UU linear bearings. The bearings should snap in their receptacles. Tinkercad model is here.</p> <p>20160614 New Z stage, now integrated into the Y end. Unimaginatively called "v2". Same gear, same pen holder, a bit stronger, a bit better (one less part, less screws).</p> </x_axis)></p> Category: 3D Printing
With this file you will be able to print Drawing Machine with your 3D printer. Click on the button and save the file on your computer to work, edit or customize your design. You can also find more 3D designs for printers on Drawing Machine.