Dremel / Mini drill / Heat set insert press
thingiverse
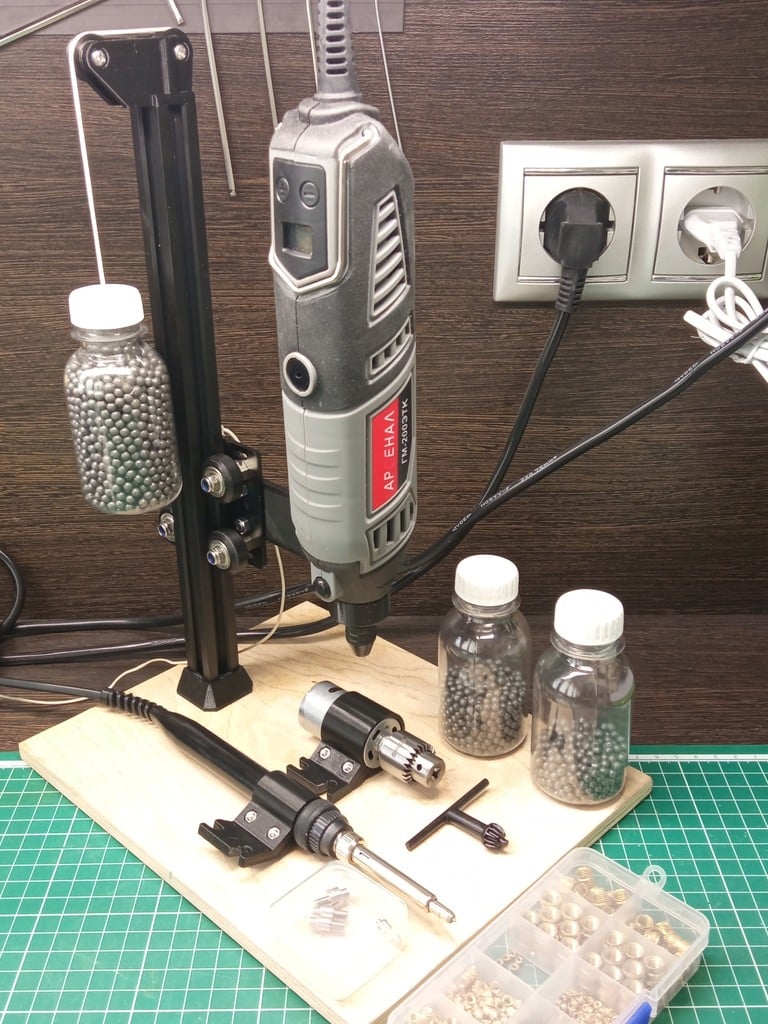
Universal vertical press stand -------------------------------------- Idea adopted from [Heat Set Insert Press](https://www.thingiverse.com/thing:3613621) by adafruit. The design seemed too complicated to me, besides, the use of a press for other tools obviously not difficult to implement. Tool change is simple: - loosen the two wing nuts, replace the tool, tighten - unscrew the cap of the bottle with a counterweight, screw on another Tools: - Dremel. Mine has a non-standard thread, keep it in mind when copying. - [Soldering iron](https://aliexpress.ru/item/1005002057912539.html) and [nozzles for hot pressing brass nuts](https://aliexpress.ru/item/1005004833464809.html). - [Mini drill based on JYCRS390 motor](https://aliexpress.ru/item/32419847650.html). Making Tips: 1. Frame of the press - [aluminum profile 20x20 with V-slot](https://aliexpress.ru/item/1005003367614421.html). I have 300 mm. 200-250 mm is also suitable if you ok with a smaller working range of heights. In the axial hole of the profile on the "up" end M5 thread made to depth 10 mm, on the "bottom" end - 20 mm depth. 2. Base - 10 mm plywood sheet 200x250 mm size. A hole Ø5 mm made at distance 50 mm from the short edge along the axis of symmetry. 3. Рut on the "heel" on the bottom end of the profile, fasten it to the base with an M5x25 screw with a washer. On the reverse side of the base, a recess with Ø12 mm pre-drilled for sinking the washer and screw head. In my case, the bolt is tightened with 8 mm nut head. Silicone pads are glued to the corners of the base. You can do it differently - install higher feet and use a screw with any cap type. 4. Install the sliding stop of the carriage by M4x10 screw and sliding T-nut. 5. Mount the "bar" on the [openbuilds carriage](https://aliexpress.ru/item/1005004063650239.html) with 3 M5x12 screws with washers and nuts. Put carriage on the profile, adjust the roller pressure with eccentrics. Loose bar screws and adjust it horizontally if necessary. 6. Tool holders clamping to the "bar" with two M5x16 bolts with washers and wing nuts. On the reverse side, the bolts are pressed into the clamping bar. 7. The "head" screwed to the profile with an M5x12 screw. Pulleys based on 624 bearings are mounted on the "head" by M4x12 screws with nuts. Washers are needed on both sides of the bearing. 8. Counterweights - 100 ml plastic bottles, filled with lead shot #0 according to the weight of the tool. It is convenient to prepare one for each tool so as not to spill the shot. It took ~700 g of shot for a dremel, 300 g for a mini drill, and 200 g for a soldering iron. Fill counterweight so that gantry moves up a little easier than down. 9. Braided cord is better. The twisted cord is untwisted on pulleys. A thick fishing line will also work. 10. Plastic parts printed in PETG, layer 0.2mm, walls/top/bottom 1.2mm, infill 40%. With good part cooling supports are required only for the lower groove of the tool holders. Development log: 04/09/2023 Working sample 04/10/2029 "Head" improved, pulleys now installed without washers Added a sliding stop for the carriage Added a reinforced version of the "bar" with cutouts for wheel screws Унивесальный вертикальный пресс-штатив --------------------------------------------------------- Идея заимствована у [Heat Set Insert Press](https://www.thingiverse.com/thing:3613621) от adafruit. Дизайн показался мне слишком сложным, к тому же напрашивалось применить тот же прицип для других инструментов. Смена инструмена проста: - отпустить две барашковые гайки, заменить инструмент, зажать - открутить крышку бутылки с противовесом, прикрутить другую Инструменты: - Дремель. У моего нестандартная резьба, учитывайте при копировании. - [Паяльник](https://aliexpress.ru/item/1005002057912539.html) и [насадки для горячей запрессовки латунных гаек](https://aliexpress.ru/item/1005004833464809.html). - [Мини дрель на базе мотора JYCRS390](https://aliexpress.ru/item/32419847650.html). Советы по изготовлению: 1. Рама - это [алюминиевый профиль 20x20 c V-слотом](https://aliexpress.ru/item/1005003367614421.html). У меня 300 мм. 200-250 мм тоже подойдет, если вас устроит меньший рабочий диаппазон высот. В осевом отверстии профиля с "верхнего" конца сделана резьба М5 на глубину 10 мм, с "нижнего" - 20 мм. 2. Основание вырезано из фанеры 10 мм, размер 200х250 мм. На расстоянии 50 мм от короткой стороны по оси симметри сделано отверстие Ø5 мм. 3. На конец профиля надеваем "пятку", прикручиваем к основанию винтом М5x25 с шайбой. С обратной стороны основания предварительно высверлено углубление Ø12 мм для притопления шайбы и шляпки винта. В моем случае болт затягивается головкой на 8 мм. По углам основания приклеены силиконовые накладки. Можно сделать иначе - установить высокие ножки, тогда углубление можно не высверливать и использовать винт с любой шляпкой. 6. Устанавливаем скользящий упор картеки, на винт М4х10 и сухарь для профиля. 5. На [каретку openbuilds](https://aliexpress.ru/item/1005004063650239.html) монтируем "штангу" на 3 винта М5x12 с шайбами и гайками. Надеваем каретку на профиль, экцентриками настраиваем прижим роликов. Регулируем горизонталь при необходимости, ослабив винты крепления "штанги". 5. Держатели инструмента зажимаем на "штанге" двумя болтами M5x16 с шайбами и барашковыми гайками. С обратной стороны болты запрессованы по шляпку в прижимную планку. 7. "Голову" прикручиваем к профилю винтом М5x12. Шкивы на основе подшипников 624 устанавливаем на винты М4x12 с гайками. С двух сторон подшипника нужны шайбы. 8. Противовесы - пластиковые бутылки 100 мл, заполняем свинцовой дробью #0 соответственно весу инструмента. Удобно заготовить по одной для каждого инструмента, чтобы не пересыпать дробь. Для дремеля потребовалось ~700 г дроби, для мини- дрели 300 г, для паяльника 200 г. Наполнять противовес нужно так, чтобы вверх инструмент двигался чуть легче чем вниз. 9. Шнур в плетеной оболочке лучше. Витой шнур раскручивается на шкивах. Подойдет также толстая рыболовная леска. 10. Пластиковые детали напечатаны из PETG, слой 0.2 мм, стенки/дно/крышка 1.2 мм, заполнение 40%. При хорошем обдуве поддержки требуются только для нижнего паза держателей инструментов. Журнал разработки: 09.04.2023 Рабочий образец 10.04.2023 "Голова" улучшена, шкивы теперь устанавливаются без шайб Добавлен скользящий упор для каретки Добавлена усиленная версия "штанги" с вырезам под винты колес
With this file you will be able to print Dremel / Mini drill / Heat set insert press with your 3D printer. Click on the button and save the file on your computer to work, edit or customize your design. You can also find more 3D designs for printers on Dremel / Mini drill / Heat set insert press.