Drink Chiller
thingiverse
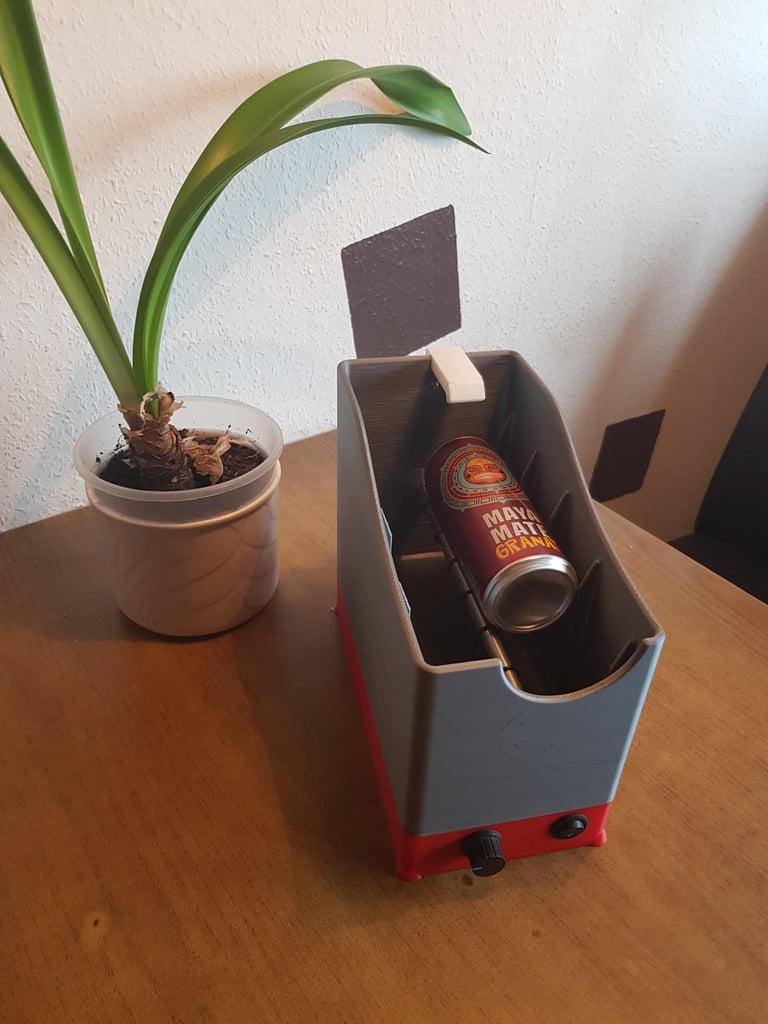
Drink Chiller ========== Hello, this is my design of a drink cooling device. It is inspired by a video from RCLifeOn on Youtube. ("https://www.youtube.com/watch?v=Qg8jFa7c_uo") I didnt bother making a video on how it works since his video already explains a lot. But i did make a video with my machine to show that it works: >>>>> https://youtu.be/0sOHWHl4jWI This contraption runs ice cold water over a can or a bottle. The can spins pretty fast and through centrigual forces, the liquid is mixed without losing its carbonation. The warm liquid spins to the wall of the can and gets cooled down. This process takes around a minute for a 330ml can from room temperature to around refridgerator temperature. All parts can be printed with a layer height of 0.2mm. The pump housing requires supports to be enabled. But all of the other parts print just fine without. The electronicsbox is 249x134mm. List of parts (not 3D printed) ------------------------------------- DC Motor: https://bit.ly/2ToBt7o Igarashi 12V DC Motor (bought on eBay) DC Motor speed controller: https://bit.ly/2JuxWoA (also on eBay) DC Switch: https://amzn.to/2Wl0J0v DC Jack: https://amzn.to/2Yc3p2c DC power supply: 12V and i recommend at least 2A with a 5.5X2.1 plug Rod: i used a 10mm stainless steel rod. A wooden dowel should also work. Bearing 608 (1 piece) O- Ring (4-5 pieces, used to increase friction) M3x40 (4 pieces) M3x15 (2 pieces) M3x6 (4 pieces) M2.5x10 (4 pieces, optional, Motors can be glued in place as well) Tube: 115mm with 9mm outer Diameter Some cables Glue The Rod has a 8mm diameter on one end to fit the bearing. On the other end it is 9 mm in diameter to fit the hole in the body easier (you can also use a 8mm rod to fit the bearing directly). It also has a 2.3mm hole to fit the shaft from the motor, Instructions --------------- I recommend printing the parts with 0.2 mm layer height to keep printing times somewhat low. The pump housing requires supports to be enabled. The other parts dont. I also recommend using at least 2 perimeters, three are better. And for infill, everything between 10 and 20% should be sufficient. The bearing is simply pressfit in place. The wiring requires some very simple soldering. When wiring, make sure when watching from the front, that the rod is turning counter clockwise and the pump is turning clockwise. The shaft of the motor should be glued into the rod, so that it can transfer the enegy without slipping. Assembling the pump ----------------------------- First, mount the motor to the pump lid. Afterwards push the impeller on the shaft of the motor. Some drops of super glue ensure a good sit. After that, glue it to the housing. Lastly, the pump needs to be glued to the main body with the hole facing straight up. Make sure to use enough glue to seal the housing so no water can leak out. When putting in the tube, i recommend sealing it with a little bit of glue to make sure it doesnt leak water onto the motors. Closing words ------------------- If you have an questions or suggestions, feel free to contact me. I hope you like my design. You can tip me if you think i deserve it. Its absolutly not reqiured but greatly appreciated and helps me keep going and finance my studies.
With this file you will be able to print Drink Chiller with your 3D printer. Click on the button and save the file on your computer to work, edit or customize your design. You can also find more 3D designs for printers on Drink Chiller.