Dry-box Filament Pass-Through
prusaprinters
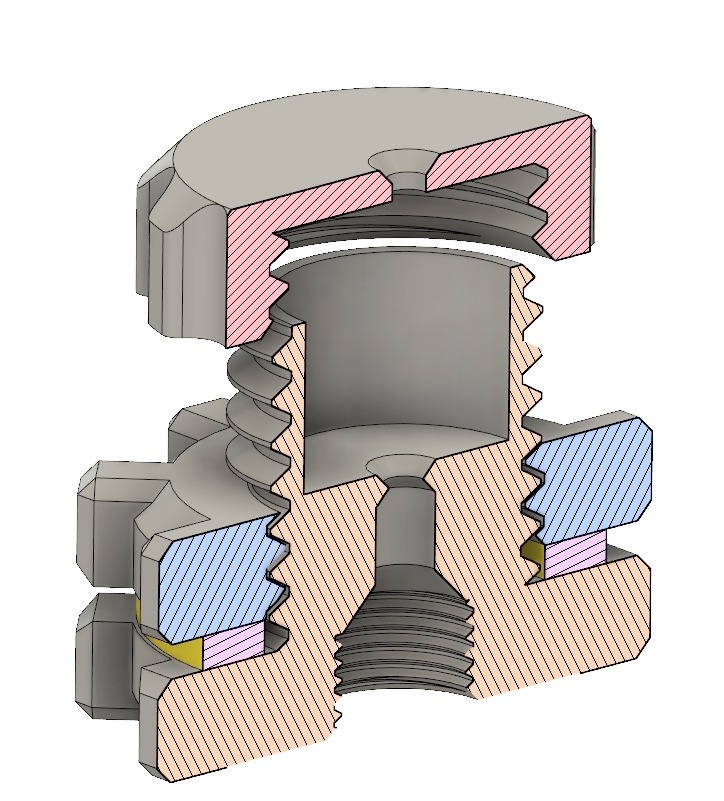
<p>I was building my own drybox and needed a port/pass-through to route filament out of the box. I wanted something that would utilize a PTFE tube and a fitting to hold that in place. I also wanted to be able to seal it off when not in use, and have it be reasonably air tight to keep moisture out. Finally, I thought it would be good to be able to incorporate a small piece of foam filter to keep any dust or dirt before out of the PTFE tube and out of my extruder.</p> <p>I couldn't find anything meeting all these criteria, so I designed my own. I feel strongly that people should provide the CAD source files for their designs, so that others can easily remix, and so I have done so here.</p> <p>In addition to the Fusion 360 and STL files, you will find a PDF and SVG file. These are to be used for laser-cutting the gasket. I cut this gasket out of 2mm EVA foam using a Glowforge laser cutter, but you could also easily cut something out with a pair of scissors.</p> <p>To use this, you will need some PC4-M10 fittings. These are available any number of places, including <a href="https://www.amazon.com?linkCode=ll2&tag=thingiverse09-20&linkId=e4759bff1fa9a55a0f897d801ce2d765&language=en_US&ref_=as_li_ss_tl"> </a><a href="https://www.amazon.com?linkCode=ll2&tag=thingiverse09-20&linkId=e4759bff1fa9a55a0f897d801ce2d765&language=en_US&ref_=as_li_ss_tl"> Amazon</a>.com. Screw the fitting into the threaded section inside the pass-through. Pass the passhtrough through a hole in your drybox (a step drill works great for drilling through plastic boxes), add the gasket, and use the Nut to screw everything.</p> <p>Insert some 4mm PTFE tube of appropriate length into the PC4-M10 fitting. It should go all the way through the fitting and be captured and held in alignment by a chamber inside the pass-through. You can now optionally add a small piece of foam to the little compartment inside the pass-through. I find it's easier to poke the filament through the foam before inserting. Don't forget to feed the filament through the hole in the cap before doing this. Screw on the cap, and you're ready to go.</p> <p>There's a separate closed version of the cap to seal everything off when a port is not in use.</p> <h3> Print Settings</h3> <p><strong>Printer Brand:</strong></p> <p>Prusa</p> <p><p class="detail-setting printer"><strong>Printer: </strong> <div><p>i3 MK3</p></div><strong>Rafts:</strong></p> <p>No</p> <p><p class="detail-setting supports"><strong>Supports: </strong> <div><p>No</p></div><strong>Resolution:</strong></p> <p>0.15</p> <p><p class="detail-setting infill"><strong>Infill: </strong> <div><p>20% or better</p></div></p> <p><strong>Notes:</strong></p> <p>The threads for the PC4-M10 fitting need to be printed in 0.15 or finer layer height. Other than that, the model is not picky about settings. There are no overhangs greater than 45%, so no supports are needed. These print nicely in PLA, but other materials should work as well.</p> </p></p></p> Category: 3D Printer Accessories
With this file you will be able to print Dry-box Filament Pass-Through with your 3D printer. Click on the button and save the file on your computer to work, edit or customize your design. You can also find more 3D designs for printers on Dry-box Filament Pass-Through.