Dry box with spooler for MMU2S 3d printing filament (scuba box)
prusaprinters
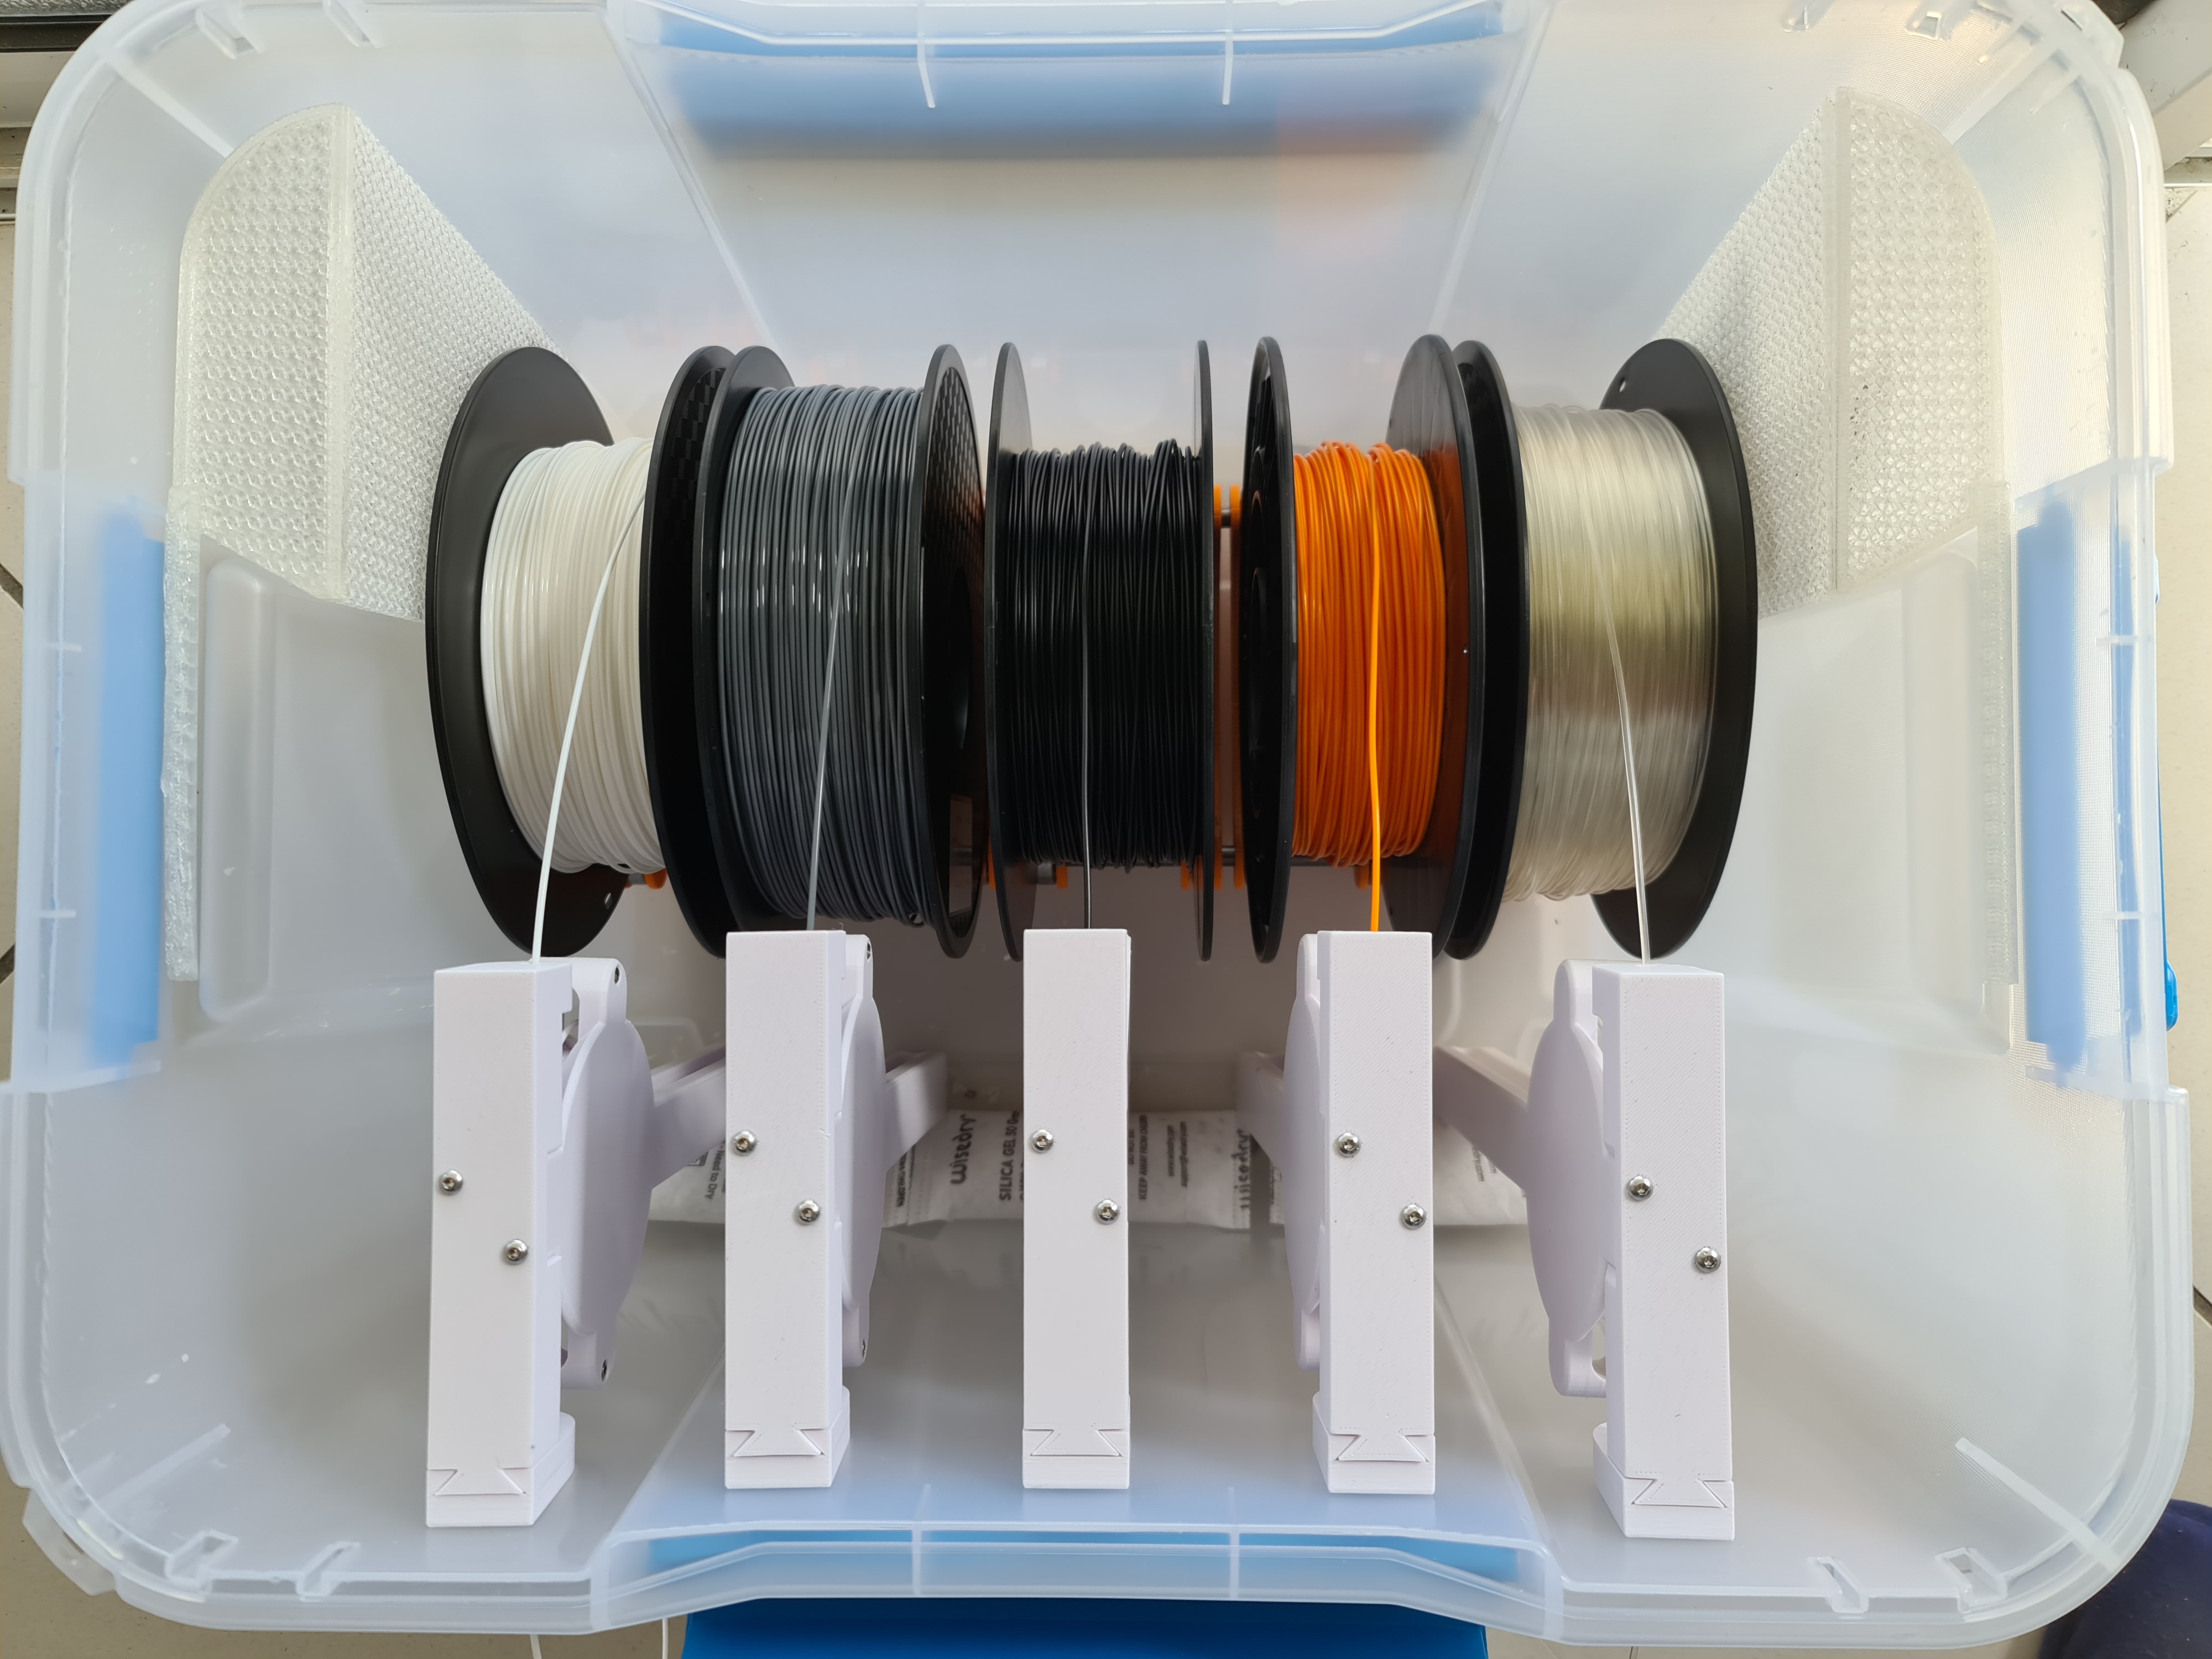
<p>Scuba box is a very popular box in Europe. It is actually the best waterproof and air tight box that I could find. I live in a tropical island so I needed something really waterproof to protect my filaments. I tried many models of boxes, and this one is simply the best. There are different sizes and I chose the 45 liters scuba box to build my filament dry box.</p><p><a href="https://www.printables.com/fr/model/225753-dry-box-for-3d-printing-filament-scuba-box">The first version of my dry box</a> was perfect with MK3S+, but I designed this new version after upgrading to MMU2S to add build an air tight buffer. It will be fine if you have a MMU, and if you don't, you can just print it without the buffer.</p><p>The idea of this box is from <a href="https://www.printables.com/fr/social/66879-canislupus">Canispulus</a>, author of <a href="https://www.printables.com/fr/prints/146367-ikea-samla-45l-filament-buffering-dry-box">this project</a> and I just had to adapt it to the scuba box. As you will see bellow his work is really functional and the conception remarquable.</p><h3>Description</h3><p>The box is completely air tight and the filaments are guided out of the box till your MMU2S. We use bowden tubes and PC4M10 connectors.</p><figure class="image"><img src="https://media.printables.com/media/prints/225798/rich_content/7855f8ef-24c4-4a2e-a713-cfb595a311a3/20220616_121639b.jpg#%7B%22uuid%22%3A%22ba1c869c-2a14-4009-9d75-1cb2f54655de%22%2C%22w%22%3A4000%2C%22h%22%3A1791%7D"></figure><p>The buffer : </p><p>I reused the idea and the box interface from <a href="https://www.printables.com/fr/social/66879-canislupus">Canispulus</a> without modification, but for the filament buffer modified the file from <a href="https://www.printables.com/fr/social/15177-ensoniq2k">ensoniq2k</a> from <a href="https://www.printables.com/fr/model/5610-fully-enclosed-mmu2-wheel-buffer-with-screw-holes-/files">this project</a>.</p><p>The filament buffer is very efficient thanks to the 608zz bearing in the center of the wheel.</p><figure class="image"><img src="https://media.printables.com/media/prints/225798/rich_content/2b55362c-cca7-4f59-8e3d-9e54bf5fcde5/20220616_120431.jpg#%7B%22uuid%22%3A%22cd3cdefb-511f-4686-9016-66f4567c107f%22%2C%22w%22%3A3000%2C%22h%22%3A4000%7D"></figure><p> </p><p>To roll the filaments without friction, I reused the sliders from my previous project. It was actually directly reused from "Universal Dry Spool Box by Flex35"<br><a href="https://www.thingiverse.com/thing:3065301">https://www.thingiverse.com/thing:3065301</a><br>Thanks to the 608zz bearings on the 8mm steel axis, there is a minimal friction. Also you can adjust the positioning to a spool with specific size.</p><figure class="image"><img src="https://media.printables.com/media/prints/225798/rich_content/ab358664-4218-4b42-9975-83bba46f8439/sliders.jpg#%7B%22uuid%22%3A%220baea5ac-f6c2-4198-ae88-f7369095ad63%22%2C%22w%22%3A3035%2C%22h%22%3A1858%7D"></figure><p>Supports to elevate the sliders :</p><p>On both extremities, I added two pieces (the middle one without bearing on the picture bellow). Those pieces raise the supports 1cm higher from the bottom of the box, and that allows you to gain 2 or 3cm lenght for your spools because of the shape of the bottom of the box.</p><p>Those <strong>steel bar holders</strong> are designed to elevate the bars and hold it at the right position. Their position will not be adjustable, that's why you don't insert bearings inside. It will be positionned under a spool.</p><figure class="image"><img src="https://media.printables.com/media/prints/225798/rich_content/1a2304a7-919b-48cd-b075-f4155dce945f/20220616_120530c.jpg#%7B%22uuid%22%3A%22ba45d6e5-6cde-4da9-bf5b-e38ced31d18e%22%2C%22w%22%3A3095%2C%22h%22%3A758%7D"></figure><p><strong>The silica gel box:</strong></p><p>It's a box (one on each side) where you can insert silica gel pearls or if you prefer silica gel sachets. Those boxes also hold the steel bar in place. This is a very funtional idea from canislupus. I completely redesigned those elements to make it fit perfectly to the scuba box. I also created a design in two parts that allows an easy extraction of the box to dry the silical pearls while the base remains in place.</p><p>You have more space than needed for the silica pearls so if you prefer, instead of pearls, you can buy sachets (pearl bags) and it will fit in the box. With the transparency you will see the pearls color changing.</p><p>You can see in the picture the white base and the transparent silica box. The base stays in place thanks to the foot wedged by the slider support. The box is easily removable, it clics on the base the cover clics on the box. You can see a long cylinder on the top of the covers, it fits perfectly in a space in the dry box to hold everything in place in case you need to move the box.</p><p>So you don't need glue or tape, everythings holds in place by the way it is designed.</p><p><strong>Reusable silica gel</strong>: like normal silica gel, those pearls absorb humidity, protecting your filament. When it is full of humidity, the color change and you have to microwave it to dry and make it usable again.</p><figure class="image"><img src="https://media.printables.com/media/prints/225798/rich_content/4a4b171a-6fe1-47e5-8f78-35ceb12f9cad/20220616_113527b.jpg#%7B%22uuid%22%3A%22f5ab4224-3cfd-4e99-9493-8a004fc2104f%22%2C%22w%22%3A3000%2C%22h%22%3A3263%7D"></figure><h3>Printing instruction:</h3><p>You should print the silica gel box in transparent material to have a better perception of the silica pearls color. The buffer in white or transparent for better vision of the filament.</p><p>Printing settings: 3 perimeters for parts buffer (elements with screws).</p><p>The base of the box is printed in white PLA, default settings 10% infill.</p><p>The box and the cover are printed in transparent PLA with a giroid grid to let the air get into the box so the silica gel can absorb the humidity.</p><p>To get this effect, I use a 20% gyroid infill without perimeter. This may be obvious for you, if not, here is how to do it in Prusa slicer:</p><ul><li>open the main stl file (box or cover)</li><li>on the right side, under name, right clic on the stl, choose “add modifier” then “Load…”</li><li>choose my modifier stl file</li><li>the modifier now appears under the main stl file. </li><li>right clic on it, choose "infill" select “gyroid” “20%”</li><li>right clic again, choose “Layers and Perimeters” and put all 3 settings to “0”</li><li>to keep the alignement only after this operation, select all shapes and rotate it</li></ul><p> </p><ul><li>print the box verticaly, the open side on the top, with a 10mm brim, no skirt, 0.20 layer</li><li>print the base verticaly</li></ul><p>→ I also included a 3mf file but make sure the settings match your printer</p><p>Repeat the same process for the box and the cover. If you want to save some time, you can start with left side and then use the “miror” function of prusa slicer for the right side. You won't need to download the 5 stl files for silica box right side.</p><figure class="image"><img src="https://media.printables.com/media/prints/225798/rich_content/88f25f7a-c704-4a7e-9bac-0f243111e14b/prusa-slicer-box.png#%7B%22uuid%22%3A%22f460dd9e-c27c-4bb1-a9c3-7832d3eb91b0%22%2C%22w%22%3A1360%2C%22h%22%3A992%7D"></figure><h3>Mounting instructions:</h3><p>Assemble the sliders :</p><ul><li>cut the M8 bars at 41.4 cm and 37,1 cm</li><li>Insert the bearings into the sliders, and then the bar inside as following</li><li>On both extremities, 41.4 cm bars will be inside the silica gel box base, then a first slider with bearing, then the bar support without bearing, and the sliders with bearing. And symetricaly on the other side.</li><li>The second bar will be mounted the same way except the part into the silica gel box base</li></ul><p>Illustration on the following picture :</p><p><Pic> </p><p>Assemble the spooler (see bellow). Position it inside the box to mark the point where you need to drill. Drill a small hole the size of the PC4M10 screw.</p><p>Insert the PC4M10 into the dry box washer on the outside of the box.</p><p>On the other side, screw the box interface in the PC4M10.</p><p>Then insert the spooler into the box interface, it is easy to remove.</p><p><strong>To assemble the spooler :</strong></p><p>Insert a 608zz bearing into the filamentbuffer_wheel (picture 1 bellow)</p><p>Insert the wheel between the male and female parts of the buffer (pic1)</p><p>Screw the male to the female using 3x M3 16mm screws (pic2)</p><p>Screw the buffer base on the top of the previous part using 2x M3 16mm screws (pic3)</p><p>Then adjust the position of the wheel between both sides till it rolls smoothly without friction.</p><p>Insert a 10cm bowden tube in the hole of the buffer, toward the filament spool</p><figure class="table"><table><tbody><tr><td><figure class="image image-style-align-left"><img src="https://media.printables.com/media/prints/225798/rich_content/123dfb1c-2cdb-4fab-9281-714eefbe8955/20220621_163224.jpg#%7B%22uuid%22%3A%22132370c2-a6ba-4907-9278-ac06d9f3fc98%22%2C%22w%22%3A3000%2C%22h%22%3A4000%7D"></figure></td><td><figure class="image image-style-align-left"><img src="https://media.printables.com/media/prints/225798/rich_content/8f815d0e-3112-4f2f-880a-b28c94ded0c5/20220621_163237.jpg#%7B%22uuid%22%3A%226fbcc4bf-32d1-4946-9306-aea56ee1577e%22%2C%22w%22%3A3000%2C%22h%22%3A4000%7D"></figure></td><td><figure class="image"><img src="https://media.printables.com/media/prints/225798/rich_content/f6209335-8ad4-490a-bdd6-8484f6204e74/20220621_163636.jpg#%7B%22uuid%22%3A%22693651b6-e0b7-490f-b3bd-5707387d83e8%22%2C%22w%22%3A3000%2C%22h%22%3A4000%7D"></figure></td><td><figure class="image"><img src="https://media.printables.com/media/prints/225798/rich_content/4f879510-3e10-4d2c-9eab-3d8d2b8c13da/20220621_164041.jpg#%7B%22uuid%22%3A%22de287888-43a6-4e6f-814c-c4463e689ec1%22%2C%22w%22%3A3000%2C%22h%22%3A4000%7D"></figure></td></tr></tbody></table></figure><p> </p><h3>Changelog</h3><ul><li>v1 <a href="https://www.printables.com/fr/model/225753-dry-box-for-3d-printing-filament-scuba-box">The first version of my dry box</a> before the MMU2S</li><li>v2 of the buffer, on the right of the picture below</li><li>v3 (next version) of the buffer on the right was redesigned. The left and bottom parts of the spooler fit perfectly to the side and bottom of the box with a 4° angle. The design was modified to allow a longer buffering and increase the second buffering loop (useful in case you really need a long buffer).</li></ul><p> </p><p> </p><p><strong>More info on assembly</strong></p><p>For more detailed instruction on assembling the buffer, you can check canislupus page, he did a very nice description job with pictures: <a href="https://www.printables.com/fr/model/146367-ikea-samla-45l-filament-buffering-dry-box">https://www.printables.com/fr/model/146367-ikea-samla-45l-filament-buffering-dry-box</a></p><h3><strong>Remixed Projects</strong></h3><ul><li><a href="https://www.printables.com/fr/model/146367-ikea-samla-45l-filament-buffering-dry-box">Ikea Samla 45l Filament Buffering Dry Box </a></li><li>My project : <a href="https://www.printables.com/fr/model/225753-dry-box-for-3d-printing-filament-scuba-box">Dry box for 3d printing filament (scuba box)</a></li><li><a href=""Universal Dry Spool Box by Flex35" https://www.thingiverse.com/thing:3065301">Universal Dry Spool Box by Flex35</a> </li></ul><h3><strong>Directly Reused Parts</strong></h3><ul><li>The box interface from <a href="https://www.printables.com/fr/model/146367-ikea-samla-45l-filament-buffering-dry-box">Ikea Samla 45l Filament Buffering Dry Box </a></li><li>The buffer wheel from <a href="https://www.prusaprinters.org/de/prints/76800-fixed-filament-buffer-wheel">Fixed Filament Buffer Wheel von Dash Lambda | PrusaPrinters</a></li><li>Washer disk for PC4M10 from - <a href="https://www.prusaprinters.org/de/prints/40850-knurled-pc4-m10-ptfe-drybox-filament-pass-through">Knurled PC4-M10 PTFE Drybox filament pass through von Antipode | PrusaPrinters</a></li><li>The slider from <a href=""Universal Dry Spool Box by Flex35" https://www.thingiverse.com/thing:3065301">Universal Dry Spool Box by Flex35</a> </li></ul><h3><strong>Non-printed Material</strong></h3><ul><li>1 <a href="https://www.amazon.fr/Kis-8433000-0485-01-Transparent/dp/B00ITRDNB4/ref=sr_1_2?__mk_fr_FR=%C3%85M%C3%85%C5%BD%C3%95%C3%91&crid=11LAIJSUOP4VP&keywords=scuba+box&qid=1655456291&sprefix=scuba+bo%2Caps%2C347&sr=8-2">scuba box 45l</a> available on amazon but also in some supermarkets and stores in Europe.</li><li>6 <a href="https://www.amazon.de/dp/B078SLGZ42?ref_=pe_3044161_248799201_302_E_DDE_dt_1">PC4-M10</a> or <a href="https://fr.aliexpress.com/item/32969784965.html?spm=a2g0o.order_list.0.0.74dd5e5bQ2z5Ex&gatewayAdapt=glo2fra">PC4-01</a> passthrough adapters</li><li>1m (Xmm + Ymm) of 8mm steel rod (M8) you can buy it from your local hardware store</li><li>25 (5x5) <a href="https://www.amazon.de/dp/B07RZ651J7/ref=pe_27091401_487027711_TE_SCE_dp_1">608ZZ bearings</a> also available <a href="https://www.aliexpress.com/item/33012587724.html?spm=a2g0o.order_list.0.0.74dd5e5bQ2z5Ex">here</a> but if you prefer, you can print it, there are nice designs full plastic or <a href="https://www.printables.com/fr/model/66530-608-bearing-using-bbs">using steel balls</a></li><li>25 (5x6) <a href="https://www.amazon.de/dp/B08XMNDQ3F/ref=pe_27091401_487024491_TE_item">M3 16mm screws</a></li><li>~4m <a href="https://fr.aliexpress.com/item/1005001446770552.html?spm=a2g0o.productlist.0.0.22c46079taIFid&algo_pvid=17883e2e-d6df-4746-acfb-de965718128b&algo_exp_id=17883e2e-d6df-4746-acfb-de965718128b-1&pdp_ext_f=%7B%22sku_id%22%3A%2212000016141649914%22%7D&pdp_npi=2%40dis%21EUR%21%211.38%21%21%21%21%21%40210318b816555287374054167ec015%2112000016141649914%21sea">PTFE tube (outer 4mm, inner 2-3mm)</a>. I prefer inner diameter larger (3mm) except for flexible filament that requires smaller diameter. According to <a href="https://www.printables.com/fr/social/66879-canislupus">Canislupus:</a> “you will need ~16cm from wheel buffer to spool + ~50-100cm from box interface to MMU unit depending on your setup”</li><li>Reusable silica gel in <a href="https://www.amazon.fr/wisedry-d%C3%A9shydratants-R%C3%A9activation-indicatrices-coffres-forts/dp/B07TCGPZXK/ref=sr_1_21?__mk_fr_FR=%C3%85M%C3%85%C5%BD%C3%95%C3%91&crid=12K3MHN7D09RR&keywords=silica+gel&qid=1655456356&sprefix=silica+ge%2Caps%2C259&sr=8-21">sachets </a>or <a href="https://www.amazon.fr/wisedry-Perles-d%C3%A9shydratantes-indication-couleur/dp/B08J2RH97N/ref=sr_1_10?__mk_fr_FR=%C3%85M%C3%85%C5%BD%C3%95%C3%91&crid=12K3MHN7D09RR&keywords=silica%2Bgel&qid=1655456356&sprefix=silica%2Bge%2Caps%2C259&sr=8-10&th=1">pearls</a>. The color will change when it's full of humidity, you can microwave and reuse it.</li><li>I recommend using a wireless humidity sensor that can notify you when humidity increase. I use <a href="https://fr.aliexpress.com/item/32990414707.html?spm=a2g0o.productlist.0.0.2bfb27fazUfrzq&algo_pvid=f181f650-2b12-4bb6-a56c-4e4893163c8d&algo_exp_id=f181f650-2b12-4bb6-a56c-4e4893163c8d-5&pdp_ext_f=%7B%22sku_id%22%3A%2212000027110221992%22%7D&pdp_npi=2%40dis%21EUR%21%2122.5%2122.5%21%21%21%21%402101e9d416559574337972573e4c06%2112000027110221992%21sea">those Xiaomi sensors</a>. It needs the gateway or any zigbee base to work. I use it with Jeedom software so I get an alert on my smartphone when I need to dry silica pearls.</li></ul>
With this file you will be able to print Dry box with spooler for MMU2S 3d printing filament (scuba box) with your 3D printer. Click on the button and save the file on your computer to work, edit or customize your design. You can also find more 3D designs for printers on Dry box with spooler for MMU2S 3d printing filament (scuba box).