Dry Erase Board Accessory Holder
thingiverse
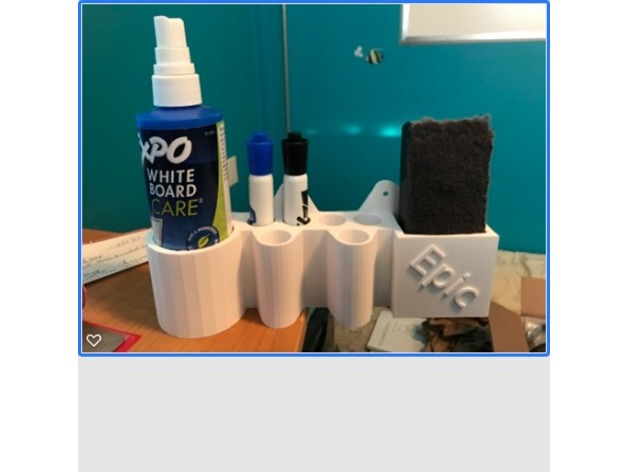
I made this since we use a spray cleaner on our board pretty regularly and i wanted all items for the board to be in one spot. So this holds up to 6 markers, because i like colors, the eraser for the board, and a spray bottle up to 5.5 cm in diameter. We got ours at the dollar store, but it also fits the ones made by Expo. Two designs are attached: The first design has screw holes to be used on both the top and the bottom side of the design. This design must be printed using the flat side which would be placed on the wall being down on the printer bed. Printing without supports is doable but makes the eraser holder a bit messy, printing with supports will require some cleanup inside the design. This design does provide more stability, but I have found that this is not really necessary. The second design has screw holes only in the top side of the design. This is better for printing as it allows the design to be printed from the bottom up rather than using the wall side of the object. I have found that the strength from just the two screws is more than sufficient. I did have to turn the object sideways to fit the print bed for my printer which is 200mm X 200mm, so if your slicer is showing it as not printable try rotating it and moving it around at a 45 degree angle and that should work. As a side note I did also install two very large dry erase boards (3'X4' and 4'X5') in my office at home for less than $50. We went to Home depot and got a 4x8 ft white panel which has a plastic coat over the top. This was actually marked as dry erase board in the store, but their website does not seem to have it. We then got carpet strips in order to frame it and some 1.5" wide head nails of the same color as the carpet strip. we used something similar to this, http://www.homedepot.com/p/TrafficMASTER-Silver-Hammered-144-in-x-1-3-8-in-Carpet-Trim-06940/100179516. Cut the erase board down to the size of the white board you want in your office using a razor of some kind and a straight edge such as a ruler or meter stick. Use tin snips or a hack saw to cut the carpet strips to the length that you want. Keep in mind that you want the interior square of your carpet strips to be slightly less than the edge of the white board itself. so if you cut the whiteboard to be 3' X 3', then the carpet strips should be something like 2'11" X 2'11".The cuts should be at 45 degrees so that it forms a frame around the white board. Think about the cuts before you make them so that you don't waste too much material and to ensure that the inside edge of the strip is the shorter side. Attach the bottom carpet strip to the wall making sure to level the strip. Do not nail it down flat, keep enough gap to slip in the erase board. Put the dry erase board on the wall, resting the bottom edge on the nails used to put up the bottom carpet strip. You can now nail these nails the rest of the way in to make it tight. nail on the other pieces of carpet strip around the edge of the white board to hold it in place firmly and complete the appearance of a frame. Print Settings Printer: ANET A8 Rafts: No Supports: No Resolution: .1mm Infill: 15% Notes: This took about 30 hours on my printer with 15% infill, it could easily be done and strong enough with 10% though. How I Designed This Design process I designed this using Sketchup at a large scale and then scaled it down. I intentionally left a low polygon count on the circles as I like the appearance of multiple straight edges. I also left the eraser holder with a flat blank face so that text can be easily added to customize your print.
With this file you will be able to print Dry Erase Board Accessory Holder with your 3D printer. Click on the button and save the file on your computer to work, edit or customize your design. You can also find more 3D designs for printers on Dry Erase Board Accessory Holder.