Drybox for 4 spools (Ikea Samla 22l based)
prusaprinters
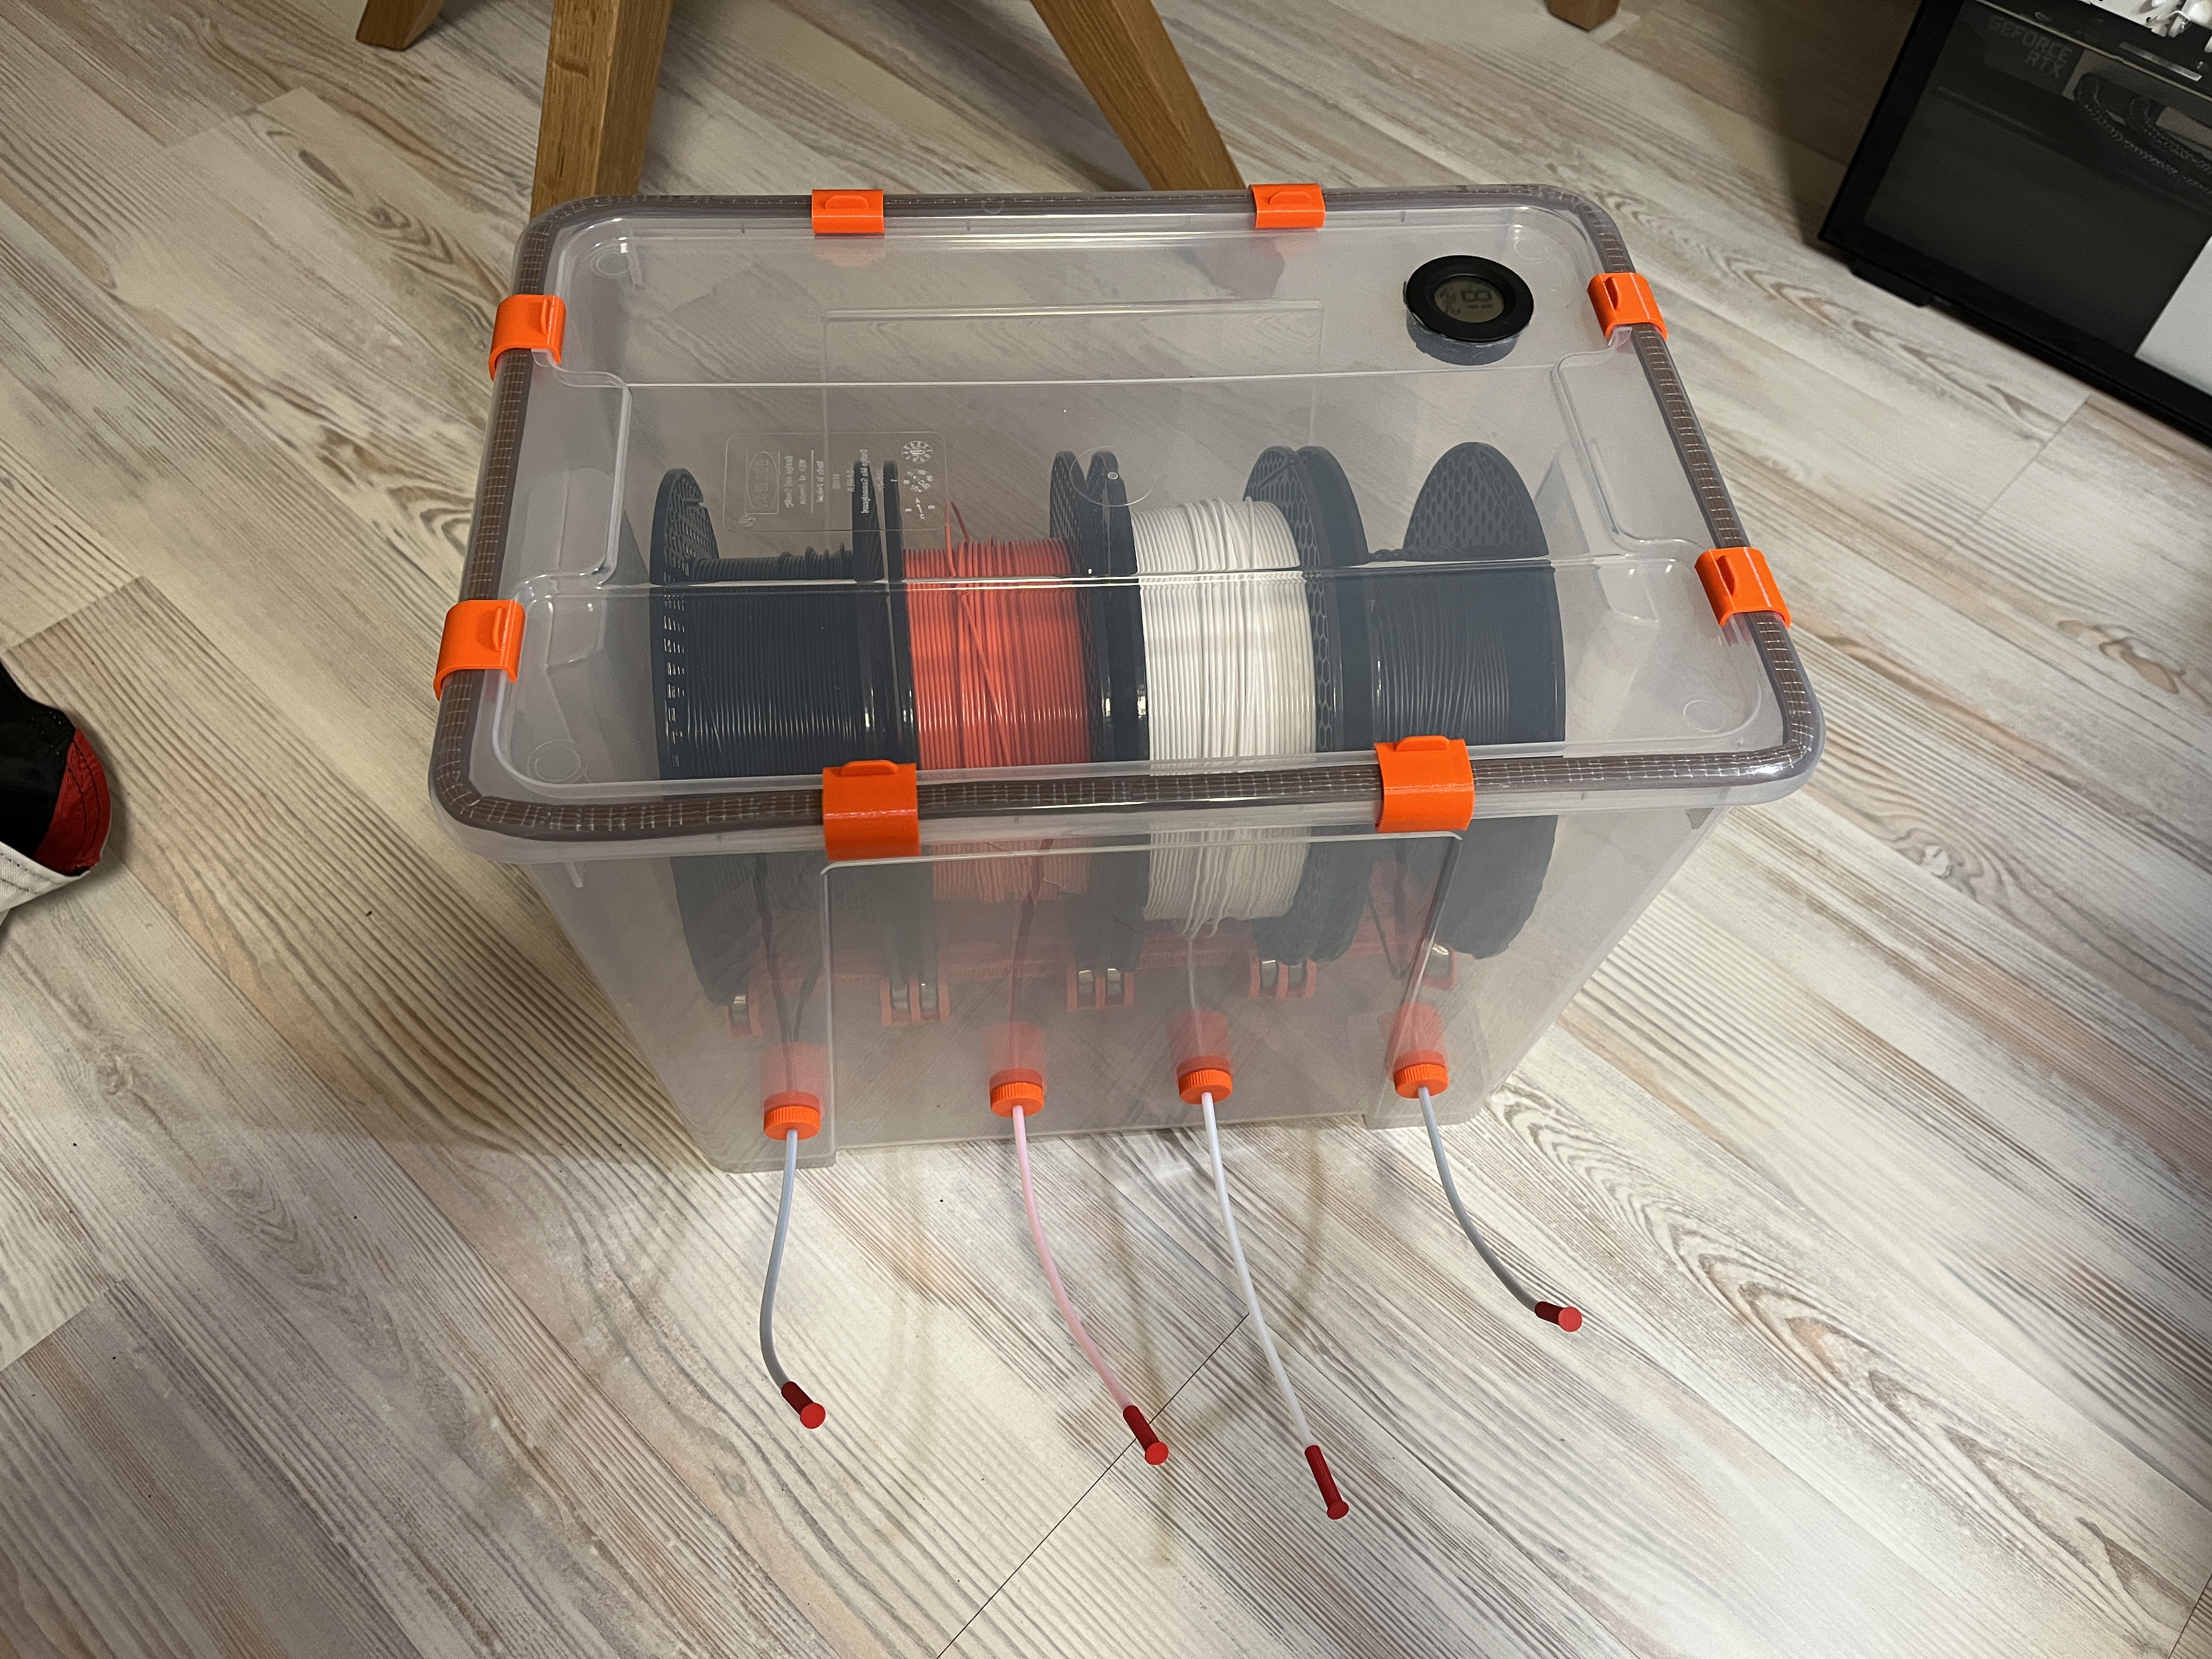
<p>You can find many single parts, videos or blog posts regarding dryboxes. When I realized I have stringing problems with my PETG prints because of accumulated moisture, I went through many of them, printed, experimented, basically tried to combine all that knowledge to build perfect samla-based drybox. Such drybox will come really handy if you need to store some even more moisture sensitive materials, like nylon or TPU and others. The result is bellow, proven design which holds my spools for months now at comfy ~19%. It also allows me to quickly swap filaments beside my printer, something which you do quite often with 20+ filament spools.</p><h5><strong>What you need:</strong></h5><ul><li>Ikea Samla 22l with a lid (Ikea code 80102976)</li><li>window/door foam seal tape (basically any profile, about 1cm wide)</li><li>~70cm of PTFE tube</li><li>~250g of desiccant pearls (you can get color changing ones so you know just by the look if it's time to refresh them)</li><li>common 608 ball bearings, 16pcs</li><li>6x M3x24, 4x M3x12, 8x M3x8 screws</li><li>10x M3 nuts</li><li>print all the parts</li><li>optionally common rounded hygrometer</li></ul><p>Besides the Samla box you can generally source all the parts from the nearest hobby shop or, if you have some spare time, AliExpress. </p><h5>Printing:</h5><p>All the printed parts are mostly simple shapes, you can print them basically at defaults, like 0.15-0.2 layer with 15% infill where needed. It makes sense to use PETG.</p><h5>Put it all together:</h5><p>Now, I redone original Mini spool holder so it stands higher and makes a room for boxes which are filled with desiccant. Those are assembled pretty much the same way as the <a href="https://help.prusa3d.com/en/guide/building-your-mini_177717#179085">original thing</a>, all the screws and nuts go here. When properly put together (it's outer+full/full+half+half+full/… for component names consult 3mf…) you'll get this:</p><p><img src="https://media.prusaprinters.org/media/prints/98008/rich_content/5b5d5242-ee8f-404b-94e2-814966e8a569/2021-12-19-1.png#%7B%22uuid%22%3A%2267f5095f-2a2c-4020-907d-297bec42c9a0%22%2C%22w%22%3A2125%2C%22h%22%3A1220%7D"></p><p>You also can and should make small foam feet for them from pieces of the seal you have for the lid. Underneath slide two filled desiccant boxes but careful, desiccant deteriorates very quickly when on fresh air,<i> do this as the last step right before you close the lid</i>.</p><p>Because of the weight of the load you also need to glue a simple feet in the middle of the bottom, to keep it flat. Hot glue works well here. It's a simple 12mm high puck, made directly in slicer, no 3mf here.</p><figure class="image image_resized" style="width:50%;"><img src="https://media.prusaprinters.org/media/prints/98008/rich_content/c4038041-dc27-473c-8f97-ac14a20d5784/20211219_151151511_ios.jpg#%7B%22uuid%22%3A%2258764136-28b5-416a-bb8f-061725530ec6%22%2C%22w%22%3A3024%2C%22h%22%3A2904%7D"></figure><p>Filament leaves the drybox through simple printed fittings, which also provide inside chamber, which can be filled with dust cleaning agent (if that's your thing, I tried and never found it being really helpful). Piece of the TPFE tube goes through the fitting, its length depends on your desired distance from the printer. There is also a cap for the end of the tube, to limit the air exchange with outer environment even further. </p><figure class="image image_resized" style="width:50%;"><img src="https://media.prusaprinters.org/media/prints/98008/rich_content/bbd0a247-5ff5-4fa6-86fa-b11f71c1fed8/20211219_152509632_ios.jpg#%7B%22uuid%22%3A%22c6037465-9f0e-4ca4-a6ae-1e1794a506bc%22%2C%22w%22%3A4032%2C%22h%22%3A3024%7D"></figure><p>The lid absolutely needs the seal of course. Depending on the glue used on your seal it will be more or less annoying to place the tape properly, especially in the corners. Do not underestimate this step, this is what keeps the moisture out, and desiccant can absorb only that much. There are clips to hold the lid and compress the seal, those are based on the common type circulating around here, but remodeled to make them good fit and still allowing easy putting on and off. </p><figure class="image image_resized" style="width:50%;"><img src="https://media.prusaprinters.org/media/prints/98008/rich_content/90dc4fce-33d4-4670-858f-cc8f9e30a480/20211219_152908384_ios.jpg#%7B%22uuid%22%3A%22bc3bb0ff-e7e3-4e70-898d-5dc0afd28330%22%2C%22w%22%3A3024%2C%22h%22%3A4032%7D"></figure><p>Finally you can place the hygrometer somewhere, where you can easily monitor it. You can make a hole through, if you know you're going to be able to seal it properly (hot glue works here too), or you can simply glue it from the inside. And, well, if you feel a bit anarchist, you can simply throw the meter inside the box, though it doesn't seem to be too practical.</p><figure class="image image_resized" style="width:50%;"><img src="https://media.prusaprinters.org/media/prints/98008/rich_content/b9b755c7-a1c1-4b17-b10c-7a90c1e7757e/20211219_153000214_ios.jpg#%7B%22uuid%22%3A%225ba735c9-838a-401f-910a-e7ccd24e873f%22%2C%22w%22%3A2631%2C%22h%22%3A2581%7D"></figure><p> </p><p>It's been a few months since I built this. So I already know it works well but I also forgot those little pieces of advice here and there you gather during construction. If there would be anything unclear or even wrong, let me know please, so I can fix that. Now go and enjoy your dry and less stringing filaments.:-)</p><p><i>If you have any questions regarding drying filaments, or its moisture, check Stephan's CNC kitchen channel on Youtube.</i></p>
With this file you will be able to print Drybox for 4 spools (Ikea Samla 22l based) with your 3D printer. Click on the button and save the file on your computer to work, edit or customize your design. You can also find more 3D designs for printers on Drybox for 4 spools (Ikea Samla 22l based).