Drying filament box
thingiverse
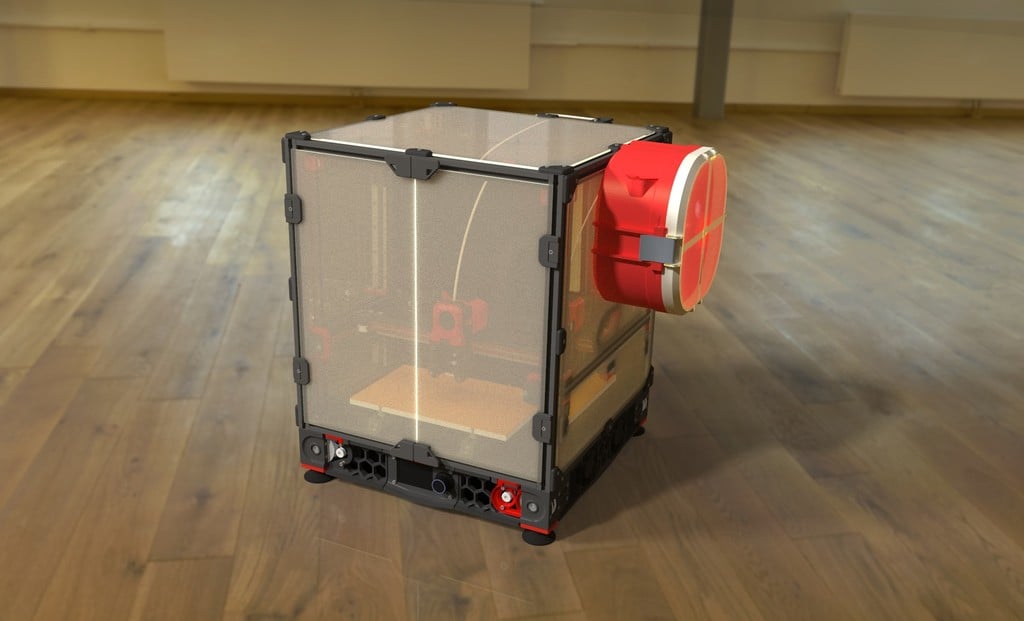
<p><hr><strong>RU</strong></hr></p> <h2><br><strong>* * * Зачем нужен этот бокс? * * *</strong></br></h2> <p>Практически все пластики, применяемые в FDM печати, гигроскопичны – им свойственно впитывать влагу из окружающего воздуха. Это плохое качество, так как влага в филаменте негативно сказывается на результате печати (падает прочность, плохо работает откат пластика, страдает поверхность детали). Для борьбы с этим явлением просушенный пластик всё время должен храниться в максимально сухом климате. Функцию сохранения пластика сухим во время печати и выполняет данный бокс.</p> <h4><br>Максимальные размеры катушки:210х90</br></h4> <h4><br>Требуемый размер печатной области стола: 232х218</br></h4> <h4><br>Для сборки бокса потребуются:</br></h4> <ol> <li>M3-10 x 4 – крепление дна разделяющего нишу осушителя от полезного объёма.</li> <li>M3-20 (M3-16) x 4 – крепление крышки и защёлки.</li> <li>Шпажка 4-55</li> <li>Крепёж для крепления на стену, профиль или потолок</li> </ol> <h4><br>Если вы хотите получить прозрачную крышку вам потребуется:</br></h4> Вариант 1: Просто напечатайте её целиком из прозрачного PETG Вариант 2: <ol> <li> в слайсере для детали "cover_" установите высоту слоя 0.2мм и ширину линии дна >=0.8мм (чем больше, тем выше прозрачность). </li> <li> запланируйте смену филамента после конца второго слоя с прозрачного PETG на любой другой, например белый.</li> <li> выполните смену филамента при печати</li> <li> PROFIT</li> </ol> <h4><br>Что сделано в ремиксе:</br></h4> <ol> <li>Добавлена ниша для хранения силикагеля.</li> <li>Опорная ось под катушку выполнена одной деталью с коробкой.</li> <li>Оптимизированы толщины всех стенок, значительно увеличена жёсткость конструкции без увеличения её массы.</li> <li>Предусмотрена возможность выполнения крышки полупрозрачной для наблюдения за катушкой во время печати. </li> <li>Исправлены диаметры всех отверстий правильной работы петель.</li> <li>Добавлено универсальное быстросъёмное крепление коробки, предусмотрены различные варианты её крепления (стена, профиль 20*20, потолок).</li> <li>Форма защёлки изменена на более эргономичную.</li> </ol> <h4><br><strong>Если вам нравится то, что я делаю, вы можете выразить свою благодарность скинув мне денег на кофе:</strong></br></h4> <p><a href="https://www.paypal.me/HEgor" title="__paypal.me__"><strong>paypal.me</strong></a> </p> <p><strong>WebMoney: 347020767347</strong></p> <p><hr><strong>EN</strong></hr></p> <h2><br><strong>* * * Why is this box needed? * * *</strong></br></h2> <p>Almost all plastics used in FDM printing are hygroscopic - they tend to absorb moisture from the surrounding air. This is a bad feature, since moisture in the filament negatively affects the printing result (strength decreases, plastic rollback does not work well, the surface of the part suffers). To fight this phenomenon, dried plastic must be stored in the driest climate at all times. The function of keeping the plastic dry during printing is performed by this box..</p> <h4><br>Maximum coil dimensions: 210х90</br></h4> <h4><br>Required size of the printed area of the bed: 232x218</br></h4> <h4><br>To assemble the box you will need:</br></h4> <ol> <li>M3-10 x 4 – fixing the bottom of the dehumidifier separating the niche from the usable volume.</li> <li>M3-20 (M3-16) x 4 – cover fixing and latch.</li> <li>Skewer(Stick) 4-55</li> <li>Fasteners for mounting on a wall, profile or ceiling</li> </ol> <h4><br>If you want to get a transparent cover you will need:</br></h4> Option 1: just print it entirely from transparent PETG. Option 2: <ol> <li> in the slicer for the "cover_" part, set the layer height to 0.2 mm and the bottom line width to >=0.8 mm (the larger, the higher the transparency). </li> <li> plan to change the filament after the end of the second layer from transparent PETG to any other one, such as white.</li> <li> change the filament when printing</li> <li> PROFIT</li> </ol> <h4><br>What is done in the remix:</br></h4> <ol> <li>Added niche for storing silica gel.</li> <li>The support axle for the spool is made in one piece with the box.</li> <li>The thicknesses of all walls have been optimized, the rigidity of the structure has been significantly increased without increasing its mass.</li> <li> It is possible to make the cover translucent for observing the spool during printing.</li> <li> Corrected diameters of all holes for correct hinge operation.</li> <li>Added a universal quick-release fastening of the box, various options for its fastening are provided (wall, profile 20 * 20, ceiling).</li> <li>The shape of the latch has been changed to a more ergonomic one.</li> </ol> <h4><br>If you like what I do, you can express your gratitude by giving me some money for coffee:</br></h4> <p><a href="https://www.paypal.me/HEgor" title="__paypal.me__"><strong>paypal.me</strong></a> </p> <p><strong>WebMoney: 347020767347</strong></p>
With this file you will be able to print Drying filament box with your 3D printer. Click on the button and save the file on your computer to work, edit or customize your design. You can also find more 3D designs for printers on Drying filament box.