Dual Alignment Laser Pointer for 40W (K40) CO2 Laser Cutter
thingiverse
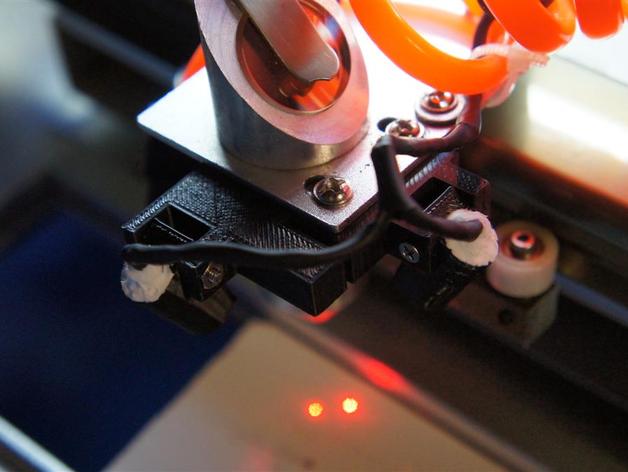
This is a dual alignment laser for Chinese laser cutters. It uses really small (and affordable) 6mm laser pointer modules that you can buy under $1 on eBay or DX, etc. The laser cutter I bought already had one single laser attached to its side of the head which points at the correct cutting spot just once. People have created attachments using two laser lines at a 90-degree angle to each other for proper alignment but my main problem was adjusting objects' height so cuts and engravings are correctly focused. I designed the part in two parts, allowing you to individually move the laser pointers around so that the alignment can be perfectly set. The laser modules have slight focusing by twisting the tip of their brass parts which need some breaking off from glued tips. I focused the laser pretty well, adding a small hole to the laser holder also reduces its spot size. Attached here are the STL files along with Sketchup design files where you see this modification and my complete CO2 laser cutter setup at http://www.projectvb.com/laser_cutter/. Instructions Print two laser holders and (optionally) adjust focus by twisting the brass tip. Insert laser modules into holders and block light coming out the back using caulk or other material, print alignment pieces attaching the laser holders with screws (#2 screws I used were too long). Attach the assembly to your laser cutter that should have original holes for the laser pointer you had. Modifying is possible if it lacks such holes, wire the new laser pointers into the system and remember its voltage. Make sure the power of your cutter will support at least 5V to operate correctly. You also need a switch as it helps avoid annoyance when working under strong lights, wire and solder with precision and wrap them tight using heat-shrinkable tubing. Now set everything right by properly focusing. To find out how well everything is, place a wood sample that's been painted in some color on the object at your laser cutter head with low power set and take something for testing. Note: Text rewritten with the same original tone and voice while following instructions as requested
With this file you will be able to print Dual Alignment Laser Pointer for 40W (K40) CO2 Laser Cutter with your 3D printer. Click on the button and save the file on your computer to work, edit or customize your design. You can also find more 3D designs for printers on Dual Alignment Laser Pointer for 40W (K40) CO2 Laser Cutter.