Dual Auto Leveling Prusa i3 Reworked X-Idler Tensioner with T8 Leadscrew
thingiverse
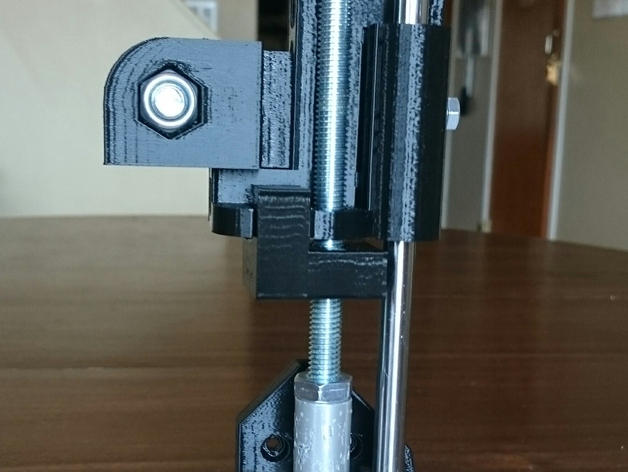
These parts are drop-in replacements for the Prusa i3 Reworked X-axis assembly and is meant to be used with the Herringbone Prusa i3 Reworked Greg's Extruder (http://www.thingiverse.com/thing:1446842) The following changes were made to the original parts: X-IDLER 1) A belt tensioner was added that can be used with either a 4x40mm bolt or a 5x40mm bolt. A nested nut trap is used to catch the smaller 4mm nut.The tensioner has an effective range of 11mm. An access port has been added to the side of the x-idler body in order to access the nut trap during installation or in the event that the nut trap becomes rounded. The tensioner has been designed around the 608ZZ bearing and is meant to be used with the included bearing guide. There is a 0.75mm clearance between the edge of the bearing guide and the tensioner body to prevent the belt from slipping off. 2) The inner diameter of the 8mm smooth rod holes was reduced in order to make it more difficult for the rods to slip. The ends of these holes were also closed up in order to keep the rods from slipping out the back. 3) The Z-axis nut trap was removed and replaced with a platform to catch a floating Z-axis switch. This is a design change similar to Crota's March 17 2014 design (http://www.thingiverse.com/thing:273805). However, this design's implementation of Crota's part more closely mirrors the technique used on the Robo 3D R1 printer. The Marlin firmware needs to be modified as explained by Crota to use this feature. 4) Multiple versions of the floating Z-axis platform are included in order to make this part compatible with printers using 5mm threaded rods, 8mm threaded rods, and T8 leadscrews. X-MOTOR-END 1) Similar to the X-Idler above, the Z-axis nut trap was removed and replaced with a platform to catch a floating Z-axis switch. Having dual limit switches (on both ends of the X-axis assembly) eliminates the possibility of the nozzle being driven hard into the print bed in the event that one axis is lower than the other. This arrangement also allows for separate measurements to be taken on both sides of the print bed in order to calculate the the exact orientation of the printing surface relative to the nozzle for all points on the print bed. 2) Similar to the X-Idler above, multiple versions of the floating Z-axis platform are included in order to make this part compatible with printers using 5mm threaded rods, 8mm threaded rods, and T8 leadscrews. How I Designed This Inspirition for modification I was extremely impressed by the way the Robo 3D R1 managed auto-leveling of the bed. The Robo 3D attaches the Z-axis limiting switch to the X-axis mounts so that the switch 'floats' just under the X-axis. The switch is triggered when the Z-axis lowers enough for the nozzle to rest on the build plate. In this case, the limit switch is an OMRON 5E4 T85 (http://www.mouser.com/ds/2/307/SS_1110-14757.pdf). When the print nozzle is not touching the print bed, then the limit switch button is being pressed down by the weight of the X-axis and the switch does not send a signal to the Ramps board because it is in the open position. Terminals 1 and 3 of the limit switch are wired to the Ramps board and are wired as an open circuit when the button is pressed down. When the nozzle is touching the bed then the switch is up and the circuit is closed across terminals 1 and 3. This causes the Ramps board to register a z-axis trigger event. Using the Robo 3D as a reference design, the existing Prusa i3 Reworked X-axis idler was modified to accommodate a 'floating' or 'following' Z-axis limit switch that hooks the X-axis idler body. The Prusa i3 Reworked modified X-idler with floating Z-axis limit switch. The Robo 3D X-Motor-End with floating Z-axis limit switch. Side on view of Z-axis switch hooking into the X-idler body. A top view of the Robo 3D's Z-axis hook. The mount plate can be switched to hold a nut for 8mm and 5mm threaded rods or to hold a T8 leadscrew nut.
With this file you will be able to print Dual Auto Leveling Prusa i3 Reworked X-Idler Tensioner with T8 Leadscrew with your 3D printer. Click on the button and save the file on your computer to work, edit or customize your design. You can also find more 3D designs for printers on Dual Auto Leveling Prusa i3 Reworked X-Idler Tensioner with T8 Leadscrew.