Dual-hotend for Ender 3 (tested with linear rails)
prusaprinters
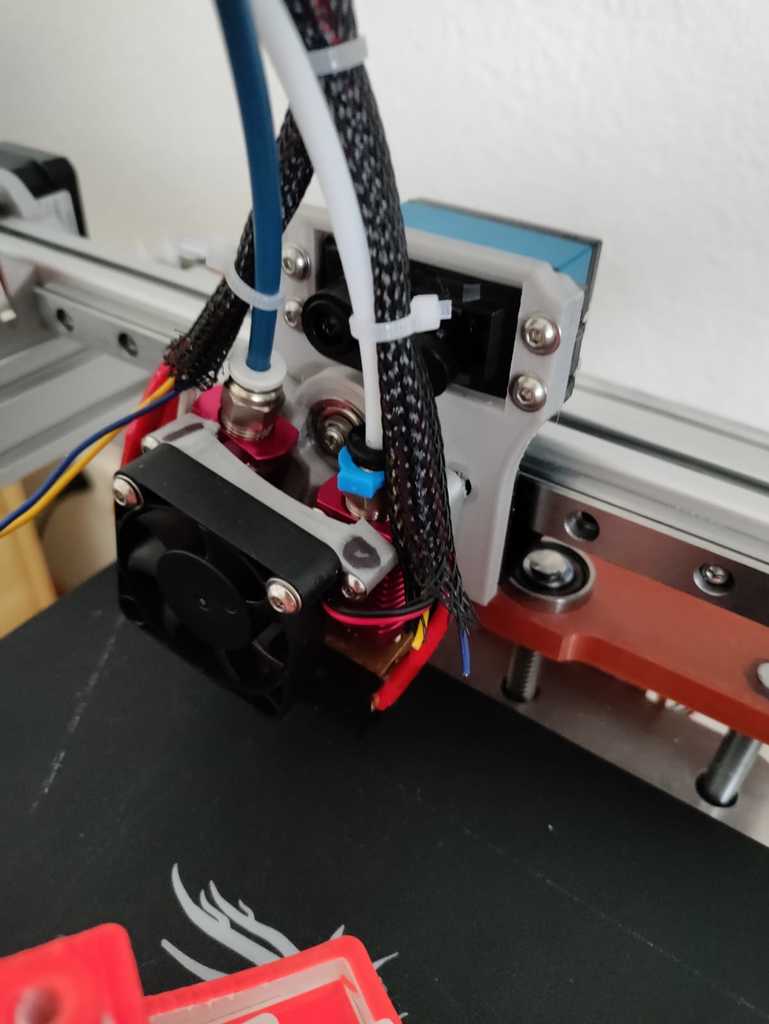
<p>My take on a switching hotend design.</p> <p>I designed this to take two standart creality hotends, a servo (I used: <a href="https://www.amazon.de/Carson-500502015-CS-3-Servo-3KG/dp/B0037Y93CW/ref=asc_df_B0037Y93CW/?tag=thingiverse09-20&linkCode=df0&hvadid=308560290452&hvpos=&hvnetw=g&hvrand=13038791246047174797&hvpone=&hvptwo=&hvqmt=&hvdev=c&hvdvcmdl=&hvlocint=&hvlocphy=9042271&hvtargid=pla-562746861987&psc=1&th=1&ref=&adgrpid=61609593792">https://www.amazon.de/Carson-500502015-CS-3-Servo-3KG/dp/B0037Y93CW/ref=asc_df_B0037Y93CW/?tag=googshopde-21&linkCode=df0&hvadid=308560290452&hvpos=&hvnetw=g&hvrand=13038791246047174797&hvpone=&hvptwo=&hvqmt=&hvdev=c&hvdvcmdl=&hvlocint=&hvlocphy=9042271&hvtargid=pla-562746861987&psc=1&th=1&psc=1&tag=&ref=&adgrpid=61609593792&hvpone=&hvptwo=&hvadid=308560290452&hvpos=&hvnetw=g&hvrand=13038791246047174797&hvqmt=&hvdev=c&hvdvcmdl=&hvlocint=&hvlocphy=9042271&hvtargid=pla-562746861987</a> )</p> <h3>Print Settings</h3> <p><strong>Printer Brand:</strong></p> <p>Creality</p> <p class="detail-setting printer"><strong>Printer: </strong> <div><p>Ender 3</p></div> <p><strong>Rafts:</strong></p> <p>No</p> <p class="detail-setting supports"><strong>Supports: </strong> <div><p>No</p></div> <p><strong>Resolution:</strong></p> <p>0.2mm layers</p> <p class="detail-setting infill"><strong>Infill: </strong> <div><p>30%</p></div> <p><strong>Filament:</strong> What gives you good results :) PETG <br/> <p class="detail-setting notes"><strong>Notes: </strong></p> </p><div><p>Use 3-4 perimeters for better durability</p></div> Custom Section ============== <p><strong>MK1 and MK2</strong></p> <div><p>There are two versions of this design (mk 1 and mk 2). </p> MK1 uses a gear ratio to move the hotends. I abandoned this design because of the backlash the gears caused. So I moved on to MK2. <p>MK2 uses a pushrod from the servo arm to the "tiltplate"</p> <p>There is only a small hole in the 3D model which you than can drill open to fit your paticular rod (I used 2mm copper or something)</p> <h3>Custom Section</h3> <p><strong>Required parts:</strong></p> <p>Of course the servo: <a href="https://www.amazon.de/Carson-500502015-CS-3-Servo-3KG/dp/B0037Y93CW/ref=asc_df_B0037Y93CW/?tag=thingiverse09-20&linkCode=df0&hvadid=308560290452&hvpos=&hvnetw=g&hvrand=13038791246047174797&hvpone=&hvptwo=&hvqmt=&hvdev=c&hvdvcmdl=&hvlocint=&hvlocphy=9042271&hvtargid=pla-562746861987&psc=1&th=1&ref=&adgrpid=61609593792">https://www.amazon.de/Carson-500502015-CS-3-Servo-3KG/dp/B0037Y93CW/ref=asc_df_B0037Y93CW/?tag=googshopde-21&linkCode=df0&hvadid=308560290452&hvpos=&hvnetw=g&hvrand=13038791246047174797&hvpone=&hvptwo=&hvqmt=&hvdev=c&hvdvcmdl=&hvlocint=&hvlocphy=9042271&hvtargid=pla-562746861987&psc=1&th=1&psc=1&tag=&ref=&adgrpid=61609593792&hvpone=&hvptwo=&hvadid=308560290452&hvpos=&hvnetw=g&hvrand=13038791246047174797&hvqmt=&hvdev=c&hvdvcmdl=&hvlocint=&hvlocphy=9042271&hvtargid=pla-562746861987</a></p> <p>The servo comes with fitting servo arms.</p> <p>one 625-ZZ bearing (the ones used in rollerwheels of creality printers, can be harvested from old roller wheels or bought): <a href="https://www.123kugellager.de/lagern-625-ZZ?gclid=Cj0KCQjw--GFBhDeARIsACH_kdYwM2DZj_tRy26FjAbRNkdhx1dc9rm-h3dLQv2y4LBQjIJK83mFgIQaAr5iEALw_wcB&gclsrc=aw.ds">https://www.123kugellager.de/lagern-625-ZZ?gclid=Cj0KCQjw--GFBhDeARIsACH_kdYwM2DZj_tRy26FjAbRNkdhx1dc9rm-h3dLQv2y4LBQjIJK83mFgIQaAr5iEALw_wcB&gclsrc=aw.ds</a></p> <h3>Custom Section</h3> <p><strong>MK1:</strong></p> <p>If you decide to use MK 1 you have to cut one of the servo arms to fit the groove in the spur-gear as shown bellow.</p> <p>This version uses seperate fans for each hotend. You can find spacers for the fans in the history of the CAD-Model. (I never printed them because i never really used this design and just used long M3 bolts to hold the fans in place for testing.</p> <p><strong>Servo arm cut and fitted in the spurgear</strong></p> <p><strong>I'd recommend using this arm (Photo taken from <a href="https://www.amazon.com?linkCode=ll2&tag=thingiverse09-20&linkId=e4759bff1fa9a55a0f897d801ce2d765&language=en_US&ref_=as_li_ss_tl">Amazon</a>)</strong></p> <h3>Custom Section</h3> <p><strong>MK 2:</strong></p> <p>If you decide to use MK 2, you can use the other, thicker servo arm:</p> <p>You drill the hole in the mounting plate to the size of rod you are using and then bend it. After bending make sure the servo can move both hotends up and back down onto the build plate.</p> <p>Then install the Hotends with a shorter and a longer screw that also holds the fan mount to the assembly. To which you then screw one 40<em>40</em>10mm fan.</p> <p><strong>I turned one heaterblock upside-down to have more space for flowing air in between the hotends.</strong></p> <p><strong>Nozzle-offsets:</strong></p> <p>For MK1: I unfortunately can't give the offset between the nozzles.</p> <p>For MK2:</p> <p>X -26,40</p> <p>Y -1,50</p> <p>Z 1,1</p> <p>Servo angles:</p> <p>for me and my mounting orientation it was L56 U76</p> <p>THESE VALUES WILL VARY!</p> <p>some calibration will be needed</p> <p>I used this thing to calibrate: <a href="https://www.thingiverse.com/thing:124450">https://www.thingiverse.com/thing:124450</a></p> </div></p></p></p> Category: 3D Printer Extruders
With this file you will be able to print Dual-hotend for Ender 3 (tested with linear rails) with your 3D printer. Click on the button and save the file on your computer to work, edit or customize your design. You can also find more 3D designs for printers on Dual-hotend for Ender 3 (tested with linear rails).