Dual Motion Fidget Spinner
thingiverse
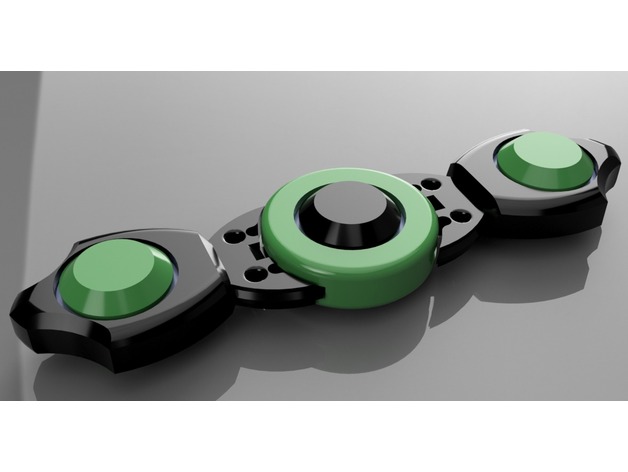
Yet another fidget spinner... My take on the tend utilizes skate ball bearings (designed for Bones REDZ, but will likely fit many similar bearings) as per usual. It also uses two resistance bands (two Viton O-Rings until I find a better option) that attach through the central body to both wings. The model has a revolving slider mechanism that allows the wings to each revolve a total of 70 degrees around the central bearing. When combined with the resistance bands it means you can spin it around as well as fold the unit in a jack knife fashion. I have yet to print this myself yet, making it a work in progress. If anyone beats me to the punch please let me know if you encounter any problems. I eventually plan on tweaking this model so that the core body snaps together instead of needing to be adhered together. Print Settings Printer Brand: LulzBot Printer: TAZ 5 Rafts: Doesn't Matter Supports: Yes Notes: Print 6 bearing plugs, two of each wing insert, and one of each wing and the core body halves. Post-Printing Closing In The Resistance Bands Within The Wings The bands need to be attached to the two wings first and foremost. If you haven't done so already, remove any support structures clinging to the wings. Place a band in each of the grooves in one of the wings. Then slide the respective inserts into the wing, closing the resistance bands in. Use your preferred adhesive to lock the inserts in place. Repeat the process on the other side of the bands with the other wing. Assemble The Main Body One the wings are fitted with the resistance bands it's time to get them enclosed in the main central body. Start by sanding the core body halves where they will end up meeting so that they fit flat against each other. Place the slider arm of each wing into the side cavities of the bottom half of the core body. Maneuver the bands over the bottom half of the core body by threading them around the inner perimeter and press the top half of the core body over them. Use your preferred adhesive again to attach the top half and the bottom half of the core body together. Pop In The Ball Bearings Press a ball bearing into each cavity. If they end up moving around, use your preferred adhesive to lock them in place (just don't get any into the bearing). Loctite STIK'N Seal Outdoor Adhesive works pretty well for me when bonding metals to plastics. Next Press a bearing plug into each side of the bearings (or leave them off if you'f like a slimmer model. Enjoy. Updates 02-02-2017 Hey sorry I didn't make this updates section sooner. A few days ago I updated the slider mechanism on both wing files. Upon printing them myself I realized some difficult-to-sand areas (the slider plate and the extension connecting it to the wing) were frustrating me. So the plate is a little thinner now and the extension is as well (it was catching against the core body). Hopefully it will require less post-processing. After printing the wing inserts I realize they are pretty small and might be troublesome on some printer models. I may end up making the inserts larger to remedy this. If you guys agree, let me know.
With this file you will be able to print Dual Motion Fidget Spinner with your 3D printer. Click on the button and save the file on your computer to work, edit or customize your design. You can also find more 3D designs for printers on Dual Motion Fidget Spinner.