Duck Call with Reed
thingiverse
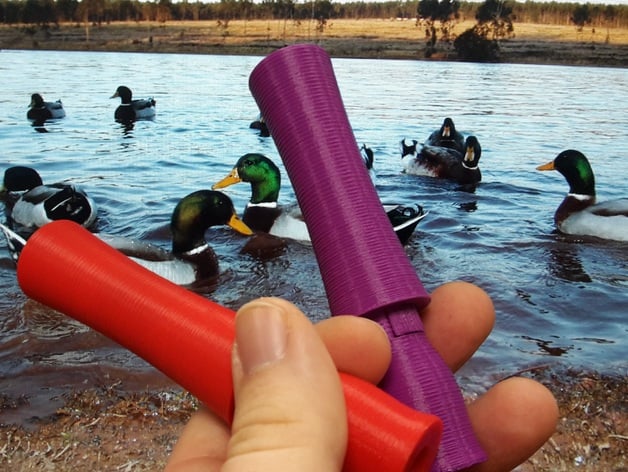
Assembly Video Decibel Test Video This is a fully functional duck call that my students and I designed to learn about 3D printing and modeling. It works flawlessly, but we did encounter a slight issue when fitting it into the tube. A light sanding of both the reed and the sound board resolved this problem. Printing took approximately 2.5 hours with settings of .2mm medium fill on our XYZ printer. You might need to gently bend the reed away from the sounding board to get an optimal sound quality. Begin by blowing softly at first, then adjust the position of the reeds for maximum effectiveness. To help users experiencing printing difficulties, I've included a slightly thicker reed as an alternative solution. This reed produces a louder sound due to requiring more air pressure. Feel free to print one and share your experiences – it would greatly benefit my students! One design element I'd like to modify is incorporating the stopper with flexible material. However, our printer does not currently support this option. If you are able to successfully print one in flexible material, please share it with me – it will be incredibly helpful for my students. A follow-up video showcasing the actual duck sound this call makes will be uploaded soon. We've decided to participate in the #MakeItLoud competition, hoping to win a new printer that will enable us to print with flexible materials. Our current decibel reading stands at 84db according to our Sound Meter app on Android (refer to second video for details). **Print Settings:** * Printer: * XYZ * Rafts: * Supports: * Resolution: * .2mm * Infill: * Notes: * I used ABS with a heated bed, printing mine at .2mm with medium infill. Experimenting with very low infill levels caused the stopper and sounding board to break when removed. **Post-Printing Construction:** 1. Sanding Be sure to carefully sand the reed (or use your preferred duck call reed) where it comes into contact with the sound board, ensuring a smooth finish. 2. Curve the reed Gently curve and place the reed onto the sounding board. Placing the smooth side against the sounding board yields optimal results. 3. Place stopper Carefully position the stopper atop the reed. By adjusting the reeds distance from the back of the sound board, you can control the sound's pitch level, creating a 'quack' sound with lower resonance when the reed is farther back. 4. Place tube Gently insert the sounding-board, reed, and stopper assembly into the tube. It should slide in fairly far but not all the way, leaving a little bit of play room for ease. If it feels too tight, lightly sand some more to ensure smooth fit. 5. Try it out! Gently blow at one end of the device while keeping an eye on the stopper and reed positions inside the tube for adjustments, making sure everything functions as expected without causing breakage. I've also decided to experiment with Tinkercad's modeling capabilities by switching from the initially used 123D Design.
With this file you will be able to print Duck Call with Reed with your 3D printer. Click on the button and save the file on your computer to work, edit or customize your design. You can also find more 3D designs for printers on Duck Call with Reed.