Duet 2 Wifi / Ethernet / Maestro enclosure
prusaprinters
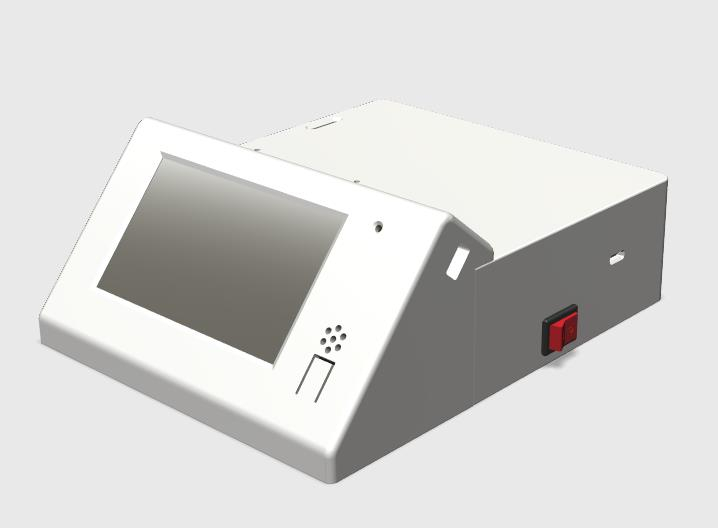
<p>This is a Duet 2 Maestro / WiFi / Ethernet enclosure, which I've designed as a standalone solution (as in: not mounted directly to the printer).</p> <p>Originally designed for the new Duet Maestro, it can easily be used with the Duet WiFi or Duet Ethernet, since all the Duet boards share the same size and mounting holes (afaik).</p> <p>The blower fan at the bottom is used for cooling down the stepper drivers and can be connected to either the "Always on" fan or to a PWM fan.</p> <p>The lid was designed with a snap in feature for easy access to the internals.</p> <p>The (4.3 inch) TFT case is mounted to the lid using 3 M3 x 10mm screws. It is detachable though, just in case one likes to mount the display elsewhere.</p> <p>For the connection to the printer I'm using DB25 / DB9 and MPX connectors/plugs, which allows me to swap controllers as needed.</p> <p>The DB25 connector connects with the stepper motors and the endstops. The DB9 connector connects with the hotend (heater, Z-Probe and fans). One of the MPX goes to the heated bed (if you use one), the other is meant for some LED-lights (or whatever you fancy). Take a look at the<strong>"Connectors pinout"</strong> PDF file for detailed information.</p> <h3>UPDATE:</h3> <p>I had to redesign the snap-in latches on the lid. Made them separate parts now, which will snap in to the lid.</p> <p>This way, you can print them with a different orientation, which makes them way stronger. On the other hand, if they break, you can simply replace them without the need to reprint the whole lid.</p> <p>Please note: The latches are a real tight fit, so you have to insert them with a bit of force.</p> <p>Also, print the lid without supports. It may block the snap-ins for the latches.</p> <h3>UPDATE:</h3> <p>I've added the STEP file, so others can remix the case for different LCD sizes and such.</p> <p>The Duet 2 Wifi board I've used for modelling is missing though, since I converted it to STL for performance reasons. If you need the board for remixing, there's a decent model of it on GrabCAD made by<strong>Phil Maddox</strong>. You can find it here: <a href="https://grabcad.com/library/duet-wifi-1">Duet2WifiPCB</a></p> <p>A model of the 5 inch display you'll also find there, made by<strong>Morten Nielsen</strong>: <a href="https://grabcad.com/library/paneldue-5-with-pcb-version-2-1">PanelDue5</a></p> <h3>Print Settings</h3> <p><strong>Printer:</strong></p> <p>ZEvolution</p> <p class="detail-setting rafts"><strong>Rafts: </strong> <div><p>No</p></div> <p><strong>Supports:</strong></p> <p>Yes</p> <p class="detail-setting resolution"><strong>Resolution: </strong> <div><p>0.2mm</p></div> <p><strong>Infill:</strong></p> <p>25-30%</p> <p><strong>Filament:</strong></p> Extrudr.eu NX2 PLA <p>White</p> </p></p> Category: 3D Printer Accessories
With this file you will be able to print Duet 2 Wifi / Ethernet / Maestro enclosure with your 3D printer. Click on the button and save the file on your computer to work, edit or customize your design. You can also find more 3D designs for printers on Duet 2 Wifi / Ethernet / Maestro enclosure.